
Music is an immersive experience that transcends the activity of making music and spreads its powerful benefits to all academic areas, and all walks of life. Great innovations in technology such as the iPad have increased the potential for musical involvement by providing entry points for a wider range of users, therefore allowing a greater percentage of people to experience the growth that this fascinating, powerful, and wonderfully enabling activity we call music can provide. An excellent example of this can be found in just one of GarageBand for iPad's Smart Instruments, the Smart Strings.
Taking Inspiration From Real World Examples: Karajan's Berlin Philharmonic
Before I allow my students to interact with the Smart Strings interface, I introduce them to the string instruments through video - a crucial first step in their understanding and appreciating the realistic interactivity of the Smart Strings. I show them excerpts of what I consider to be a definitive orchestral DVD collection: Beethoven - The Symphonies Boxset / Herbert Von Karajan
Karajan and the Berlin Philharmonic Orchestra's interpretations of Beethoven's nine Symphonies are arguably the best out there, and these videotaped performances serve as an insightful introduction to the way orchestral instruments are played in that setting.

From “Beethoven - The Symphonies” DVD
Karajan's Multi-Media
Karajan was, in addition to being a great conductor, a pioneer of A/V media, and realized the importance of combining the visual with the aural for the audience. These wonderful videos are a tribute to this foresight, as well as his vast conducting abilities.
The Teachable Moment
What I feel speaks most to the quality of these video performances is the fact that the majority of my students, although not of their generation's music, are riveted to the performances. The incredible energy of the first movement of the 5th Symphony is of particular note. Because these videos generate such high interest, I can take the opportunity to point out the various basic techniques that string players employ to produce various sounds. What really piques their interest is when I tell them that they can play strings like that on the iPad.
Enter Garageband's Smart Strings
The first thing I show my students about the interface is how to produce pizzicato. Telling them that it's similar to what the string players did in the video when they played the strings with their fingers instead of the bow, I demonstrate the tap and release motion. Many become fascinated upon hearing the resulting crisp, clean, authentic sound, and immediately want to try it themselves. I can then garner further interest by demonstrating the 'bowing' motion, telling the students that their finger can act just like the bow by sliding up and down along the chord panel. We have fun getting into dynamics here, as it is a great group activity to have several students try to crescendo and decrescendo together. Finally, I demonstrate the marcato, again comparing my finger motion to the strong, short bowing motion made by a string player. The class can then form an iPad string ensemble by playing the three different techniques in unison; another fun group activity. Programming only two or three chord panels is more than enough to introduce the interface in a musical way, getting the students to interact with it as a string player might interact with their instrument. The association between what they saw the string players in the Karajan video do and what they are now doing on the iPad can be very uplifting for them, as well as great fun.

Programming a basic V-I cadence; a good place to start.
Introducing Orchestration - Scores of Possibilities
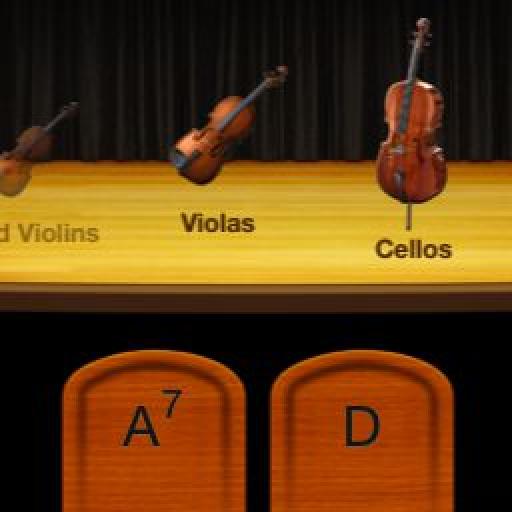
Another great feature of the Smart Strings Smart Instrument is the ability to turn on or off the five string instruments of the standard string section, which are represented at the top of the interface (on the virtual stage). Tapping any of the instruments turns that section on or off. Here is another great opportunity to immerse the student in valuable musical learning. Simply by isolating each realistic sounding instrument individually and going through the V-I cadence shown above, the student can begin to hear how the different instruments within the string section sound and function, and the different roles each might play. Allow the students to play through all four of the chord panel sections for the V chord, from bottom to top, (as in a broken chord) and then immediately do the same on the I chord. This can open their ears to various ways cadences can be resolved, without the need for complex (read 'boring') theory lessons, because the experience is so hands - and ears - on and interactive. Then, try building up from just the Bass, adding each instrument to it in succession, from Cello to 1st Violin, until all the instruments are sounding. Encourage the student to try many different combinations. The more they experiment, the more their ears will open up!

Each chord panel is divided into four sections. The five instruments of the string section are above that, with only the highlighted Bass and Cello sounding.
Auto playground
Now it's time to really have some fun. Have a student choose any one of the four Auto play modes (located near the upper right-hand corner of the interface), and let them start a pattern on just one chord. Point out to that student that they can change the pattern within each mode by tapping the chord panel with either one, two or three fingers (this only works with straight major or minor chords). Have the student isolate the different string instruments, to again emphasize the different sound, tone, range and role of each. Let each student experiment in this way, while the Auto play runs. Additionally, you can have other students play along manually to the running Auto play sequence. Encourage them to bow with dynamics, and use marcato and pizzicato. Let one student choose an Auto play mode, and use only Bass, Cello, and Viola, for example, while another student chooses a different mode, using only 1st and 2nd Violin. Let them try all kinds of different combinations like this. Add more chords, make chord progressions. The possibilities are endless, and so is the fun! Enjoy!

Discussion
I am wondering...how do you program "only two or three chord panels is more than enough to introduce the interface in a musical way" as this would make garage band even more accessible to the young adults with special needs that i work with.
Many thanks!
Thanks for your interest.
To program chords and the desired number of chord panels, tap the 'Wrench' icon in the upper right hand corner of the Smart Strings interface. Near the bottom of the pop-up window, tap 'Edit Chords'. Now just tap on the panel that you wish to edit. There are many choices available, including 'None'. Choosing 'None' from the chord name wheel, and then tapping 'Done' will result in no panel appearing on the interface.
Enjoy!
Want to join the discussion?
Create an account or login to get started!