If you haven't heard of Skrillex yet, then you must have been hiding in a cave for the last few months. This young Computer Musician/Producer has been causing some big waves in the EDM community, and the world. At a mere 24 years of age, he has already scooped up 3 Grammy awards. This is quite an achievement for a computer musician and the computer music world. We are finally getting realized. Skrillex may fall under the now well-recognized dubstep genre, but his sound is very unique.
With a very limited setup of a MacBook Pro, Ableton Live, some 3rd party plugins, and a M-Audio Trigger Finger MIDI controller, Skrillex pushes out some highly-refined productions. I am going to attempt to create a track similar to Skrillex's genre-bending tracks. I am going to use Ableton as my DAW and its native plugins to show how to achieve a sound similar to Skrillex. So let's dig into it….
Step 1 – The Beat
Skrillex's tracks morphs between the Electro-House and Dubstep genres, which have tempos varying between 128BPM – 140 BPM. I am going to create a more dubstep Skrillex tune, so I am going to be working at 140BPM. Here is a taster of what our final loop will sound like:
In this article I am going to show you how to build up the initial beat, and intro section, then into the typical growling layers of Skrillex-style lead synths. In following parts I will show you how we can expand on these sections by creating interest with different elements and create the oh so famous Skrillex drop. So let's get started with the beat.
I have built up a simple kick and snare pattern, and included is a hats pattern (which is made up of a few different hat samples layered together).
Here is what the beat sounds like:
Take a look at Nigel Broad's Dubstep tutorial if you wish to get deeper into programming dubstep beats.
Step 2 – Organ Intros
Skrillex seems to use quite a bit of organ sounds in his tracks. I am going to use an organ sample from the Ableton Live 7 Legacy pack (you can download the pack from http://www.ableton.com/livepacks). Its location is Instruments > Instrument Rack > Live Legacy 7 > Keys > B5.
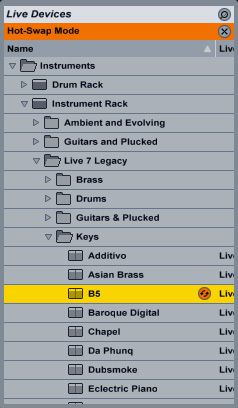
I have programmed in a simple organ chord pattern that plays on the upbeat, which will give the beat a bit of a swing feel.
On the Organ instrument I have added an EQ low cut at 150Hz with EQ Eight, and a little dip as well at 350Hz. I have also added some slight compression.
After this I have added some Chorus to widen the sound, some White Noise with the Erosion plugin to degrade the sound slightly, and Saturator to also add some more grit to the organ sound.
Together this give us a nice sweet Intro section before the craziness.
Step 3 – Big Skrillex Synths
What is definitely apparent in Skrillex's productions is the heavy processing on his synth sounds. One can tell much time and effort is put into his production techniques when it comes to his synth sounds. He applies heavy processing with such effects such as distortions, delays and filters.
For my first synth I have pulled a Simpler preset from the Live 7 Legacy pack again. I have used the Hybrid preset from the Simpler > Live 7 Legacy > Harmonic section. This is quite a nice buzzy sound.
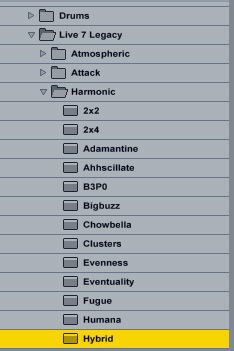
To this I have added the Overdrive, Redux, Saturator and Simple Delay plugins. These plugins have carved out the sound, and have added more character to the Hybrid preset. With the Simple Delay I have changed the delay settings from Sync to Time, and have decreased them to 22ms. This adds some width and depth to the synth.
The pattern is quite simple. I have added two long notes, with a few staccato notes that follow, which creates that machine gun-type sound effect which is heard quite often in Skrillex's productions. At the moment these staccato notes don't sound too polished, but we'll get there with the following layered synth sounds.
Step 4 – Staccato Noises
To get those machine gun staccato notes sounding more abrasive let's layer up some more harsh-sounding synths. Create 2 new MIDI tracks. Copy the MIDI clip from the previous synth to these new MIDI tracks. Go into those clips, and remove the long MIDI notes, so that you are only left with the short staccato notes.
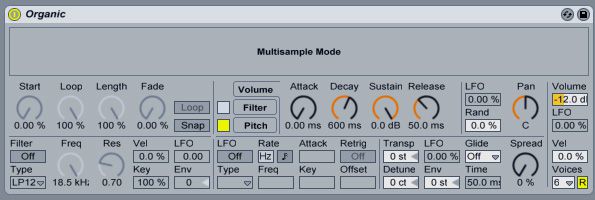
For the first MIDI track I have pulled in the Organic Simpler preset in, and have tweaked it slightly.
Next I have created an Audio Rack Effect and have called the chain Noise 01. To this rack I have inserted a Redux, Overdrive, Erosion, and Simple Delay like the previous synth. Here are the settings I have applied:
I have also added a Flanger with the above settings to create some movement in the stereo field with this synth when it hits those staccato notes. The LFO in the flanger creates this effect. Try fiddling with the LFO settings to see what different results you can get.
Let's create the second synth that will complement this one. Move onto the next MIDI track. For this track I want a guitar-sounding synth. I have called up the Guitar-Burn 2 B Wilde preset (Its location is Instruments > Instrument Rack > Guitars and Plucked > Electric Guitars). Next I have added a Compressor, Saturator and Simple Delay again. Here are the settings I have applied:
With these effects I have degraded the sound quite drastically but with the rest of the mix it blends in quite well. Take a listen to the sound here:
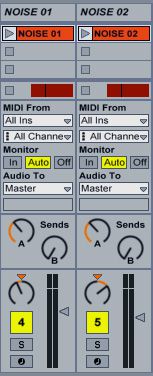
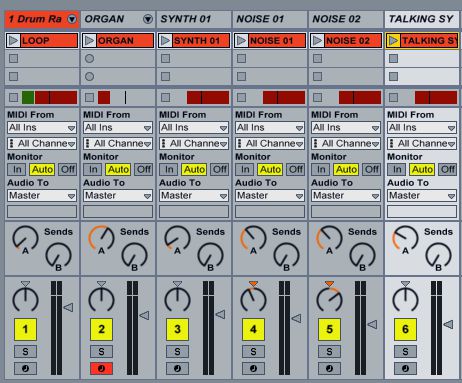
I have panned these two synths slightly apart to create some depth to the staccato sounds. Here are the pan settings I have applied:
Step 5 – Talking Bass Lines
What is also synonymous with Skrillex's sound are the talking-style basses that he adds to his tracks. These can be achieved quite nicely in Ableton using the chain selector and the Map Mode.
Like I did with the previous synths where I removed the long notes and left the short staccato notes, with this synth I am going to do the opposite. I want the talking bass to 'talk-out' the long notes, while the short notes burst out with loudness and impact.
So on a new MIDI track I have copied the first synth MIDI clip to it, and then removed the unwanted notes.
First I have added an Analog Saw synth to a Simpler instrument from the Live 7 Legacy pack (Instruments > Simpler > Live 7 Legacy > Harmonic). Group this synth so that it now resides in an Instrument Rack (Choose the synth and then press Command-G). Next I have added an Audio Rack. I have called it VOWELS. Inside this rack I have made 5 Chains and have given them the Vowel names (A, E, I, O, U). I have pulled onto each of these chains the corresponding vowel EQ (which can be found under the EQ Eight presets under the Formant subfolder).
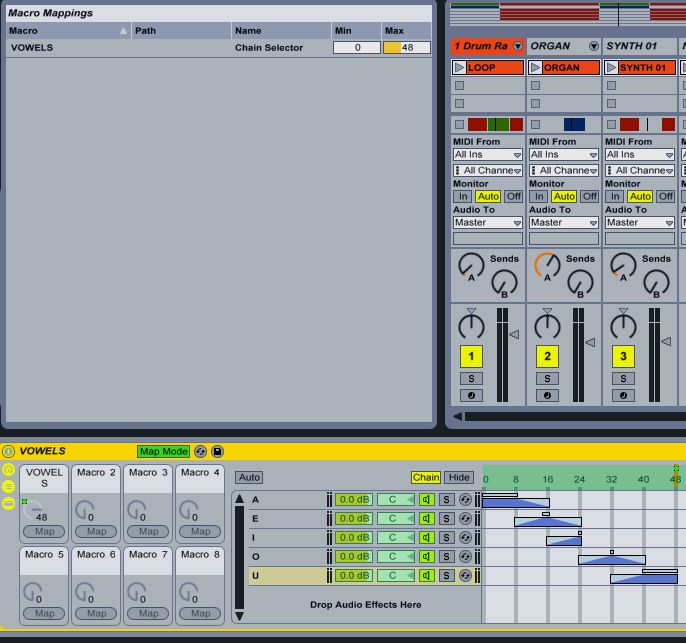
Now let's create a chain selector for this Audio Rack. Click the Chain button to show the chain. Then move the chain blue buttons to the corresponding sections, like I have done below:
You can expand these blue sections by dragging on each side. Also if you hold near the top section you can drag in crossfade sections on these parameters.
Now use Map Mode to link the chain selector to the button. Then go to the Instrument Rack and use the Map Mode to map the chain selector button from the last mapping to the Audio Rack Macro button. I can now automate this button to move between the different vowel EQ chains.
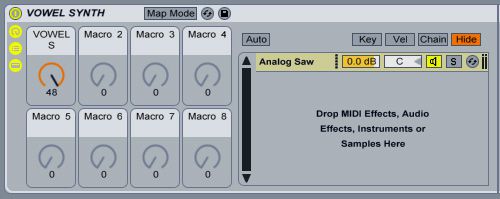
I have kept the Min value to 0, but have decreased the Max value to 48, so that the Macro button only moves between the sections on the chain selector that I have assigned. I just need to do one more Macro mapping. Move to the Instrument Rack now, choose Map Mode there, and then assign the previous Macro button to a Macro button on the Instrument Rack. Rename it VOWELS.
I am going to create this automation in the MIDI clips Event editor window. Double click the MIDI region to bring up the MIDI, and then click on the E to show you the event editor. Make sure under Envelopes VOWEL SYNTH I VOWELS is chosen (which is the Vowel chain selector I have mapped). Then draw in some automation that will switch between the different formant vowel EQ's.

I have also added the following effects to the synth:
Here is what my Talking Bass sounds like:
Step 6 – Final Mix and Arrangement Ideas
I have created a simple arrangement that has an Intro section with the Drum loop and Organ section. Then it goes straight into the next section with all the synths together with the beat. I have mixed the elements together to get a rounder sound for the Skrillex-style track.
And here again is what the finished track sounds like:
Conclusion
So this is a little taster on how to get close to Skrillex's sounds. In the next article we'll look closer into how to create a busy and crazy, yet musical 'Skrillex-like' track by make use of Ableton's editing and resampling techniques.








 © 2024 Ask.Audio
A NonLinear Educating Company
Discussion
There are still Logic Pro tutorials coming out:
http://www.macprovideo.com/hub/logic-pro/humanizing-midi-notes-in-logic-pro-9
http://www.macprovideo.com/hub/logic-pro/logic-pro-sampler-instruments-exs24
http://www.macprovideo.com/hub/logic-pro/touch-tracks-logic-pro
And there's more Logic Hub articles on the way...
So don't worry, there's still Logic Love!
If its a Skrillex for Logic article that you want, send out some comments requests here, and I can work on one.
than Logic? A How to make electronic music in Logic tutorial would be cool since that doesn't exist.
Thanks
There are some Logic Electronic Music tutorials. Check out the following:
http://www.macprovideo.com/tutorial/logic9404
http://www.macprovideo.com/tutorial/logic406
http://www.macprovideo.com/tutorial/logic405
http://www.macprovideo.com/tutorial/logic409-dubstep-essentials
Olaf's tutorials are great. He explains tips and tricks very clearly.
Nigel's Dubstep tutorials is also very good. He takes you through the steps on creating and arranging a typical Dubstep tracks. And through the tutorials gives some other handy Logic tips as well.
But I still think that they could be more in depth.
Thanks again
Thanks of the feedback. We've got the largest Logic tutorial-video catalogue anywhere... but we're always looking to expand our offering!! Let us know what titles you'd like to watch in the "Suggested Training" forum here at macProVideo.com.
btw, you might also be interested in this funky home page for Logic Pro articles here on The Hub:
http://www.macprovideo.com/hub/land/logic-pro+mainstage
Rest assured we've plenty of Logic tips and tricks articles in the works for The Hub... and, in case you haven't already, you might enjoy the new Remix Essentials iBook based in Logic Pro (available on Apple's iBookstore).
Cheers
Rounik
Executive Editor, MPVHub
I switched from Logic to Ableton about 8 months ago. One of the best decisions of my life.
Logic is just full of bizarre idiosyncrasies. It's always felt very messy to me and filled with submenu upon submenu of - sometimes useful - but mostly useless crap that just gets in the way, stifling creativity. Ableton is the complete opposite - it's streamlined and helps you make music quickly.
Every time I open up Logic I feel like I'm going to work at a dead-end, soul-sucking corporate job, whereas Ableton is like relaxing at the beach with a margarita in your hand. One is stressful music making; the other, fun.
But regardless, Mac Pro Video has taught me both DAWs very well! More Ableton videos please!
Want to join the discussion?
Create an account or login to get started!