In this QuickTutorial, we'll be recreating the main chord-stab synth sound from Benny Benassi's "Cinema":
(There are in fact three different versions of this sound featured in the track; we're going to be reproducing the short, choked chord-stab sound that appears at 0:29 in the video, just before the vocals, but without the bass line, which sounds like a different track.) We'll be using Logic's ES 2 for this one. Let's get started.
Step 1 - Set Up the Logic Project
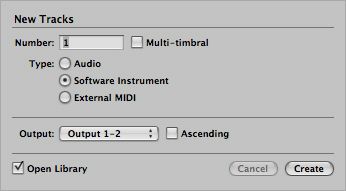
As usual, launch Logic, and start with a new empty project containing one empty Software Instrument track:
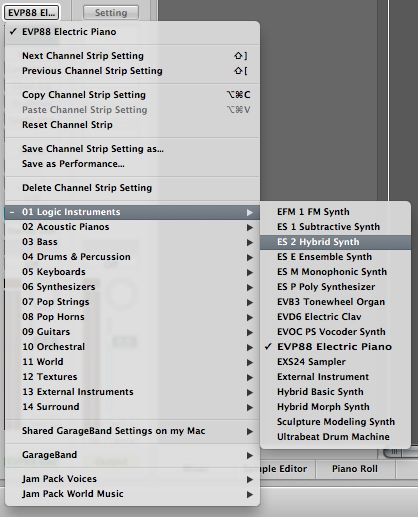
Click and hold the default EVP88 instrument at the top of the channel strip and choose 01 Logic Instruments > ES 2 Hybrid Synth from the pop-up menu:
Step 2 - Analyze the Sound
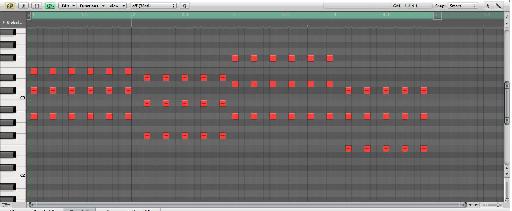
Here is my transcription of the chord progression in question as I hear it:
Rhythmically it has a binary feel, syncopated dotted eights. The chords themselves are simple triads. But in terms of the sound itself, it has a short envelope, with another short envelope also being applied to a lowpass filter that closes down quickly along with the amplitude envelope. There are at least two oscillators in the patch, one an octave above the other, and the waveforms are buzzy, probably sawtooths. It also sounds like there's a little flanging or phasing on the sound as well.
Step 3 - Create the Sound
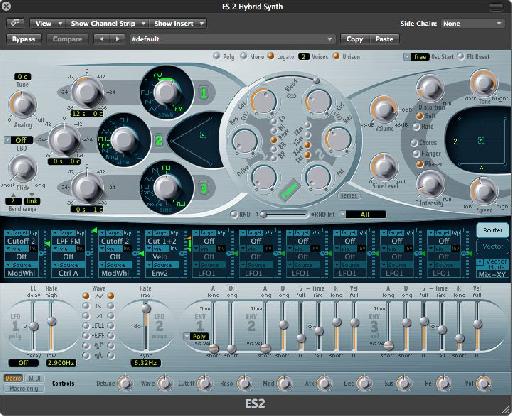
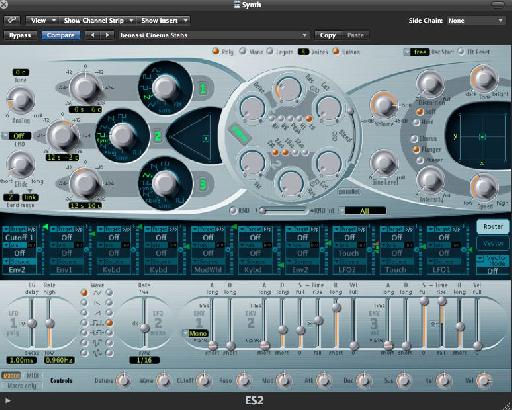
OK, here's my ES 2 version of the patch:
Do your best to emulate these settings as exactly as you can to reproduce my patch, while experimenting with those settings to see what effect they have on the overall sound. We'll also take at look at some of those settings in closer detail so you can understand what's going on in this patch:
- First, note that we have all three oscillators enabled. 1 & 3 are set to sawtooth waves, which gives us our basic buzzy sound. Osc 2 is set to rectangular sync. Oscillator 1 is set +6c Oscillators 2 to 12s -2c, and Oscillator 3 is detuned 12s and 10c to add a little more fullness to the patch.
- From there, the mixed oscillators go through a low-pass filter, with the Cut almost all the way down and the Res (resonance) a little over quarter way. The other filter is mixed out, as set in the Blend slider.
- After that, in the Effects stage, I've left the settings at heir default values.
- Next, in the Router, the first Router slot's Target is set to Cutoff 1 (the Cut frequency of the first filter), with the Source set to Env2 (Envelope 2). The Control Amount slider (the green arrowhead) is set to the top of the positive value range, so the filter cutoff sweeps over a fairly wide range. (The other Router slots are disabled, as we don't need them for this patch.)
- Below the Router, Envelope 3, which is controlling the amplitude of the patch, is set to a short attack (A) and decay (D), with a medium release (R), to create the short stabbing envelope for the chords. Envelope 2, which is controlling the cutoff frequency of the first filter (as set in the Router), has similar settings, but with a somewhat longer Decay and Release, so the filter closes down just a bit faster than the amplitude.
Once you've set your ES 2 settings to match mine, you should hear a sound very much like this (to which I've added a simple 4/4 kick drum):
(Please note: towards the end of audio sample above the Env 2 Decay is automated to open up the sound).
And that's it. As always, I encourage you to tweak the settings in this patch to come up with your own variations on the sound. And if you feel like taking this concept a little further, try starting with these settings and see if you can recreate the first sound in the video track (hint: try the high-pass filter) as well as the fuller chord sound before the vocal starts (hint: try a longer amplitude and filter envelope decay.)
And to learn more about the ES2 check out Logic 206 - ES2 Exposed.



 © 2024 Ask.Audio
A NonLinear Educating Company
Discussion
Sorry that I didn't get it right the first time around, but thanks for hanging in until we did. ^_^
Want to join the discussion?
Create an account or login to get started!