
The last single from breakthrough UK Dubstep/Drum and Bass act Nero was a slice of pop epicness! In this tutorial I'm going I'm going to show you how to recreate a patch in Omnisphere similar to the lead sound that carries the insanely catchy synth hook of the track 'Me & You'.
Continue reading to watch the Me and You video by Nero...
The Video
Identifying the Sound
The synth used for the lead in this track is has all the characteristics of what's usually referred to as a 'Sync Lead'. This is a sound that uses the hard syncing of two oscillators to produce fairly aggressive lead and bass sounds.
How does this work then? Well, when one oscillator (Slave) is synced to another oscillator (Master) it is forced to restart it's cycle when the Master cycle is complete, regardless of where it is in its transition.
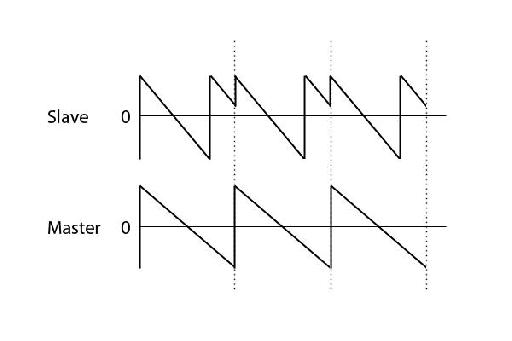
The fundamental pitch is defined by the Master and simply produces a more complex waveform in the Slave. The result can vary depending on the pitch of both oscillators from very subtle effects to ear splitting screaming leads.
This kind of sound is pretty easy to recognize once you know what it sounds like. So let's see how we do this in Omnisphere.
Step 1 - Basic Setup
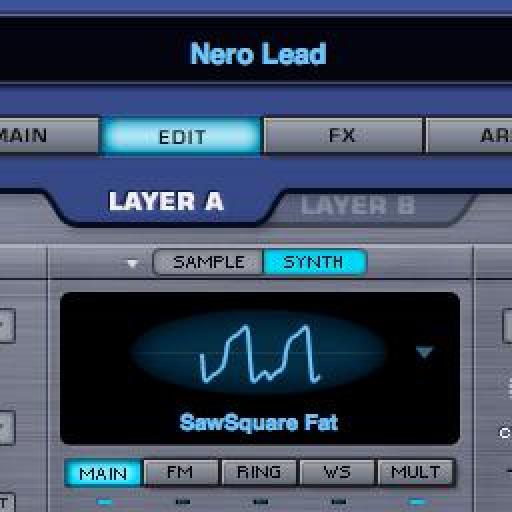
Start up Omnisphere. The 'Default' sound is just a simple oscillator called 'SawSquare Fat' and this is what we're going to build from.

Here's the simple waveform.
Step 2 - Shape The Oscillator
First I'm going to apply an amplitude envelope to give a bit of attack at the start. I've selected 'AMP' in the Envelopes section and dialed in these settings.

I'm then just going to move the 'Shape' parameter towards the right to morph the waveform towards a Square wave a bit. You'll find you get pretty dramatic results depending on what kind of waveforms you 'Sync' and this should be OK for this sound. Then I'm going to apply some Hard Sync.
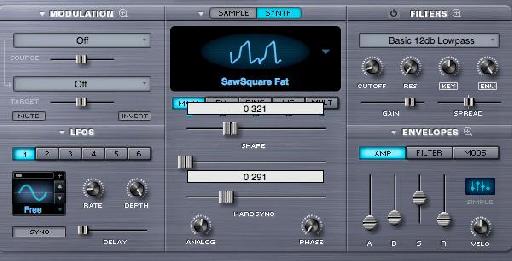
Omnisphere has it's own invisible Hard Sync oscillator for each of the layers which is really cool as on most synths you would lose an oscillator to achieve this. I'm going to move the slider over to the right about a quarter of the way.
Step 3 - Modulating the Hard Sync
Set Up An Envelope:
Now we're going to Modulate the Hard Sync with an envelope to give it some movement.
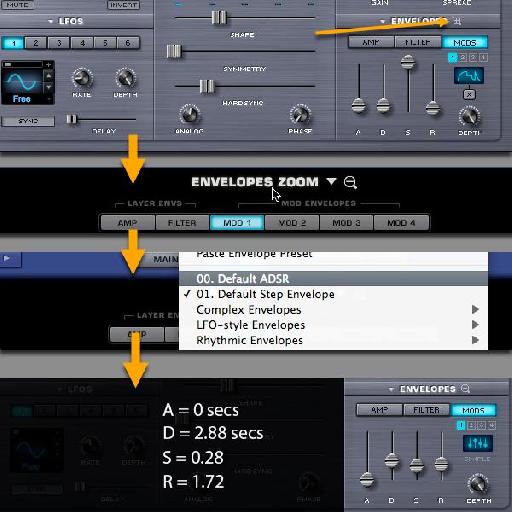
First off go to the Envelope section and choose 'MODS'. Make sure you have 'Modulation Envelope 1' selected. There are four to choose from (see the boxes marked 1-4).
The default Modulation envelope is a complex step envelope and I just want a simple ADSR. Click the magnify icon to enter the 'Envelopes Zoom' window. Click on 'Envelopes Zoom' and choose '00. Default ADSR' from the preset list.
I'm then going to set the following values for the envelope back in the edit window.
Modulate the Hard Sync:
Next up I need to set this envelope to modulate the Hard Sync parameter. To access the 'Modulation Matrix' I click the magnify icon in the Modulation box.
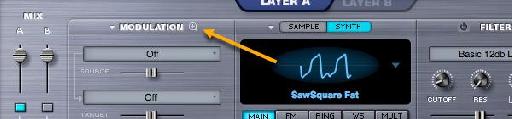
In the first slot I'm going to select 'Mod Envelope 1' from the first drop down box in the 'Source' list and 'Synth hard Sync' from the first box in the 'Target' list. Leave the Depth slider at half.
We should now get something that sounds like this. You can hear that we're now getting more Hard Sync at the start which then trails off a bit.
Step 4 - Thicken Up The Sound
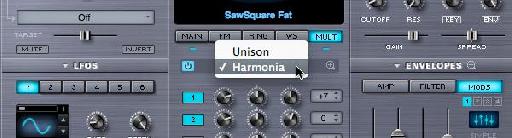
Next up I'll add a bit of detuning to widen the sound. Go to 'MULT' in the oscillator section and turn it on. Then choose 'Harmonia' from the drop down in the center. Click the magnify icon to enter the new (in the 1.5 update) Harmonia editor.
Here are my settings for the Harmonia.

In the first two slots I've got two unison voices that are detuned a bit. The second two slots add an octave either side of the original. This will fatten up the sound a bit.
Step 5 - Add A Filter
Next I'm just going to add a 'LPF Juicy 24db' filter to the patch. I don't really want this to extract any of the top end, in fact I want it to add a bit. The Cutoff and Res are set quite high and add a bit of fizz!
Make sure the 'Key' and 'Env' dials are all the way down so they don't effect the Cutoff.
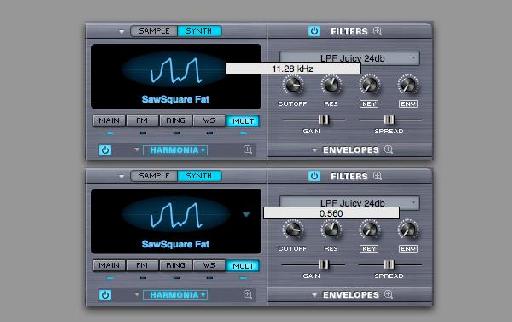
Here's the patch with the filter added.
Step 6 - Add Some Attack With Compression
To really give this sound an aggressive attack I'm going to apply a compressor over Layer A in the 'FX' page. This will really give a punchy transient attack to the sound. This is the default setting which I've tweaked. Below you can see the setting I've dialed in.
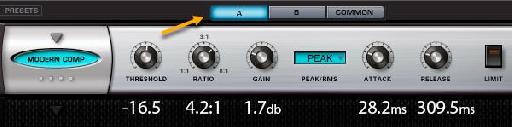
Here's the result.
Step 7 - Add Some FX
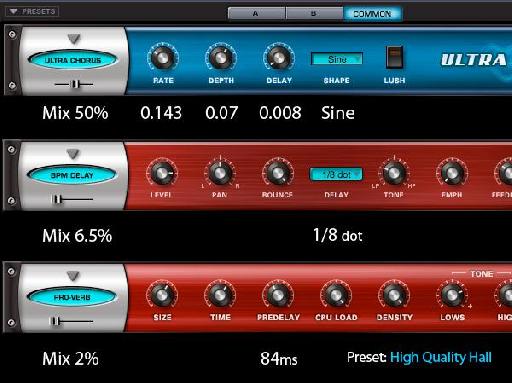
At this point I'm going to record in a part similar to the 'Me & You' track in Logic to see where I am. Once I've done this I'm going to add some FX to the 'Common' tab. These will be the overall FX for my patch.
I've used an Ultra Chorus, BPM Delay and Pro-Verb in that order. The Chorus and Delay are tweaked from their default settings while the Pro-Verb is a preset called 'High Quality Hall' with a slight adjustment to the PreDelay. You can see the settings below.
Here's the part I recorded with the FX on. It's starting to get pretty close now.
Step 8 - Add Some Pitch Mod
The final touch is to add some Pitch Mod via the Mod Wheel. This will give the sound a lot more movement and excitement.
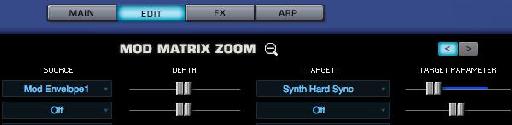
To do this I'll set LFO 1's Rate to about 6.2Hz. Then I'll hop back in to the 'Modulation Matrix' and set up some parameters.
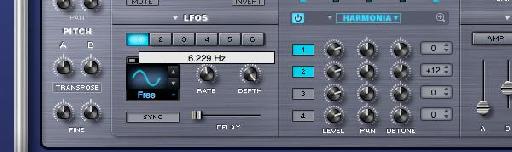
In the 'Mod Matrix Zoom' window I've assigned LFO 1 to modulate the 'Pitch Fine' of the Oscillator in Row 2. It's not over the top and I've set it to about 0.13 with the Depth slider.
Finally, in Row 3 I've set 'Wheel' as the 'Source' and assigned it to the Depth of LFO 1 at 100% depth. Make sure the slider for 'Target Parameter' is set to zero. Moving the Mod Wheel up will increase the depth of LFO 1 which will then modulate the 'Pitch Fine' of the Oscillator.

I've recorded some Mod Wheel data into Logic over my part.
Here's the final result.
Conclusion
So there you have a nice little 'Sync' style lead. You can obviously experiment with this further and fine tune to your own taste.
Experimenting with 'Hard Sync' can yield some pretty extreme sounds in Omnisphere especially when used with added distortion. Have fun!
Discover more about Omnisphere on the Spectrasonics site here.
Be sure to check out these tutorials on Omnisphere and Trilian to learn more synth programming techniques.
Discussion
Want to join the discussion?
Create an account or login to get started!