
Sculpture, Logic Pro's physical modeling instrument, is a powerful sound design environment that even many long-time Logic users haven't delved into. Admittedly, it has a dense, daunting interface with parameter names and features that may be unfamiliar to even experienced synthesists. But once you understand Sculpture's internal logic (so to speak), it will all start to make sense, and you can begin experimenting with your own advanced sound design. We're going to look at how to use Sculpture to simulate the sound of a sitar, the familiar plucked string instrument used in Hindustani (North Indian) classical music, and help you understand this deep and fascinating environment.
Interlude - The Sound of the Sitar
Here's the sound that I'm going to be aiming for in this tutorial, a sample taken from my own library:
This is a single plucked note with a fade out, pitched at A 220 Hz, the A below Middle C. As you can hear, the plucked string has a rich harmonic structure in which you initially hear a burst of overtones during the attack that decay away in a progressive manner, something like closing down a resonant low-pass filter. This is the result of the sitar's strings passing over a wide hard bridge, so that as a note decays, the string vibrates against the bridge, adding a sort of buzzing sound to the basic timbre. The sitar also features a number of additional resonant strings, called sympathetic strings, that aren't played directly but that vibrate in sympathy (hence the name) with the melodic strings. This adds a bit of echo to the played notes, somewhat similar to singing into a piano with the pedal held down. Our goal here is to recreate that characteristic initial pluck and harmonic buzzing sound in Sculpture.
Step 1 - Create the Logic Project
Create a new empty track with a single software instrument, then assign Sculpture to the track. Disable any default insert plugins for the track, and double-click the Sculpture button under I/O to open the interface. From the Settings menu at the top of the window choose Tutorial > 0000 default to load the neutral Setting that we'll start with to create our sound. (It's essential that you start with this Setting, because my tutorial is based on these initial parameter values. Any parameter I don't mention or change is assumed to be set to the values in the 0000 default Setting.)
Interlude - About Sculpture
As I mentioned, Sculpture is a physical modeling instrument which uses a synthesis method called component modeling. With physical modeling, instead of the standard oscillators-into-filters-into-amplifiers techniques of subtractive synthesis many synths use, the instrument simulates, or models, the way actual acoustic instruments produce sound. Sculpture is specifically based on string models, so instead of generating sound with sine and square waves, Sculpture simulates the vibration of a plucked string. In addition, Sculpture can also simulate the different parts or components of a typical string instrument, including the string's material (steel, nylon), the material used to pluck or strike the string, its length and thickness, the instrument's body shape, size, and material, and so on - all of which affect the final sound.
One of the great strengths of a physical modeling instrument, though, is that it isn't limited to real world components - there's nothing to say that your guitar string couldn't be 30 feet long or made of rubber or resonated by a glass body. That's where physical modeling really shines as a sound design tool - the ability to create unreal but physically accurate instruments.
Now, if Sculpture modeled every possible component of every possible string instrument, creating a sitar would be easy - we'd set up a long steel string, pluck it with a fingernail or steel plectrum, run it over a wide hard bridge of bone or plastic, add some sympathetic strings, and that would do it. Sculpture doesn't include all those possibilities, though, so we're going to have to fudge things a bit. But we should be able to get quite close to our target sitar sound.
One last thing - this tutorial isn't designed to be a comprehensive Sculpture manual, so we won't be looking at all its features, just the ones we need to approach our sound. macProVideo has a complete Sculpture tutorial that I encourage you to check out if you want to learn more.
Step 2 - Create the First Object
We'll begin by creating the basis of our sitar sound - the plucked string. One important thing to understand about Sculpture is that all the components of the sound have a significant effect on the final results, and even a very small tweak in one minor setting can change the sound dramatically. I'll try to be as exacting as I can about the values involved here, but as always, you should experiment on your own to see where it leads you.
If you play the 0000 default sound, you'll hear that's already a plucked string, something like a harp. We'll use this for the attack portion of our sitar. As it is, the sound is pretty mellow, and we need something with more energy and harmonics. So, in the Object Parameters area for Object 1, grab the Strength knob and turn it all the way up.

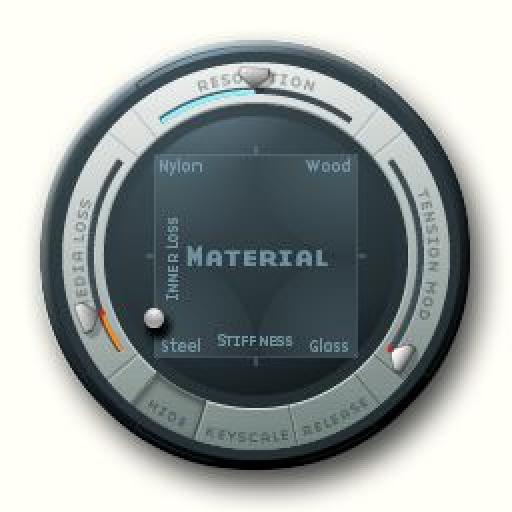
Next, move over to the Material Pad area of the interface, grab the little steel ball on the left of the Material area, and drag it down closer to the Steel corner (the exact values are 0.16 and 0.0). Then grab the Resolution slider and drag it all the way to the right. Finally, grab the Media Loss slider and drag it down to a value of 0.20. Your settings should look like this:

What we've just done is increase the stiffness of the string and increased its brightness by reducing its Media Loss - the loss of high frequencies due to the damping of the string's body.
Next, move over to the Amplitude Envelope area to the right of Material Pad, and set your ADSR as follows:

This will remove the infinite sustain of the default sound and give us a more natural string-like decay.
Next, drop down to the Body EQ area, just below the ADSR, click on the Body EQ name to enable it, then click on the Model menu below the knobs and choose Banjo - this will apply an EQ that simulates a banjo body, which will both beef up and brighten up the sound.

Our last step here is to adjust the string's Pickups - the virtual pickups that work much the same way as electric guitar pickups, and affect the sound in a similar way. There are two pickup parameters we'll be concerned with. The first is the relative position of the pickups themselves along the string (adjusted with the Pickup Position Sliders), and the second is the Object Position - the point along the string where the initial attack of the sound occurs. As with a regular electric guitar, playing closer to the "bridge" will give us a brighter sound.
So, to start, move over to the Pickup area, under the first Object Parameter area, and drag the Pickup A slider (the thin gray slider labeled "A") over to the left so it reads 0.13 - when you do, you'll see the vertical orange line move. Then grab Object 1's Position Slider (the triangle labeled 1) and drag it over to 0.27 (you'll see the vertical orange oval move).

At this point, your sitar should sound like this:
Not very sitar-like, admittedly - more like a thin acoustic guitar. But that's OK; this is just the first part of our sound. Next we'll move on to creating the harmonics, and this will bring us much closer to sitar country.
Step 3 - Create the Second Object
Now move back to the Object Parameters area for Object 2, and enable it by clicking on its number. Objects in Sculpture are actually the things that make the string vibrate or otherwise affect that vibration - they aren't the string itself. So Object 1 is the thing that excites the string - puts it in motion - and Object 2 can either excite the string as well or disturb it - change its vibration after it's been excited by Object 1. So what we're going to do is use Object 2 to disturb the string's vibration in a way that will add the cascading harmonics that we need.
So, set Object 2's Type to Blow, which simulates the effect of blowing into an air column (in this case, the string is going to respond the way a column of air would.) By changing the position of the air disturbance along the string/column, we can add a lot of upper harmonics that aren't in the original string sound, somewhat like overblowing a flute. So, here are the settings we want, which I arrived at after much trial and error:
- Strength = 0.83
- Timbre (T) = -0.55
- Variation (V) = 0.67
Finally, over in the Pickup section, set Object 2's Position to 0.90.

And your sitar should sound like this:
Now that's more like it! We actually have a pretty reasonable sitar sound, and all through physical modeling. We have one last little step to do, though, before we call it a day.
Step 4 - Create the Third Object
Our sitar is still a bit bright and buzzy, and the decay of the harmonics isn't quite right. To fix that, we can add a third object to damp the overtones created by the Blow object.
First, enable Object 3 by clicking on its number, then choose Damp from the Type menu - the Damp object will help reduce some of the overtone content of the sound, just like lightly damping the string by hand would. Set the Strength to 0.28, and the Timbre to 0.63 (although you should try different values here and see how they affect the sound.)

And your sitar should now sound like this:
And there you have it - synthesis through physical modeling in Logic's Sculpture. If you compare my sound to the original sitar above, you'll hear it isn't an exact duplicate by any means, but it comes pretty close to my ears. And there are some further tweaks you can try that I'll leave up to you, such as enabling the LoPass filter under the Material Pad to further remove some of the higher harmonics, or even enabling envelope control of the filter in the Modulation section under the Body EQ section. Give it all a try, and above all, experiment and have fun.
Discussion
Have fun making music,
ionut
Want to join the discussion?
Create an account or login to get started!