

The iPhone, iPad and iPod Touch video capabilities have improved enormously over the last few years—to the point where video quality is more than adequate for shooting music videos or live shows. I'm going to go over several different options and methods for doing so, and introduce you to a few amazing bits and bobs that will make your production both easy and high quality.
Whether your shooting a live show or a music video, nearly all the same principles will apply—the differences will mostly be related to the fact that you have to capture the audio when shooting live shows, as music videos will typically use pre-recorded audio and you'll be cutting your footage to the audio.
The Challenges
You've probably tried shooting music videos or live shows, and one of the biggest challenges was rounding up enough camera operators or, even if you were placing cameras for static shots, having to start the video recording at the right time and then syncing it all up in a video editing app later.
Audio sync was another problem—after importing all your footage from each device to your video editing app, you would have to sync each video source to the audio recording, which involved a lot of nudging, dealing with frame and sample rates and, generally, it was a task that would test anyones patience.
The Solution
No longer is that a problem—it's now possible for one person to easily control multiple cameras and even edit on the fly from an iOS device. I'm going to talk about my favorite app for this purpose as well as give a nod to another app that's less expensive and may be adequate should you be on a seriously tight budget.

Vizzywig
That's not a typo - that's the actual name of the app, but don't let the name fool you, as this is seriously amazing software that will revolutionize what can be done with iOS video recording. With Vizzywig, one person can control up to 8 iOS devices, edit video feeds on the fly, add transitions, titling, credits and create a complete video, ready for upload to YouTube, Facebook and Vimeo directly from within the app. You can also import the final video OR all the footage from every camera to your favorite video editing program, if you choose to edit the old fashioned way.
Getting Started
Each iOS device will need to have the Vizzywig app installed so that they can communicate with each other. The app is $29.99 on the Apple Store—while that may *seem* expensive for an iOS app, keep reading and you'll understand why it's a steal at that price. If you have multiple iOS devices registered to your account, you only need to buy Vizzywig once to be able to install it on all your registered devices. On a *seriously* tight budget? Check out RecoLive MultiCam, which I'll talk a little more about later in this article.
Recommended Devices: iPhone 4 or higher, iPad 2 or higher, iPod Touch 5th Generation. Other iOS devices may be used, but video quality will suffer greatly.
All devices must be on the same Wi-Fi network*—if you're shooting at a venue, make sure you talk to the venue beforehand and that their network is up to the task, get their network login details and set up each device to connect to the network as one of your pre-show tasks. Tip: If the venue doesn't have Wi-Fi or it's inadequate for your needs, one thing I do that works well is bring my own Airport Extreme to create a network. Since you do not need internet access for this to work, all that it takes is plugging in the Extreme and connecting each device to the network the Extreme creates. You could use nearly any Wi-Fi device or even a mobile Hotspot for this purpose. As always, though, test everything beforehand, so you don't have any surprises!
Vizzywig uses what are called the 'Stage' and 'Players' to determine which device has control—the Stage is the controller, while Players are the remote cameras. The Stage device will be able to switch between each of the Players in real time (aka the 'active' camera) and Vizzywig will create a final video based on your active camera. It's fully editable after the fact, which is a good thing in case you miss an epic moment or—and this is really cool—if you don't have someone to operate the stage you can go back and edit the footage together after the show!
Tips:
Fully charge your devices and, if possible, consider having them connected to power so you don't run out of battery. That would suck.
Clear off as much space as you can from each device, as video recording can take up a lot of space and you definitely don't want to run out!

Player Setup
Connect the device to the WiFi network.
Put the device into Airplane mode, then go back and re-enable Wi-Fi—this is so that your recordings will not be interrupted by incoming phone calls.
Enable Do Not Disturb—again, so the recording is not interrupted by incoming alerts, notifications, etc. In the Do Not Disturb settings, be sure to go through all the options, such as 'Allow Calls From', 'Repeated Calls' and 'Silence', and disable them as well.
Quit out of all other apps and I highly recommend doing a restart of the device before launching Vizzywig. This is to be sure there's nothing cached that could cause problems and that no other apps will be able to interrupt recording.
Find a good location for each device. I typically choose a full stage view, a 'behind the band into the crowd' shot, and a smattering of side views and close-ups, such as on the singers mic stand, somewhere on the drummers kit or anywhere that looks interesting. Tip: Make sure to stock up on tripods, clamps and whatever else you may need to secure each device into position. Look for angles that won't get blocked by people standing in the way!
Launch Vizzywig, touch the 'gear' icon in the upper right to go to Settings and make sure that video quality, Multi-Camera Resolution and Frame Rate are exactly the same on ALL Players and the Stage device. This is important so the video is consistent between devices. Should you decide to edit all the footage in a computer based editing program, you'll be even more thankful that you set this up properly. Exit out of Settings. Tip: Use 1280x720 resolution and 30 fps, as it's high quality video and will give you more recording time than 1920x1080. It also is the highest supported resolution that is common to all of the recommended devices previously mentioned.
Touch the '+' button in the lower right and choose 'Multi Camera', then touch 'Switch to Player' in the upper right to enable Player mode.
Triple tap the screen to get the options for setting and locking the focus point, white balance and exposure. Move the focus point to where you want the camera to focus, then touch the lock icon to lock it. Typically you can just touch the lock icons for white balance and exposure, as most iOS devices do a pretty good job of getting good readings automatically. I'll include links to more info on these settings at the end of this article should you want to learn more.
Remember to get a good audio feed to one of your Player devices, either a feed from the console or set one up with a good external mic.

Stage Setup
See steps 1-4 and 6 of Player Setup
Touch the '+' button in the lower right and choose 'Multi Camera'—it should automatically launch in Stage mode and you'll see a bar across the lower 1/3rd of the screen showing you the feeds from each of the Players on the network.
If you're using the Stage as an additional camera, follow step 8 of the Player Setup as well.
Tip: Use an iPad as the Stage as it's bigger screen will be easier to control devices and see each Player video feed.
On with the Show
Recording and editing in Vizzywig is pretty straightforward, all of which will be done from the device acting as the Stage.
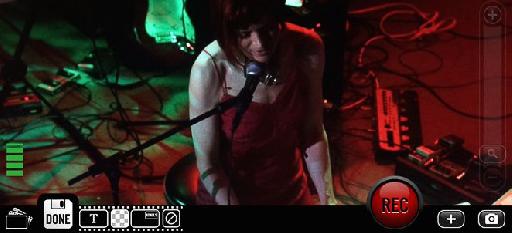
To start recording, just touch the big, red 'REC' button in the lower right. If you're using the Stage device to control Players, but don't want to use it as a camera, you can double-tap a different Player feed to set it as the active camera, then touch the Stage device feed once so that it's outlined in white, indicating it will not record—however, you should keep in mind that you can still activate and record from the Stage if you double-tap on its feed during recording.
To switch between each Player, double-tap on the respective feed for each Player and you're already creating an edited video! Vizzywig records your switches between active Players and creates an edited video automatically.
When you're done, touch the red button again (which will have a number in it indicating the number of devices you're connected to, instead of 'REC') to stop recording.
WAIT while all the video from each of the Players is transferred to the Stage device! This can take awhile, depending on the number of devices and the length of the recordings. Tip: The Stage device should be a device with a lot of storage, as it will be collecting all the video from each of the Players. A 1280x720 video takes up ~50–100 MB per minute of recording, so you would need 3–6GB of storage space for each hour of recording per Player. Example: if I had 4 Players and 1 Stage and recorded for 1 hour, the Stage device would need 15–30 GB of free space to be able to accept all video from all 4 Players and its own recorded video.
Once the transfer is complete, you'll be asked if you want to transfer the NDLNLS to each of the Players—I always select 'No', as doing so will mean that every device will get sent all the video from every other device, including the edits done during recording.
Touch the 'Done' button and you'll be asked if you want to 'Finish & Export' or 'Save for Later'—choose 'Save for Later', as you're going to need to do a few things before calling it finished.
Touch the 'Library' icon in the lower left to go to your Library, where you'll see your new recording with 'In Progress' in the upper right. Touch it to select, then touch the 'Edit' button in the upper right. From here you can edit the Titles, Credits and transitions between the cuts you made while recording.

Touch the 'NDNLLS' button in the upper right of the first clip in the 'film strip'—this is where you'll be able to choose your audio source by touching the speaker icon and then 'Choose single source'. You'll be asked to choose the camera that will be used to supply the audio track. When shooting live shows this is important, so that you have a consistent audio source for the entire show. Tip: you can use an iOS device to get either a feed from the sound console or use with an external mic to get a good audio recording.

In this same section you can also re-edit your cuts, if you so choose.
When you're done, choose Save—you can 'Finish & Export' to export a final video, 'Save and Continue' if you just want to save your progress, but still continue editing, or 'Save for Later' to save your progress and go back to the Library.

And So Much More
As you can see, doing a live show recording has never been easier. I've only scratched the surface of what's possible with Vizzywig. Here are a few other tips and features that make Vizzywig worth the price of admission:
If you don't have someone to operate the Stage, you could put the device operating as the Stage near someone in the band and hit 'Record' when you start your show, then go back and edit all the footage together at a later point.
*The Worldwide Remote Camera feature let's you control iOS devices over a 3G, 4G or LTE network, just like you would over Wi-Fi. Possible uses: the Stage controller doesn't even have to be at the venue or how about crowd-sourcing your next music video by controlling devices across the world!
Support for the Galileo remote pan/tilt device is in the works, which would give you pan/tilt control over each Player device.
Contact your fans to see who might have Vizzywig and connect with them at shows, so you can use their camera as a 'Player'.
Music Videos
There are so many ways that Vizzywig makes doing a music video easy—setting up multiple camera angles and editing all the footage works just like it would with shooting a live show. Depending on how you're creating your music video, there are several options to get it laid back to your audio.
The 'Create Music Video' feature let's you choose an audio file and record multiple video takes that you can assemble together—this is useful if you want be able to shoot lip-synced video or create a music video with a single camera, but have a wide variety of different looking shots.
There are so many possibilities that I couldn't possibly cover all of them in one article, so go forth and explore!
Super Low Budget
If Vizzywig is still not within your budget or you want something simpler, check out RecoLive MultiCam for $4.99. It's got a ton of great features and definitely gets a big thumbs up.
Vizzywig website: http://www.vizzywig.com/
Vizzywig Tutorials on Vimeo: http://vimeo.com/i4software
Vizzywig in the App Store: https://itunes.apple.com/us/app/video-camera/id434139679?mt=8
RecoLive MultiCam website: http://recolive.com
RecoLive MultiCam in the App Store: https://itunes.apple.com/app/recolive-multicam/id576184759
Discussion
Want to join the discussion?
Create an account or login to get started!