
In this article, we'll look at setting up multitimbral instruments in Studio One. If you're working with instruments like Kontakt, EastWest's PLAY and Omnisphere; you'll want to get the most out of their functionality by setting up multitimbral instruments. Right, let's see how it's done.
What is a Multitimbral Instrument
First let's explain what a multitimbral instrument is. It's an instrument that can play several different sounds or patches at the same time. And this is done by each sound or patch being controlled by a different MIDI channel. So it's sort of like a stacked software instrument. So, how is this achieved in Studio One?
Adding Your Multitimbral Instrument
I'm going to demonstrate using Kontakt, but it will be the same principle with any multitimbral instrument. Add an Instrument track, and then drag an instance of Kontakt onto this track.

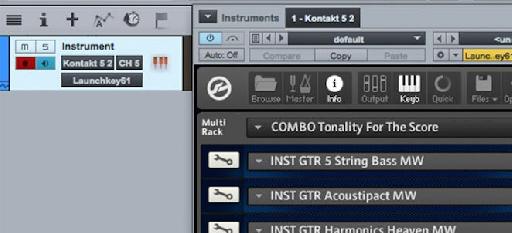
Now in Kontakt, I'm going to add an instrument. On this instrument, I'm going to load up a multi preset. I have chosen a Kontakt Damage preset (the Combo Tonality for the Score preset) as this preset will have multiple instruments loaded up in Kontakt. With this preset, each instrument in the multi instrument is assigned to a unique MIDI channel. You could also build up your own multi patch and assign each instrument in the patch to a unique MIDI channel.

But the problem with this instrument track in Studio One is that it can only send MIDI on one channel. So let's see how different tracks can send to different MIDI channels.
Adding More Tracks
Now add another Instrument track. On the input of the track choose your instrument again, so mine will be Kontakt. Now you'll see that next to the name there is a box showing CH1. This means this instrument is sending a signal on MIDI channel 1. Now click on this box and change it to CH2, and now it'll be sending a signal on MIDI channel 2. When I select this instrument, record arm it and play on my controller I can hear that it's now playing a different instrument in the multi patch.

So add more instruments tracks and assign them to the different MIDI channels of your multitimbral instrument. You can also go and rename each instrument so that it makes sense to you.
Using Multi-Output Routing
What's even better is that most of these multitimbral instruments have multiple outputs as well. So even though you're sending multiple MIDI channels to the instrument, you can also send out the stacked instruments in the multitimbral instrument to their own outputs. To do this make sure first that in your multi instrument that you have set each instrument to go to a different output. So for example on my side I have made sure that each instrument in my Kontakt multi goes to a different output.
Then in Studio One go to the Mixer panel, click on the arrow next to your instrument and choose Expand.

This will show you the outputs you can add. Tick the ones you want to add, and then you'll see in Studio One's Mixer Panel how you now have extra outputs for the Multitimbral instrument.

Now you can apply different mixing and processing effects to each instrument even though you're only using one multitimbral instrument.
The benefits of using multitimbral instruments are that in my case I only had to load up one instance of Kontakt. So this will be saving on resources. And then each track has its own dedicated track for MIDI editing. So this makes it easier and more efficient to correlate all your MIDI data for the sounds and instrument.
Conclusion
That's how to set up and use Multitimbral instruments in your Studio One songs. It makes your music production more efficient with the MIDI sending data to as few instruments as possible in your song.
For further Studio One tips and tricks, check out these video courses:
https://www.askvideo.com/course/songwriters-musicians-toolbox
https://www.askvideo.com/course/studio-one-102-producers-and-engineers-toolbox
https://www.askvideo.com/course/advanced-midi-toolbox
https://www.askvideo.com/course/studio-one-104-mixing-and-mastering-toolbox
Discussion
Want to join the discussion?
Create an account or login to get started!