
Setting up Logic for recording to video is pretty straightforward, but I would like to set a session up from beginning to end to be sure that we have all of our ducks in a row.
Scoring to video used to require complex sync setups with external video players, but now we have Quicktime. When we were given the ability to score to quicktime movies instead of tape machines, composition became ridiculously easy in comparison to the old 'wait-for-the-tape-to-rewind' days. There are many considerations we need to keep a handle on, though, so I'd like to show you all of the necessary steps to making sure your movies stay in sync, and play well with Logic.
Step 1 - Prepping the Movie for Importing
The first thing we need to do is get info on the Quicktime file we've been given. We need to know the following:
- The compression type
- The framerate
- Is there audio separation?
These are important considerations. Most post-production facilities will send out H.264 formatted movies these days. The framerate is usually 23.976, but sometimes the movies will arrive in strange filetypes and framerates. I'm going to use a public domain movie downloaded from the internet called 'Building on the Past' by Justin Cone. The video can be found here:
http://www.archive.org/details/Justin_Cone_-_Building_On_The_Past_-_640x480
Be sure your computer has Quicktime 7 on it. It can be downloaded here:
http://support.apple.com/kb/DL923
We need to use Quicktime 7 in order to change the output format to our liking. Compressor, which also comes with the Logic Studio Suite, is also an option. Quicktime 7 is a lot easier to get around though, so this is what we're using for this article.
When the movie is opened in Quicktime 7, hit Command-I to get info on it:

This window shows us that this movie is H.264 DV format, and has a frame rate of 29.97 FPS (Frames per second).
This is a very standard format for video editors sharing rough video over the Internet. The picture looks good, and the file size is small. The issue is, the cpu has to decode the video in real time as it is playing. When we have large Logic projects playing a whole lot of software instruments and plugins, the decoding of the video will slow down playback dramatically. This is why we need to convert from a compressed format to an uncompressed format.
Go to File > Export... you'll get the following prompt:

Go to the 'Export:' button at the bottom left, and choose 'Movie to Quicktime Movie':

Now select 'Options...' directly to the right of 'Movie to Quicktime Movie'. You'll see this:

Choose 'Settings' and under compression type, choose 'Photo-JPEG':

Everything else can be left as-is. Save the settings, and export to the desktop.
What this process does is give us a new movie that is essentially a stream of jpeg images. This format plays very nicely in Logic, and the quality of the video is still good.
Step 2 - Set Logic's Frame Rate
So now we have our movie. Let's open up Logic, and start with a blank slate. When you perform a 'save as...', don't include the movie file if you are working on anything over 20 minutes. The reason for this is you will be creating multiple projects for any theatrical length movie, so there is no need to make lots of copies of the original. That just takes up too much hard drive space.
For the first track in the arrange window, make it a stereo audio channel strip.
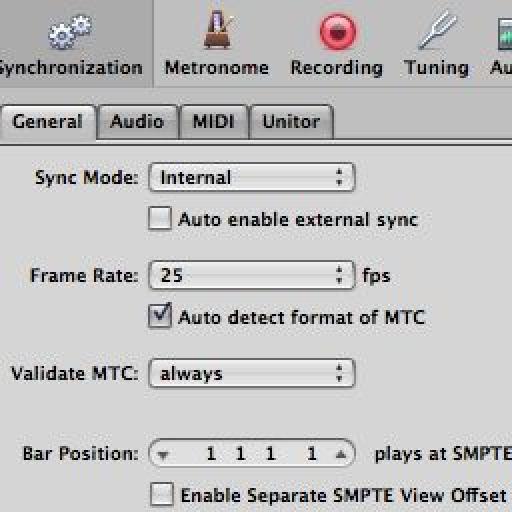
Now that we have our project open, let's check out our project settings. Open the project settings from the file menu and choose the 'Synchronization...' option:

Now we have this set of settings:

The most important things to keep in sync in any Logic project are the frame rate Logic is playing back at, and the audio sample rate. We know from our earlier research that this movie's frame rate is 29.97 Frames Per Second, or FPS. We should set Logic accordingly:

Step 3 - Setting the Audio Sample Rate
The standard in film, TV and video for a while now has been 48k for the audio sample rate. It's a good bet to have your sample rate set at 48k if you are working in this medium. If you are working in games, you should have a document that specifies what bit depth and sample rate they are looking for.
Set your sample rate in the 'Audio' tab of the Project Settings:

Step 4 - Setting the start time
Now we need to give Logic an idea of how our bars and beats are going to line up to SMPTE. SMPTE stands for Society of Motion Picture and Television Engineers, and is a standard linear time format for motion pictures. The time is measured in hours, minutes, seconds, and frames. Logic also includes an even smaller subdivision called subframes.
In the industry, the first frame of the actual movie is at 1:00:00:00. Before this timecode marking, there are usually sync references, studio notes, tones, and 'bars'. All of these things are used to help engineers calibrate their systems for the film. If you are lucky, you'll have all of this space before 'hour one'. If you are unlucky, you will get a movie that just kind of... starts. There will be no tones or sync points. In this case, you'll need to make your best guess as to where the first frame of the movie starts (hope there's not a fade-in!), and have that start at 1:00:00:00.
In this case, we are working with a movie that just kind of... starts. There is a fade-in, but we can assume the movie starts when we hit play.
In the 'Synchronization' tab of the Project Settings, let's have the session set up so that 1:00:00:00 starts at bar 5:

This allows us to create our own sync reference before the movie starts.
Step 5 - Creating a Sync Pop
The standard sync point would be 2 seconds before 1:00:00:00. That would make our sync point at 00:59:58:00. We'll be making a tiny blip at this place using the simplest tone possible - a sine wave.
Create a new software instrument lane with an EXS24 on it:

Play a note high up on your keyboard. 'A6' is a good bet. We are going to record that note now in the arrange window. Drag the region you just created to Bar 4, and then open the region in the Piano Roll Editor:

On the right side of the piano roll, we can choose to view not only Bar and Time, but SMPTE as well:

Now when we select and drag the MIDI note in the Piano Roll, we can place it exactly at 00:59:58:00:

I would suggest bouncing this to audio now. Select the region in the arrange window, and hit Control-B.
This open the Bounce Regions In Place dialog window. I'd suggest these settings:

Now we have an audio region in the arrange window. Double-click on the audio region to view it in the sample editor. Be sure that the wave of the audio region starts exactly at the region start:

Next, we need to lock that region to the SMPTE timeline. Go to Region > Lock SMPTE Position.
Now, even if the session tempo changes, this region will remain steadfastly synced to the linear timeline at :00:59:58:00
Step 6 - Import the Movie
Now we are finally importing the movie! Go to File > Open Movie...

Locate the movie and open it. If the picture is really large, Control-click on the movie once it has opened, and select '0.5 Size':

The movie will automatically start wherever 1:00:00:00 has been designated. That's the default setting. Control-click on the movie and choose 'Video Project Settings' to be sure:

Step 7 - Import the Movie's Audio
Now we can import the audio from File > Import Audio from Movie:

And we're set! Logic has imported the audio, and locked the audio down to the timeline:

As long as the audio file starts at 1:00:00:00, we're good to go. The audio file will always be the same length regardless of tempo changes, so it won't fall out of sync with the movie.
I hope this helps everyone get their sessions set up properly for scoring to picture! I've had many people complain to me that Logic was slowing down when they worked on large film or TV, and this has been a good solution for me.

Discussion
Want to join the discussion?
Create an account or login to get started!