
One of the coolest new features of Reason 7 is its ability to analyze and slice audio automatically, and in fact it does this to any sound that you record or import. You can leave audio clips untouched of course – nobody says you have to alter them – but with ReCycle effectively integrated into Reason's sequencer now, you have much more control over the feel and timing of your audio parts. Read on to find out how it works…
Step 1 – Record or import something

Here I have imported a drum loop and stretched it to fit my project by holding Option and dragging it with snapping to bar switched on. It's an MP3 file too, since Reason 7 now supports more import formats so you don't have to convert files before importing them.
Step 2 – Double-click

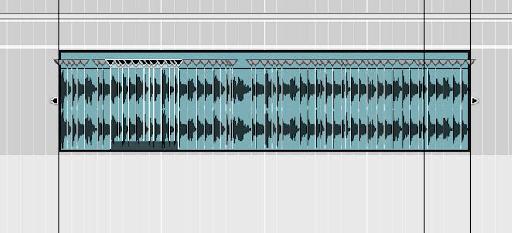
Double-click on the audio clip to open it in Edit view and you will see that it has already been analyzed and assigned slice markers. If you pick up any of these and move it, you will find that you can alter the timing and feel of the loop without changing its overall length. The movements obey the sequencer's snap settings, so to keep markers in time you can use a snap setting like 1/16, or for totally freeform movement, turn snapping off.
Step 3 – Change the feel

It's easy to change the feel of a loop by altering its transient markers, and although this is most noticeable with beats, it works on anything you record or import such as guitars or vocals. Try picking up a few markers and moving them to change the timing and feel.
Step 4 – Quantize your audio

Manual alteration of slice markers is useful but sometimes you want to pull a loop into a specific timing quickly without messing about with individual markers. To do this, open the Tool window and go to the Sequencer Tools tab > Quantize section. With the audio clip selected, choose quantize settings for the audio slices just like you would do for MIDI data. This might include not quantizing to 100% but rather a more “human” setting with less strict snapping.
Step 5 – Bounce to REX loop

You have various options after you have sliced up a loop. Of course you can leave it as it is, fully editable, and it will be fine. Or you can control-click on it and choose to bounce it out to a new recording, a new file on disk or a REX loop. If you do choose to bounce out as a REX loop, it can then be saved out to your desktop or placed directly into a Dr. Octo REX to take advantage of all the slice processing tools on offer there.
Step 6 – Divide the loop

There's another, less obvious option and that's the ability to divide a sliced loop into individual audio clips on the timeline. Control-click on a clip and choose Split At Slices, and lots of separate clips will be created. This is handy for moving, rearranging or even exporting individual bits of sound.

Discussion
Want to join the discussion?
Create an account or login to get started!