
McDSP has been putting out some of the best sounding plugins ever instantiated in a DAW. EQ and Compression in McDSP-land is warm and colorful, with a set of tools that feel wonderfully musical to play with. One of my current favorites is their multi-band compressor/limiter unit, the ML4000 ML.
An Intro to Multi-band Compression
Multi-band compression plugins have multiple compressors that attenuate amplitude in specific frequency ranges. Essentially, they can have a different compression setting for low frequency, low midrange frequency, hi midrange frequency, and high frequency ranges.
Multi-band compression has been very popular recently for compressing auxiliary channels and *gulp* master bus channel strips. With polyphonic audio streams and submixes, multi-band compressors can add definition without having to resort to draconian EQ measures.
EQ is usually a set-and-forget kind of solution for shaping the timbre of a sound. Multi-band compressors have the ability to only attenuate a specific frequency range when it becomes a problem, leaving the signal unmolested once the amplitude in that particular frequency range goes back down to a desired level.
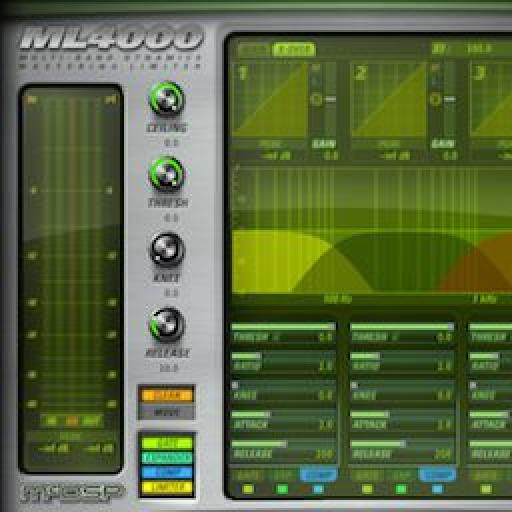
The ML4000 ML4 User interface
The ML4000 has 2 views: the multi-band meters, and the crossover meters.
The multi-band meters view contains the settings for the 4 dedicated compressors, as well as the control for the master limiter. The limiter is located on the left side, with the compressors taking up most of the real estate in the center of the screen.

The crossover meters show the frequency ranges of the 4 compressors, with the compressor settings below, and the I/O curves above. The limiter is still viewed on the left, and the compressor settings are below.

More Than Compression
When bopping around inside the ML4000, it's very important to look for all of the tabs in the GUI and their functions. The ML4000 actually includes 3 different functions per frequency range: compression, expansion, and gating.

To turn these functions on, simply click the small rectangular light below the tab of each compressor section. There are also master on/off toggle buttons just to the right of the limiter meter.
Expansion is essentially the opposite of compression. When the audio energy reaches below a threshold value, the expander will actually turn the volume down. This type of expansion is known as downward expansion. Why would you use this, you say? Well, let's say we had a file from somebody who recorded singing with their aquarium tank on in the background. Using the expander, we could have the volume go down when they weren't singing to give us a better noise ratio. This way, the tank would be made less obvious. Has this ever happened to me? Yup! The ML4000 can also be set to give us upward expansion. In this scenario, the expander will increase the audio when it falls below the threshold value. This is helpful if you want to bring out softer details in the audio signal.
The gate is also very useful for handling noise in a track. It only allows sound through when the volume reaches a threshold. Gates are more extreme than expanders. Usually gates are great for things like toms on a drum kit. If the other drums are banging away and the toms aren't being played very often, a gate can clean up the drum tracks quite a bit by cutting out the bleed from the other drums.
When the tabs at the bottom of each processor section are selected, the controls will change as well. When using expansion, we are given a 'range' parameter instead of 'knee'. When we are using a gate, the 'knee' function will change to 'hold'.
- Knee - Changes the transition time from uncompressed to compressed signal.
- Range - Decides the amount of attenuation to a signal.
- Hold - Determines how long a gate is held open.
Using the ML Limiter

The limiter built into the ML4000 ML is fantastic. Basically, it will keep the program material under a certain level, no matter what. This is called a 'ceiling'.
The limiter as some cool tricks up its sleeve. It has several modes that all sound different from each other. This can really lend a final polish... or crunch.
The modes are listed next to the limiter in a text box.
- Clean - A transparent limiter
- Soft - This is actually a bit louder sounding than the Clean mode, but still very transparent
- Smart - The limiter is doing everything it can to reduce any distortion caused by limiting. This can be handy for those who want to crush the life out of something while having it sound still rather like it originally did.
- Dynamic - A bit louder than Smart mode with minimal compression pumping.
- Loud - Pretty much the loudest limiting you can get with very little signal distortion.
- Crush - This is the loudest mode with more distortion. Good for very aggressive content.
A Plugin Suite in a Single Plugin
The ML4000 is ridiculously good sounding, and a real swiss army knife in my arsenal of tools. I highly recommend sending different types of material through it and experimenting with how it can be applied in different circumstances. I know this plugin is supposed to be used primarily on a bus, but it's pretty darn versatile, I've come to find.
Have fun!

Discussion
Want to join the discussion?
Create an account or login to get started!