
Eventide’s latest plug-in UltraTap is a multi-tap delay on steroids, which can trace its lineage all the way back through the Eventide line. Originally part of the groundbreaking SP2016 processor, the UltraTap algorithms were included in the classic H3000 Harmonizer and its successors, and more recently they’ve been available in the H9 stompbox. With the introduction of the UltraTap plug-in (available in all the usual formats), UltraTap is back in the studio, where it can lend its array of unique features to tracks and mixes of all types.

UltraTap and its lineage
So what special features does UltraTap bring to the table? Let’s take a brief look at what this plug-in has to offer.
Basic Layout
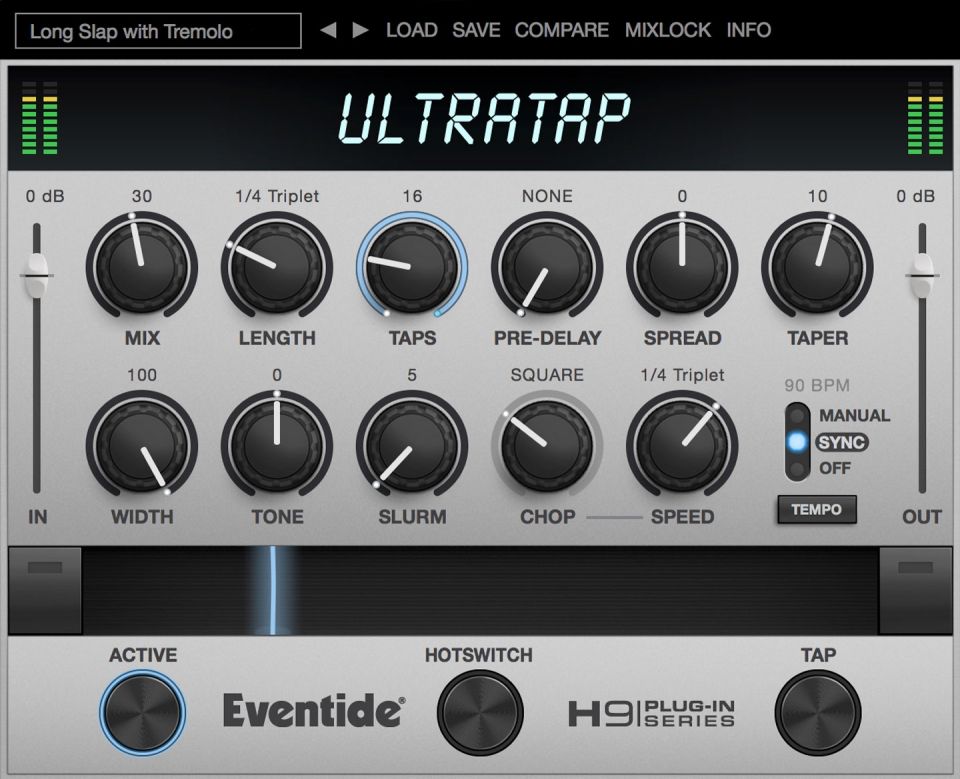
UltraTap’s front panel is arranged in four sections. At the very top are the usual menus and controls for loading and saving presets, along with a Mix lock button, which locks the user-set dry/effect balance to its current value when auditioning presets. The main section has the input and output level sliders, the mix balance knob and two rows of knobs that provide most of the controls for the plug-in (back to them in a minute). Below that is The Ribbon, a realtime effects control that lets you morph between the settings of multiple knobs, controllable by hand or MIDI input (mod wheel). At the bottom are what look like three stompbox switches (a nod to its previous H9 incarnation) for Bypass (Active) and Tap (Tempo), and the Hotswitch, which lets you switch quickly between two different setups (all controls if desired). For setting up effects, the central panel knobs are where the action is so let’s start there.

UltraTap’s main panel
Tap, Tap
At first glance, many of UltraTap’s knobs seem familiar, as you’d expect for a delay-based effect, but there are a few additional intriguing features whose names don’t fully reveal their functions. Mix, of course, sets the dry/effect balance and as I mentioned earlier, it can be locked when auditioning presets. The next three knobs - Length, Taps, and Pre-Delay - handle the basic chores of dialing up the delay taps. Up to 64 are available, and as you’d expect, delay time can be free, in sync with session tempo, or set via the Tap button below - the choice is made via the small slider at the lower right of the panel. Length sets the delay period - in Sync mode, naturally, this is expressed in musical values. Taps chooses the number of repeats, again, up to 64. And Pre-Delay sets a delay before the repeats begin.
The number of repeats spans the duration chosen with the Length knob, but within that frame the timing and level of the repeats can be varied with the Spread and Taper controls. Spread bunches the repeats up either at the beginning or the end of the delay period, making for a speed-up or slow-down echo effect. Taper dials up either a positive or negative volume ramp, making the repeat pattern either fade in or fade out. Together, these two controls can provide some nice variety for delay patterns, when used creatively.
Straight delays; SPREAD @ -60 / +60; TAPER @ -60 / +70
Slurm & Chop
The bottom row of knobs gets even more interesting. The first two, Width and Tone, are pretty straightforward - Width dials up a ping-pong echo effect, with center being mono, and positive or negative values providing L-to-R or R-to-L back & forth repeats; and Tone can both darken the repeats or brighten them (via LP or HP filtering). But note that unlike some echo tone controls, this doesn’t act on a feedback signal, gradually darkening repeats - all delay taps have the same tone (the dry signal is, of course, unaffected).
The imaginatively named Slurm and Chop controls (along with Chop’s associated knob, which changes functions depending on the Chop setting) provide some of UltraTap’s more interesting possibilities.

Slurm and Chop
Slurm smears the attack, adding micro-tuning and slurring, which has the effect of softening the attacks of the repeats and running them together, for a reverb-like quality. This is not a straight (hard) reverb effect though - it’s more of a combined reverb/chorus/modulation effect, which can add a kind of “halo” around sounds.
SLURM @ 0 / 25 / 50 / 75 / 100
Chop is a slicer, which acts on the audio signal prior to the Taps. It consists of the main Chop knob plus an ancillary knob that changes function depending on the Chop knob. The main Chop knob is basically divided into three distinct sections. Up to the halfway point (12 o’clock) you get a tremolo effect with a choice of waveforms (triangle, saw, ramp, and square, plus a random sample & hold option), each of which imposes a different envelope on the signal. This is followed by a Swell range (0–9) which introduces a slow attack, and finally a Trigger section (0–9) which slices the signal into shorter or longer segments. Each of these effects is governed by the second knob: for the tremolo effect (the waveforms) the second knob is a speed control; for the Swell range it sets rise time (attack); and for the Trigger section it’s a release control.
CHOP: Tremolo (RAMP); SWELL; TRIGGER; SAMPLE & HOLD
Ribbons And Switches
Just below the main panel is the Ribbon. As I mentioned earlier, this is a realtime control that allows you to program a range for each knob (it can control all the knobs together). You can drag a range for any (or all) knobs, and then moving the ribbon morphs within those ranges (a right-click on either side clears these settings). Depending on how you set it up, this can put some dramatic variations under realtime control, and, of course, it can be moved not only by hand (mouse) but by MIDI control as well (it’s preset to respond to CC1 mod wheel messages, although this may be dependent on your DAW’s handling of MIDI control of plug-ins).

The Ribbon and the “foot” switches
Finally, there are the three pedal-like switches at the bottom. Besides the Active switch (bypass) and Tap (Tempo), which are pretty much self-explanatory, the Hotswitch is an A/B selector for two different on-the-fly patches. When you activate it (click and hold until it blinks), you can set different values for all knobs; then A/Bing with the Hotswitch will toggle between the original settings and the ones you just made. And if you save a patch you’ve set up with Hotswitch alternatives, they’ll be saved with it.
The Rub
In use, UltraTap is the kind of effect that you really need to play around with to get a good sense of all the varied effects it’s capable of. The supplied Factory presets do a good job of introducing it, but like most delay effects, you’ll want to customize settings for the specific sounds, tempo, and rhythm of each song you use it in, and there’s a lot of room for creative experimentation. Even though most DAWs already include delay plug-ins, playing around with effects like UltraTap is a great way to venture out of your comfort zone (when it comes to delay fx), nudging you in directions you might not have gone otherwise. Not to mention, at the current sale price, you really can’t go wrong!
Price: $49 until September 5th 2017
Pros: Wide range of customizable and creative delay-based effects
Cons: None, really
Web: https://www.eventideaudio.com/products/plugins/delay/ultratap-h9-plugin

Discussion
Want to join the discussion?
Create an account or login to get started!