
The industrous engineers at Antelope have been busy this last year! On the heels of the release of the Orion 32+ | Gen3, they’ve now added a new flagship to the Orion line—the 32HD | Gen 3. Let’s see what this new interface brings to the table..

Specs
The 32HD provides up to 64 channels of 24bit/192k i/o in all—32 channels of analog i/o plus 32 channels of digital i/o. Dual HDX ports provide low-latency connectivity for Pro Tools HD, HDX, and HD Native systems; alternatively, the USB 3.0 port offers the same full i/o capabilites for other systems. (Naturally, to take full advantage of the vanishingly low latencies this box is capable, of you’ll need a suitably powerful computer.)
The big news for the Orion HD32 | Gen 3 is its converters—they provide 136 dB dynamic range (as measured at the Monitor Outs), approaching the theoretical limit of 24-bit audio. Antelope’s interfaces have always enjoyed flawless audio quality, and this latest unit adds a little icing to the cake.
Round Back

Besides the HDX ports and the USB 3.0 jack, the rear panel sports a host of connectors for i/o. 32 channels of analog i/o are available via eight 25-pin D-SUB connectors; there are also balanced TRS stereo monitor outs. Digital i/o includes 64 channels of MADI, 16 channels of ADAT, and S/PDIF.
There are a pair of Word Clock outputs, and a Word Clock input, along with an input for Antelope’s standalone Atomic Clock, their top-of-the-line external clocking device.
Clocking
But don’t let that last input fool you into thinking that you need to use an external clock—Antelope’s top-of-the-line external atomic clock may provide the last word in clocking accuracy, but it costs twice the price of the entire HD32 (!), and would probably be overkill for the vast majority of users. The HD32 | Gen 3’s internal clock employs Antelope’s “4th Generation 64-bit Acoustically Focused Clocking”, along with advanced jitter management, and the company proudly points out that it’s “simply said the best crystal oscillator clock in an audio interface”—in fact, it’s one of the big selling points of the new interface.
Front Panel

On the front panel, at the left there’s a soft-touch power button, followed by three indicators that show the current clock source in operation. In the center is a display that shows the current Sample Rate—this can be set with the “Frequency” up/down buttons just to its left—and 32 small level meters.
The “Antelope button” is just to the right of the meters; it calls up a front panel menu of options—a long click lets you select these via the same “Frequency” buttons to the left. Available settings include clock source, meter and trim settings, and SRC and S-MUX options. These settings are also available in the Control Panel software, whch I’ll look at below. Finally, five setup Preset buttons are found at the far right, rounding out the front-panel controls.
Installation and Setup
Installation is handled by the Antelope Launcher—this installs the audio driver, updates the unit’s firmware, and provides software download links. It occasionally pauses during the process but just be patient, and when it’s done the interface will appear under the Devices button.
The Control Panel
This is also where you can launch the Control Panel software, which offers routing and access to the onboard effects—the panel can be set to launch automatically, and can be accessed from multiple networked computers. At the top you’ll find the same settings available on the front panel, along with two user-selectable meter displays. Below that there are five panels—besides the HDX and Trim tabs, there are panels for Routing, the Mixer, and the onboard Effects.
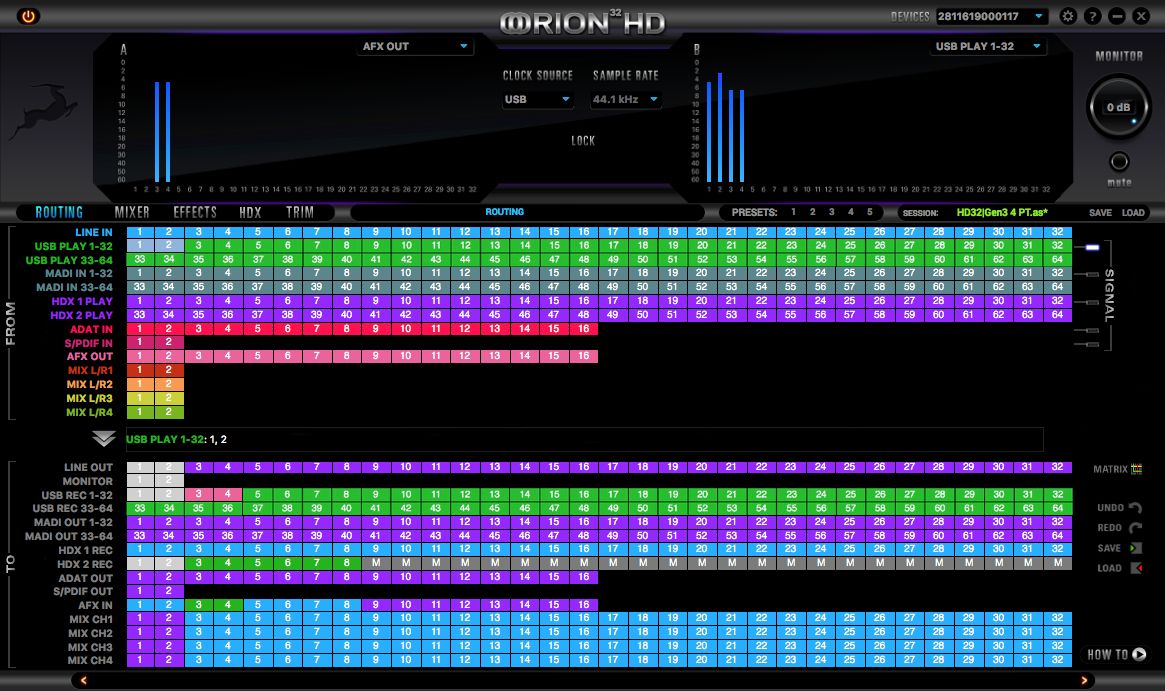
The Routing display is laid out like a traditional studio patchbay. There are two sections—From and To; these represent all the channels for input, output, and internal routing, including the USB 3.0 and HDX channels, and the Analog, ADAT, and MADI i/o. Any channel in the From section can be routed to any channel in the To section simply by dragging—for example, to set the source for the two analog TRS monitor outs, you might drag the USB Play 1/2 channels in the top From section to Monitor 1/2 in the bottom To section.
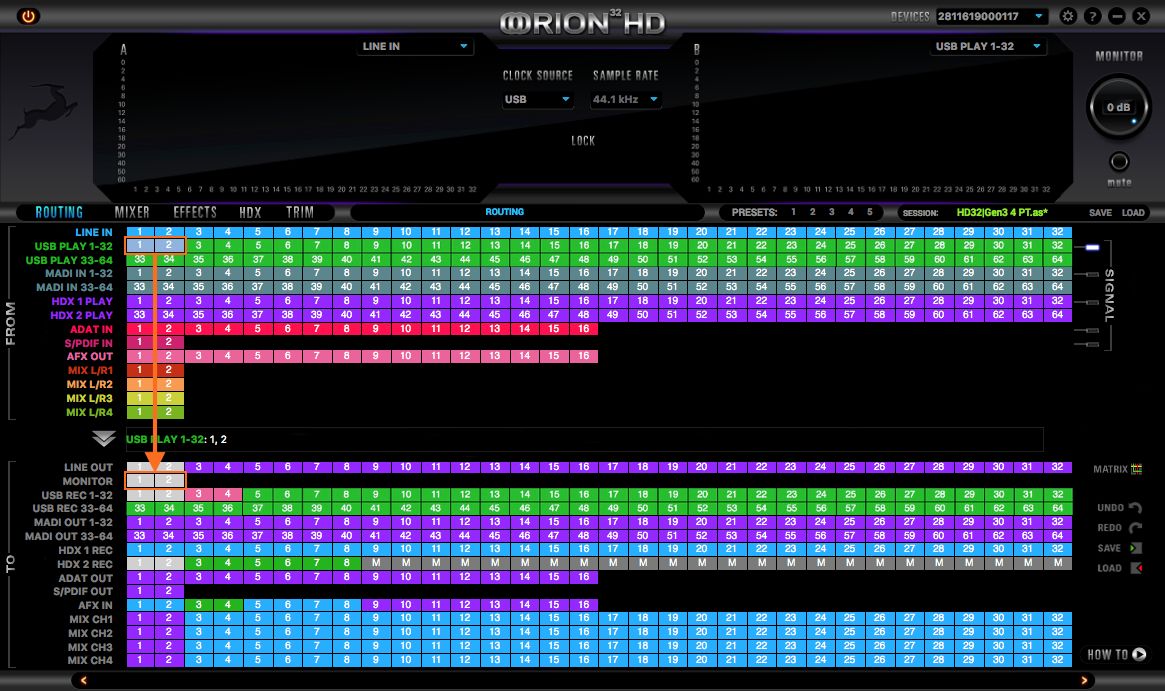
There are also virtual patch points for routing signals to and from the onboard Effects—I’ll come back to that.
The Mixer panel provides four customizable low-latency mixers, which can be used for monitor mixes and the like. The included Auraverb is available as a Send & Return effect.
The Effects
The effects panel is where you can access the onboard FPGA hardware-based effects—you can have up to 16 channels of effects in all, and each channel can have multiple processors. The HD32 | Gen 3 comes with not only Antelope’s basic EQ, compressor, and dynamic effects (expander, gate, de-esser), but also a generous collection of vintage analog EQs and Compressors. These include models of many classic hardware processors from Pultec, Neve (1173), API, SSL, Urei (1176), Sta-Level, Fairchild (670), dbx (160), and others—37 in all.
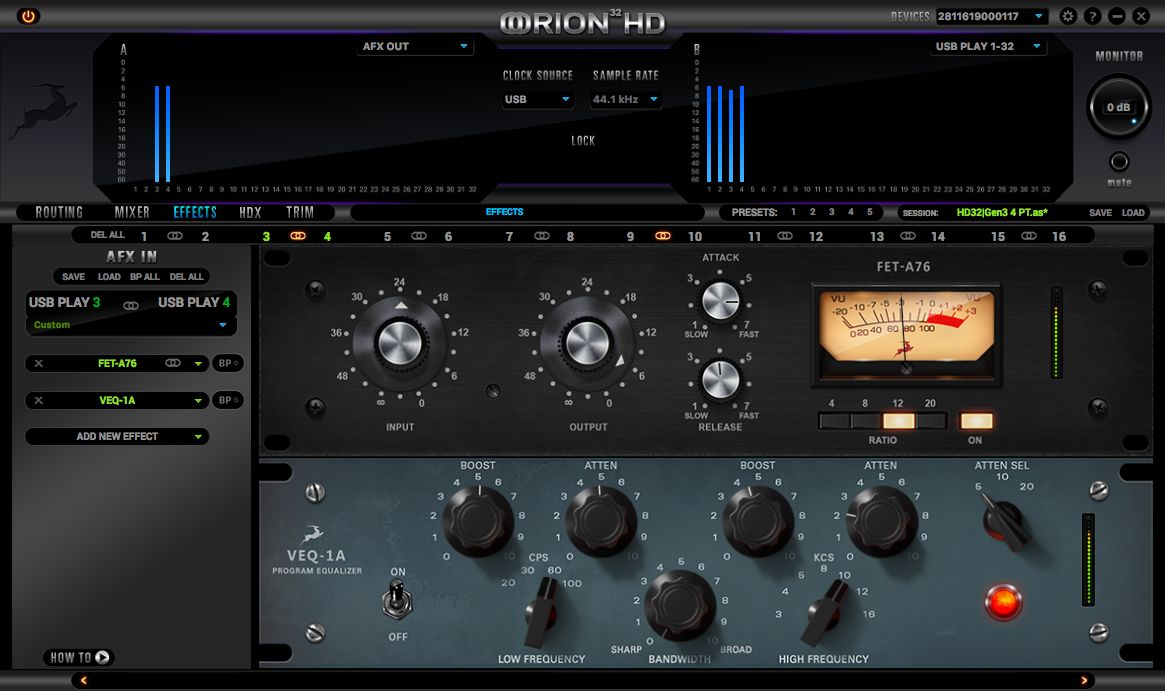
Unlike some hardware-based effects, these don’t appear directly in the DAW’s insert slots (the company’s AFX2DAW bridge for that is currently Thunderbolt-only, and is not available for the HD32 at this time). But it is easy enough to use the effects—you just have to access them and make settings in the Control Panel utility instead of directly in the DAW.
The 16 effects are patched in via the Routing page—anyone who’s ever patched effects with a traditional studio patchbay will find this immediately intuitive. You just drag a channel to an effect channel input, and the effect channel output back to the channel. In the DAW, you insert an i/o plug-in and set it to that channel. This procedure varies in different DAWs—I set it up in Pro Tools and Logic and it was a breeze in both.
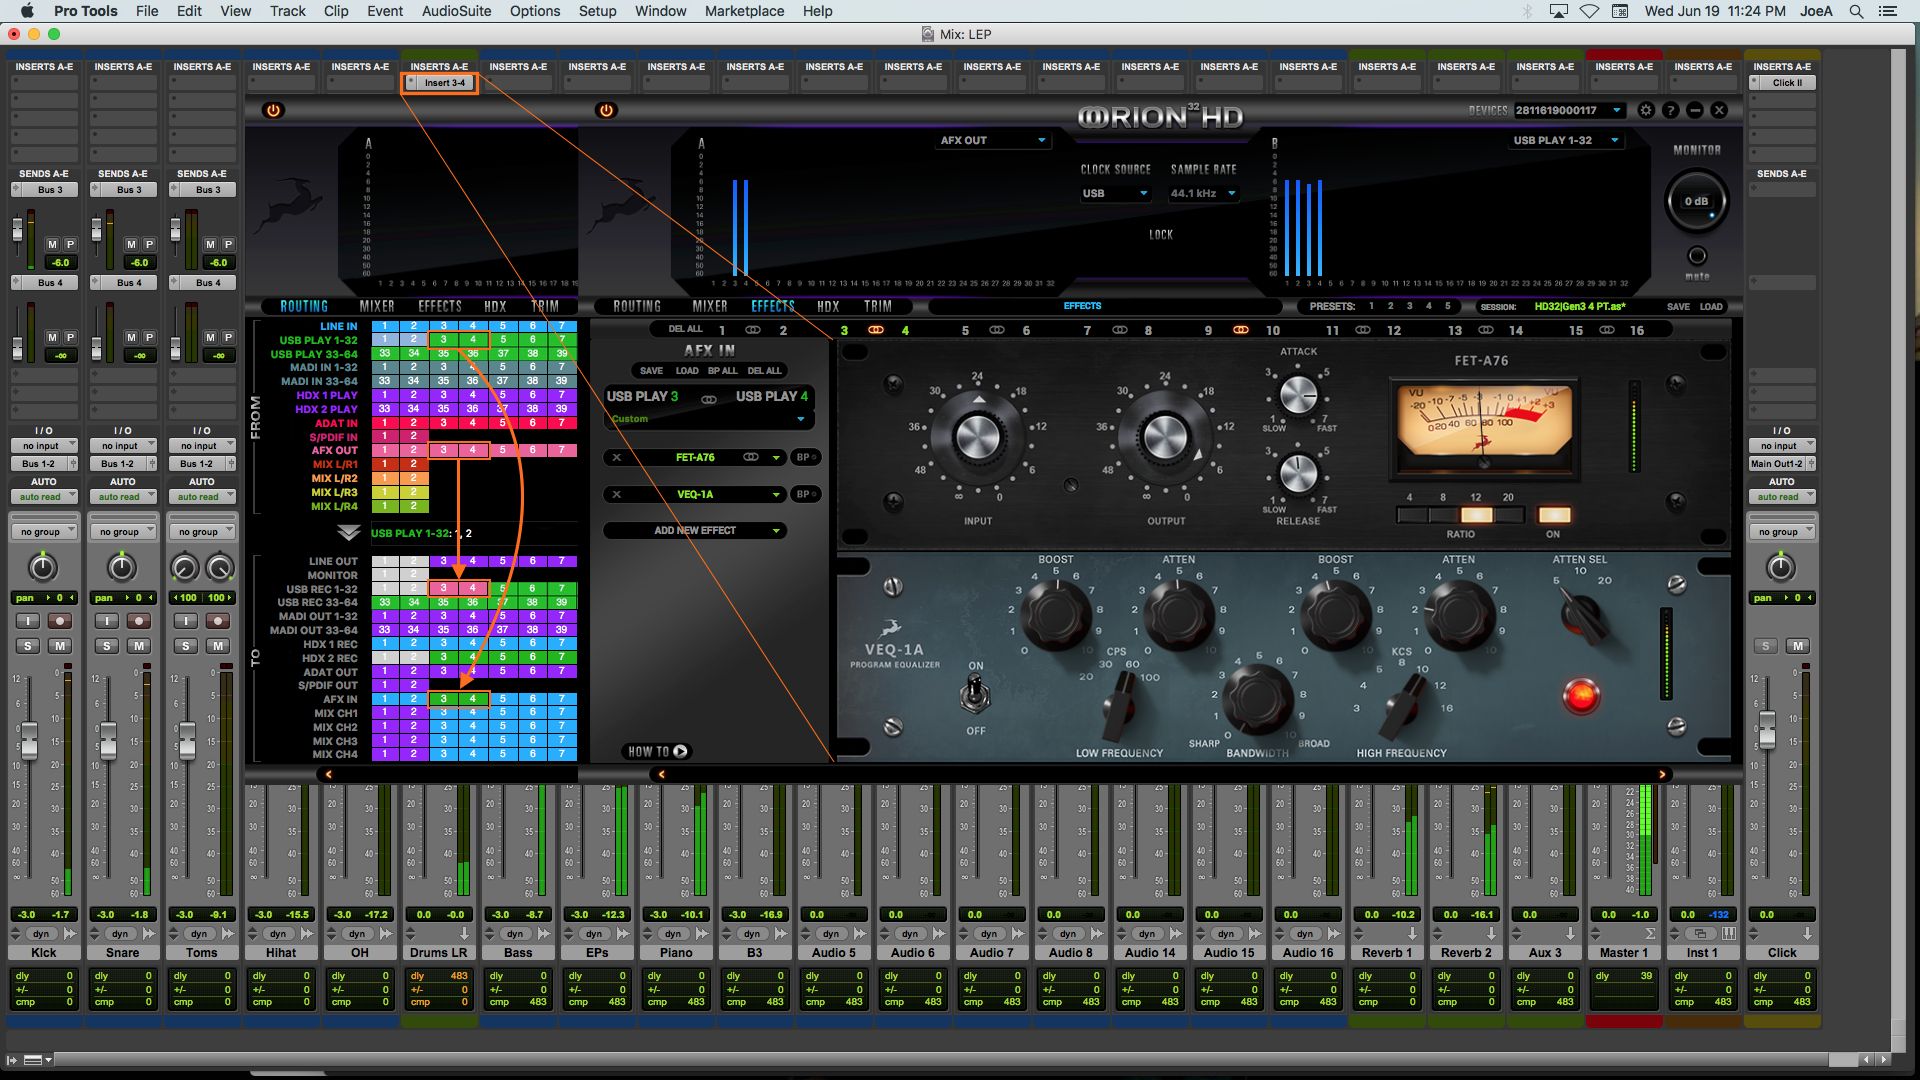
When you’ve got everything patched and the effects settings made, you can save that setup—I’d save it into the DAW session/project folder, so it’ll be sure to stay with the session. The effects can also be patched in to the inputs, allowing you to record with them—you can even mult the dry signal to another channel in the Routing panel, and record both the processed and the dry signals. The routing and workflow for both mixing and recording with effects is quick and easy once you get used to it, and the effects are worth the slight extra effort.
Wrap Up
Once again Antelope has delivered, combining flawless sound with considerable flexibility, and the included vintage effects should seal the deal. Obviusly not priced for the causal DAW user or hobbyist, Orion HD32 | Gen 3 will be a major contender for all studio operators, producers, and audiophiles who are serious about sound and connectivity.
Price: $3995.00
Pros: Excellent sound; high-end clocking; comprehensive i/o; flexible routing; included vintage effects
Cons: No headphone jack
Web: https://en.antelopeaudio.com/products/orion-32hd-gen3/
Become an audio recording expert with hundreds of pro video courses: https://ask.audio/academy?nleloc=new-releases

Discussion
Want to join the discussion?
Create an account or login to get started!