Novice recordists often start out using inexpensive microphones that offer few options, but when they gain more experience capturing live sound they’re ready to take advantage of the possibilities offered by more professional models. One aspect of microphone response that can have a significant effect on a recording is the mic’s pickup (a.k.a. “polar”) pattern: different designs have different directional characteristics when it comes to picking up the sound around them. Here’s a brief primer on that aspect of microphone performance..
Patterns of behavior
Many recordists assume that mics simply pick up what you point them at, but microphones actually come with three different basic pickup patterns; omni-directional, bi-directional, and uni-directional. Additionally, uni-directional mics (a.k.a. Cardioid mics) come in several varieties. And many high-end condenser models offer the user a choice between these patterns, for greater flexibility in different situations.
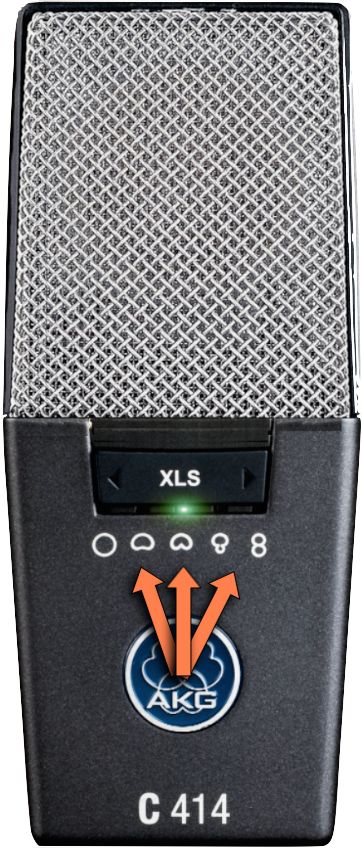
A multi-pattern mic
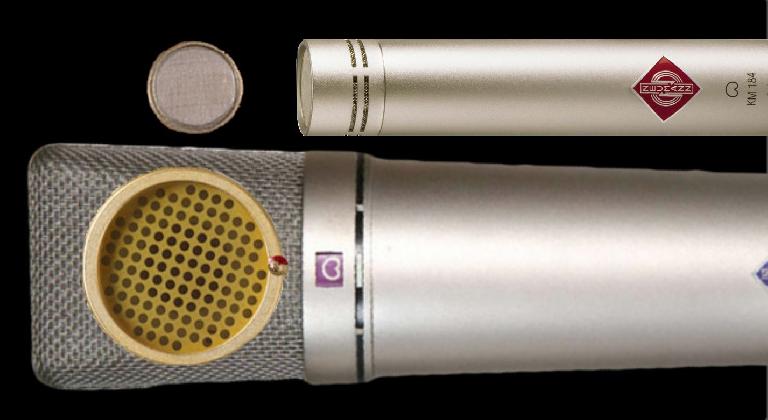
A microphone picks up sound when sound waves hit its diaphragm. The diaphragm is a flat, flexible membrane, suspended in a frame, that vibrates in response to sound waves in the air, matching their vibrational patterns. These vibrations are then converted to electrical audio signals and passed on to the rest of the recording chain (preamp, console, interface, etc). The diaphragm can be small or large (Fig 2), and is usually concealed behind the mic’s grille, which protects it from wind and blasts of air (windscreen).
Depending on how the diaphragm is utilized, the mic may pick up sounds from the front only, from both front and back, or from every direction. Let’s look at the three basic pickup patterns.
Omni
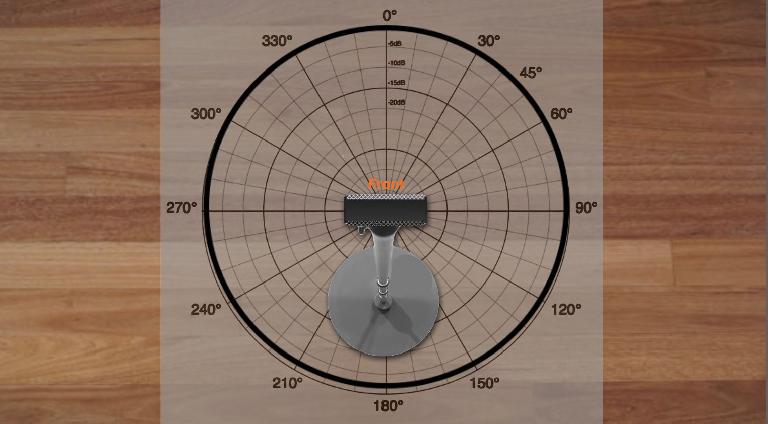
If a mic’s diaphragm is open on only one side (the front), then, perhaps counter-intuitively, it will pick up sound from every direction - front, back, sides, top and bottom.
The diaphragm responds equally to pressure variations originating from from any location, and this design is called a pressure mic, or more-descriptively, an omni-directional mic. Sound waves all hit the front of the diaphragm (the only exposed surface) eventually, and so the mic doesn’t differentiate whether they originated from; in front, behind, or to the sides.
Bi (Figure-8)
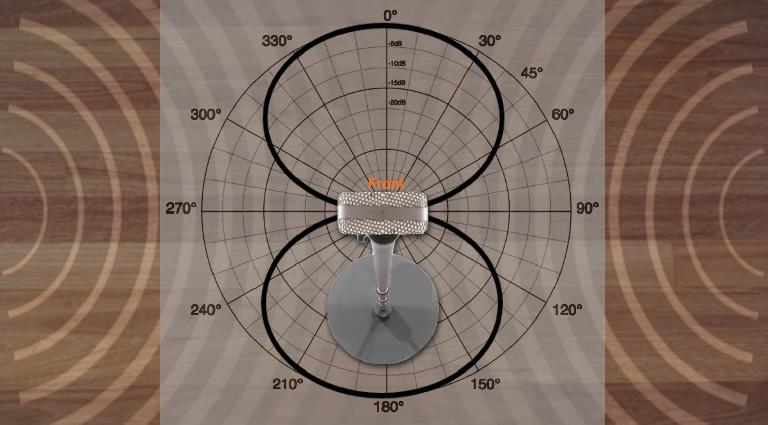
If a mic’s diaphragm is instead left open on both sides, then sound waves will hit both the front and rear of the diaphragm. If the source of a wavefront is in front of, or behind the diaphragm -a 0° or 180° angle -then it’ll be picked up in either case. But when a sound wave originates from the side of the diaphragm -90° or 270° - it hits both the front and rear of the diaphragm simultaneously with equal but opposite pressure (Fig 4). The opposite pressure prevents the diaphragm from moving, canceling out the sound wave, so there is no pickup.
These angles are referred to as “nulls” in the mic’s response. So the mic picks up sounds from two directions, front and rear, and rejects sound from the sides. This design is a pressure-gradient mic - “pressure gradient” refers to the pressure differential between the front and rear of the diaphragm. This pattern is most commonly called bi-directional, or sometimes Figure-8: the graph, or “polar pattern”, of the directional response looks like an “8” (Fig 4).
Cardioid
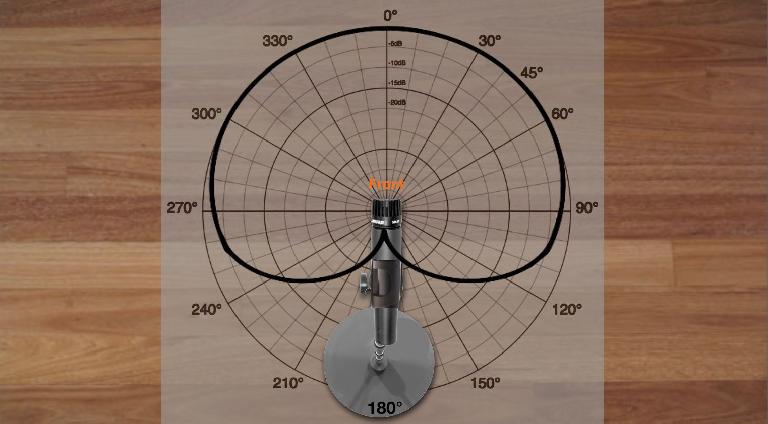
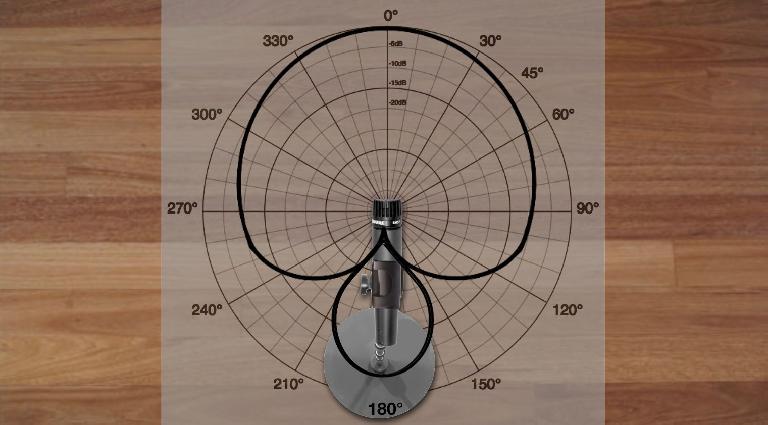
The third type of mic pattern is uni-directional. Once again, the diaphragm is open on both sides, but sound reaching the rear of the diaphragm is routed through physical ports, which are designed to make the mic reject sound from the rear, either directly behind the mic at 180° (Fig 5) or to the rear and sides (Fig 6). The ports delay sound waves reaching the rear diaphragm, resulting in phase cancellations and that’s how the rejection of sounds originating behind the mic is accomplished. This is probably the most commonly used design (especially for modern close-mic’ed recordings), a uni-directional mic pattern is referred to as a Cardioid pattern because the graph resembles an inverted heart shape.
There are several flavors of Cardioid mics. A basic Cardioid pattern has the greatest rejection at the rear (180°).
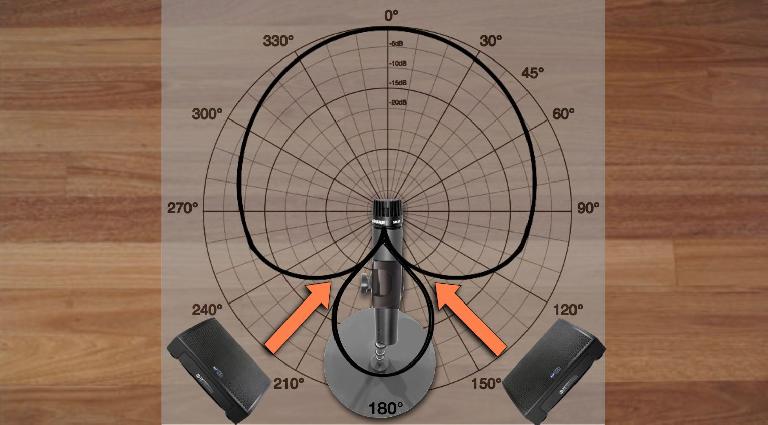
Other versions - Hyper-Cardioid and Super-Cardioid mics - may be designed to move that point of greatest rejection a little to the sides (Fig 6). This can come in handy when an unwanted sound source is not directly behind the mic, but a little to the side of 180°.
Multi-pattern mics
Many high-end (and even mid-level) large-diaphragm condenser mics offer multiple patterns at the flick of a switch (see Fig 1). These usually include Omni, Bi and Cardioid, often with two or three flavors of Cardioid. Some even provide continuous variation from omni to bi to cardioid for even greater situational flexibility. Often, these mics may have two diaphragms mounted back to back, and combining their outputs in different degrees is what allows for the varying directionalities. Companies that make multi-pattern large-diaphragm condensers typically offer more budget-conscious versions of these mics, with the same sound and quality but only one pattern (usually standard cardioid), sacrificing the multi-pattern capability for cost reduction.
Off-axis pickup & frequency response
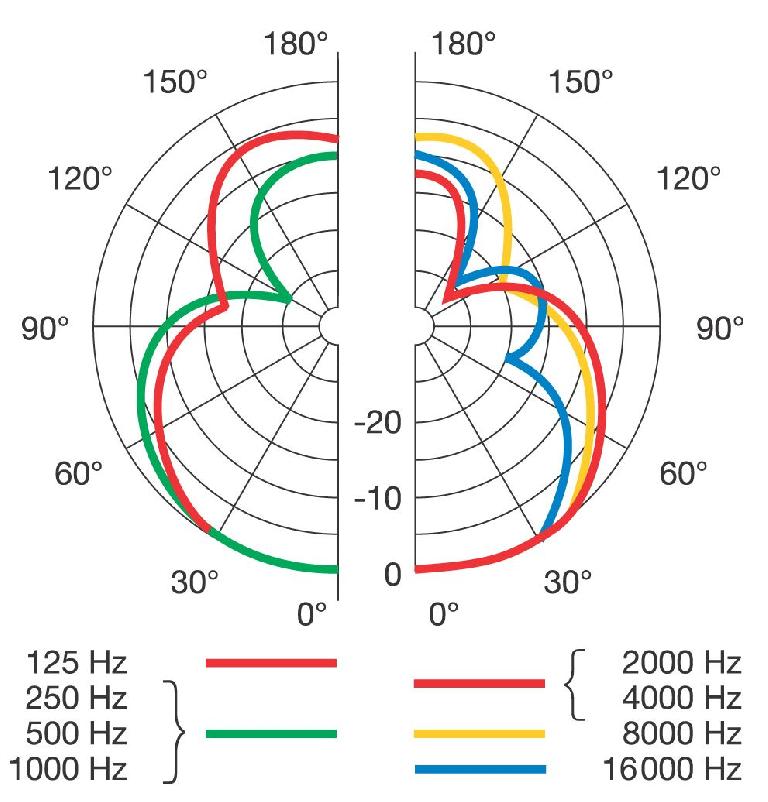
With directional mics, sound from the front is referred to as being on-axis, while sound originating from angles of rejection (null points) is referred to as being off-axis. Rejected sound is not completely rejected, the rejection is frequency-dependent. This is most significant with Cardioid designs. All directional mics are somewhat omni-directional at the lowest frequencies (where the wavelengths are too large to be subjected to effective cancellation), and exhibit different degrees of rejection at different angles and different frequencies.
To show this, the polar pattern graphs for directional mics often include several overlaid traces, showing the directional response at various frequencies to give the user a sense of how the varying tone of the off-axis sound picked up may affect the overall tonal balance of the mic.
But this is not any kind of quantifiable measurement of a mic’s character. The only way to get a sense of how a mic sounds is to actually listen to it, and the only way to really compare the directional characteristics of mics and the resulting effect on tonality is to audition them together on the same source.
Since they have no front & rear diaphragm manipulation or pressure gradients, omni-directional mics typically have the smoothest, flattest response. But since their undifferentiated pickup of everything in the room is often unsuitable for many recording scenarios, Cardioid designs are undoubtedly the most widely-used mics. However, there are useful applications for all three patterns.
Applications
Omni-directional mics, like high-quality omnidirectional condensers, are a good choice when you not only want the smoothest response but also want to pick up the ambience of the room. They’re typically employed in stereo pairs for acoustic ensembles, especially for classical music, but they can be equally effective on any source. But they will pick up sound from behind the mic as well as in front, so if there are unwanted sound sources to the rear (or sides) like a noisy audience, or instruments that are not intended to be picked up by that particular mic (in a multi-mic recording), then some kind of directional mic may be a better choice.
Bi-directional mics may not be utilized as often as Cardioids, but they are an excellent option in many cases. For example, Ribbon mics utilize a thin metallic strip as a diaphragm and provide a warm, full yet detailed sound quality. By their design they are necessarily Bi-directional, but they’re still widely employed on brass, amps, and other instruments and voices.
One good use for bidirectional mics is a recording scenario that involves capturing voice and acoustic guitar simultaneously - a singing guitarist - but still requires as much separation of the two recorded tracks as possible, for later processing or editing. Cardioid mics may work, but the side null of a bi-directional mic achieves more effective overall rejection than the nulls in Cardioid designs. If two bidirectional (condenser) mics are placed carefully, with each mic’s front axis pointing at the guitar and the singer’s mouth respectively, and each mic’s side (null) point aimed at the opposite source, this can often achieve a much greater degree of separation and provide a much smoother tone from both signals, than other patterns.
Of course, Cardioid mics are called for whenever there’s a need to reject other sounds in the room in favor of the desired sound source. Obviously, this is the case for any multi-mic'ed recording session, where a number of instruments are all playing together. Even if they’re baffled off, proper application of directional mics will contribute significantly to the isolation of the individual recorded parts.
On stage
Naturally, this is almost always the case when it comes to on-stage mic'ing. Additionally, in a live scenario, you don’t always have the freedom to position the various sound sources (instruments, singers, stage monitors) optimally for isolated pickup. Other considerations come first, like visuals or feedback rejection. A good example of this is the positioning of spot monitors at a performer’s feet. To avoid having a clunky monitor blocking the audience’s view, a singer’s monitors are often placed just to the side, rather than directly in front. This is a situation where a Hypercardioid or Supercardioid vocal mic might be the best choice. Depending on the monitors’ angles, the slightly off-center null points may achieve better rejection of the signal from the stage monitors than the 180° null point of a basic Cardioid design.
Wrap Up
Obviously there’s a lot more that could be said about both the technology and application of the various microphone patterns, but hopefully this was a useful primer for those who want to get a little more of a handle on how to choose the best mic for a job, and how to get the best out of whatever mic they may be using.


 © 2024 Ask.Audio
A NonLinear Educating Company
Discussion
Want to join the discussion?
Create an account or login to get started!