
In Part 3 of this Reaper series I mentioned to you, when we were setting up virtual instruments, that Reaper is also a Rewire host. This is excellent because this means that you can easily use other Rewire compatible (what isn't these days?) music applications along with Reaper. Let's take a closer look at how this works.
What is Rewire?
If you don't know what Rewire is, let me fill you in. Some applications like Ableton Live and Reason are extremely complimentary to applications like Pro Tools, Logic Pro, and Reaper. In fact, Reason, and Ableton are designed to be just as cool working as an accessory to recording applications, as they are when being used as standalone applications.
Rewire is the protocol that allows you to put Reason, or Ableton in to the Rewire 'mode' so that you can run them seamlessly with Reaper, Pro Tools, Logic, Cubase, etc. When this protocol is running, the host clock of Reason will be in perfect timing with the host clock of Reaper.... And this all happens on a single computer! Crazy, right?
Reason becomes what's known as a slave, Reaper becomes what's known as the host.
What's also quite cool is that you get seamless lines of audio coming from the slave application (in this case Reason) that can be discretely plugged in to Reaper. For example, you can set up a track in Reaper that has a direct input coming from Reason that is only a kick drum. You can set up a track in Reaper that has another input coming from Reason that is a snare drum.
This is cool because it allows you to mix Reason within Reaper's environment using VST, and AU plug-ins that would otherwise be unavailable to Reason... Because Reason does not support VST, or AU plug-ins.
In this tutorial, we're going to go through, together, how to set up Reason as a slave to Reaper. But, not only this... We're going to set up some drums coming from Reason, so that we can mix them in Reaper.
How Do You Rewire in Reaper?
One thing to note before you set up a Rewire session between any applications is the start order. The host application, in this case Reaper, will have to be running before you launch Reason.
Thankfully, Reaper will actually launch Reason for you! Let's check out how this works!
Step 1 - Launching Reason in Rewire
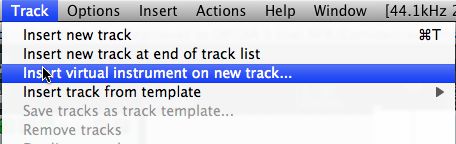
First, create a new instrument track within Reaper by going to the Insert Menu and then selecting Create Virtual Instrument on New Track.
Now, a box will pop up that gives you access to all your plug-ins. Choose Rewire on the left.
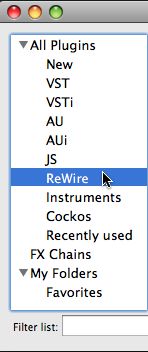
Then double-click Reason in the middle.

Reason will not launch on it's own. This may cause you to jolt a little in your chair the first time you launch Reason this way. Don't worry, the surprise will pass. Alright, we've seen the gimmick, let's see how it works in practice!
Step 2 - Setting Up Multiple Audio Channels from Reason to Reaper
Okay, here's the tricky part. Unfortunately, I have not seen one audio company, Cockos included, that makes setting up a Rewire session simple. Please follow along, because this can get a little hairy.
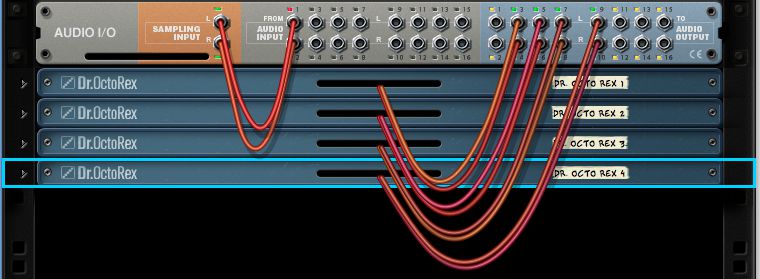
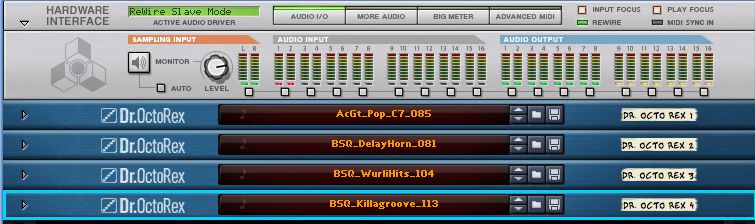
First, let's setup a few instruments in Reason, otherwise this will get really boring... And, inconclusive. I'm going to set up 4 Dr Octo Rex's that will be wired directly in to Reason's hardware interface. Make your rack look like this! Note the audio channels you are plugging in to on the hardware interface: 3/4-9/10
Next, I'll give them all different loops. I've included a screen shot here of the loops I've used from the factory sound bank, if you'd like to duplicate my exact settings. Or, just choose some loops. I made a point of actually choosing loops that reflect different instruments, you may just prefer drums.
So far, so good. Now, let's get each of these loops their own audio tracks in Reaper. Hit Command-Tab to get back over to Reaper. You'll notice that the FX dialog menu is still open. Close it, we'll come back to it in a bit.
Now, hold down the Command key and tap T 4 times to create 4 tracks.
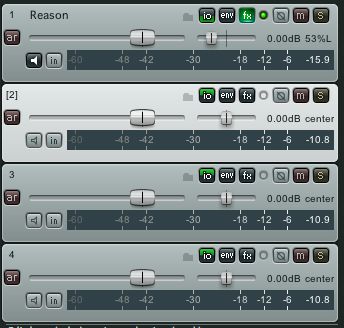
Next, click on the iO button on track 1 labeled Reason.

Step 3 - Setting Up Send Outputs in Reason
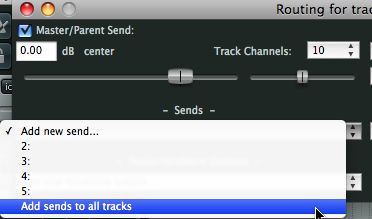
In the iO dialog menu, change the Track Channels to 10 and under the Sends section, select the Add Sends to All Tracks in the drop down menu.
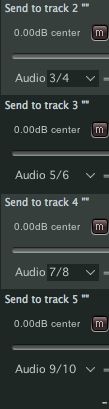
Change the Audio Input of Track 2, to 3/4.
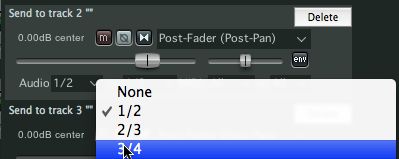
Repeat this last step till you iO section looks like below. Note: The audio in on each added channel matches what we set up in Reason, 3/4, 5/6, 7/8, 9/10.
Step 4 - Audio From Rewire
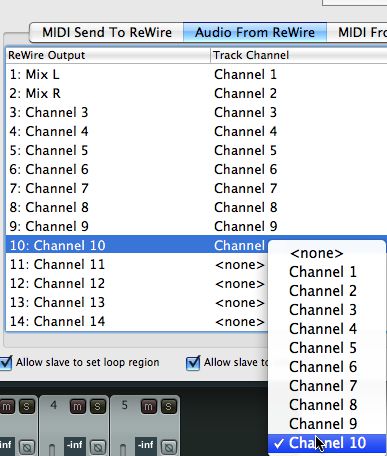
Finally, let's click on the FX button on track 1, labeled Reason. This will reopen the panel we used to launch Reason, now stating it's Rewire. Click on the 'Audio from Rewire tab.'

In the Track Channel area, assign Channel 3 to Channel 3, Channel 4 to 4, 5 to 6, etc. Till it looks like this:
Step 5 - Rewire in Action
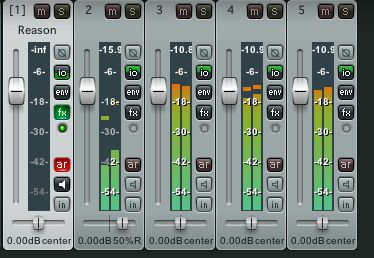
Now, when you press the space bar in Reaper, you will start all of the Dr. Octo Rex's, which will in turn be showing up with their own individual signals below. You can solo each Dr. Octo Rex input, add FX, whatever you want really.
It's also possible to set up MIDI going to each instrument within Reason from separate tracks within Reaper. This way, all of your MIDI is kept in Reaper, in case you ever want to switch to another VSTi, AU plug-in from Reason, etc, and keeps the project data all in one place. The Reaper Wiki gives a great walkthrough for this.
All in all, I will say that Reaper makes this process a little trickier than most DAWs. Thankfully, they do give a lot of ability in terms of setting up a template and template tracks. We'll explore this in the next tutorial.

Discussion
Want to join the discussion?
Create an account or login to get started!