
There’s nothing like chopping audio when it comes to creating gated stutter type effects. As long as there are no effects on the channel, when you cut sections from a piece of audio, there’s an immediate -stop- in the sound. This is very difficult to replicate on a software instrument track. One way you can, is by automating volume drops, but when you change your mind about the edit, it becomes a difficult fix. In this article, we’ll be looking at a quick method for creating gated stutters using a beat from the loop browser and Logic’s Noise Gate effect.
Step 1: Choose a Blue Loop
I’ll be gating a synth sound, but there’s no rules as to what sound you can process with this tip. If you’ll be following along, open an existing song you’d like to add the gated stutters to, then open the Loop Browser. Choose a blue loop that fits well with the groove of your song and drag it to a new empty track in the workspace.

Drag the loop of your choice to an empty track.
Step 2: Change the Loop’s Output to “No Output.”
From the loop’s output menu, choose “No Output.” We don’t actually want to hear this beat, we just want to use it as a source to trigger the noise gate. In the next step, we’ll be using this loop as a source for a side chain in the Noise Gate.

Select "No Output" from the output menu.
Remember that the side chain menu in Logic only allows you to select an audio track, a bus or an input as the source, this is why I chose a blue (audio) loop. I could have chosen a green loop too, but I would then have to output it to a bus from its track/channel after dragging it in.
Step 3: Put the Noise Gate on the Target Track
Now go back to the track you want to add the effect to, and choose the Noise Gate effect from the Audio FX’s Dynamics menu.

Insert the Noise Gate plug-in on the target track.
Step 4: Choose the loop as the Side Chain Source
In the top right corner of the Noise Gate, there’s a menu called “Side Chain.” If you don’t see it, pull on the bottom right corner of the Noise Gate window to make it larger. From the menu, select the audio track the loop you dragged in is on. Now slowly start to raise the Threshold parameter. As you do this, you’ll hear the noise “gated” stutters start to take effect and trigger with the same pattern as the beat you dragged in. The higher you raise the threshold the more choppy the effect becomes. As you raise the threshold on the Noise Gate, only the loudest sounds from the loop you chose will trigger the gate... the moment the volume of the loop dips below the threshold, you’ll hear silence.

Select the audio track from the side chain menu.
Step 5: Automate the Noise Gate’s Threshold
Now you might not want to always hear this gated stutter on the actual part. For example, you could use it sparingly at the ends of certain sections only. Press “A” to toggle track automation. Click the automation menu and select the Threshold parameter from the Noise Gate.

For even more fun, automate the Threshold parameter.
Draw in automation that is all the way down for the sections you want to play normally, and in the up position for when you want to kick in the gated stutter.

Draw in the automation.
| Tips: If the peaks in the drum loop you used are too short, you can adjust the Noise Gate’s Hold parameter to make each stutter a bit longer, you can also adjust the Release to fade the end of each stutter a bit. Try swapping out the source beat, or using multiple beats for a more varied gated stutter. Another cool thing to do is to place effects like reverb or delay after the Noise Gate… this way you’ll get the stuttered effect but with further processing after it. |
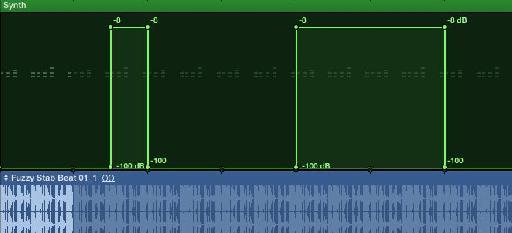
Here’s what I came up with (see picture above). The audio starts without the effect, the stutter starts at bar 4, turns back off, and then goes on again at bar 9. Thanks for reading!

Discussion
Want to join the discussion?
Create an account or login to get started!