
Ableton did something that very few other drum module/device developers have done. They made their 'Drum Rack' an instrument that is truly intuitive. Seriously, if you spend time with it, you'll find yourself instantly answering your own questions, along the lines of, “Does it do this...?”
But, with an Ableton instrument that is as expansive as the Drum Rack, it's really easy to end up loading it up to become a monster of DSP, if you're not careful.
Therefore, we thought it might be nice to give you a few tips for keeping your Drum Rack optimized! This goes not only for keeping your processing power low, but also for getting the best possible performance out of your budding Drum Rack in one song, and others. Let's go over a few concepts.
Step 1 - Map Accordingly
While you can map drums to any particular key within your Drum Rack, it would be wise to follow some of the mapping strategies that have been implemented over the years. Almost all third-party drum modules are mapped along the lines of General MIDI, which is an antiquated standard, but is still relevant. The main reason would be that many other modules are still mapped that way. What does this mean for you? Well, if you're using a drum module from a third party, and then decide that your Drum Rack is better, you want the keys that were programmed on the module before to match the mapping on your drum rack.

So, try getting in the habit of mapping your kick drum to C1, your snare drum to D1, and your hi-hat to F#1, and your open hi-hat to A#1. With just this simple mapping (not including your clap and rim shot), you'll have a Drum Rack that will instantly be useable, no matter where you throw it in.
Step 2 - Create a Good Initial Scene in your Kit
It's easy to forget that a drum set is just as much an environment, as it is an instrument, or set of instruments. The pieces of the kit are arranged in a way that's plausible and ergonomic for the drummer to actually be able to play all the different parts of the kit. And, if you listen to a drummer play a kit, you'll notice that the hi-hat is a little on the right, or left, the snare is almost in the middle, but not quite. The kick drum is dead center, and so on.

Therefore, if you get in to the habit of pre-panning your drum parts, before you save your drum rack preset, you'll be doing yourself a favor. This means that when you use the kit again, you'll have not only opened up a great set of drums. But, also a set that has clear boundaries and dimensions that you can easily incorporate into a mix.
Step 3 - Use Auxiliaries
The Ableton Live Drum Rack does not limit you in the amount of effects that you can incorporate into your kit. While this is great, it can cause you to build a kit that is hard on the processor. This is especially true if you're a reverb junkie.
Try this:
Open your Returns, and Sends...

And, then drag a Reverb into the Drag Effect Here section that appears underneath the Chain List...

Now, add on reverb where it's needed, off of one Reverb device!

With just this one reverb device, we now have reverb a plenty for every drum in your Drum Rack. This saves on processing power, and keeps you from having to set up a reverb every time you apply one to a drum.
And, remember, you can have more than one auxiliary effect!

Discussion
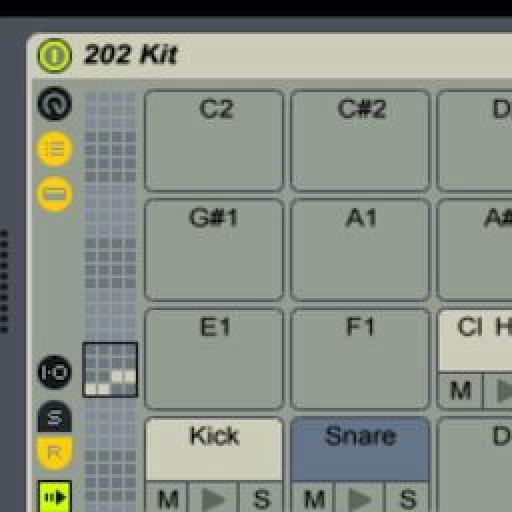
But in the 202kit example, this is not what it is shown and used: Kick:C1, SnDr:C#1, ClHH:F#1 and OpHH:G1
Would you like to confirm or explain, please ?
Thanks
Gil
Sorry for the confusion! And, thanks for giving me the opportunity to rectify any mistakes. Please go with the text, as opposed to the pictures, for the purposes of optimization. This, like the article proposes, will guarantee the kit will play right in place of most other drum kits and these mappings are based on General MIDI kits.
C1- Kick, D1-Snare, F#1- Cl Hihat, A#1- Open Hihat
Oh, and some other mappings that are really common-
C#1- Rim Shot, D#1- Hand Clap, E1- Snare 2, F, G, A,- Hi, Mid and Low toms.
Let me know if I can be of any further assistance!
G
I am new to this and love the articles.
I have recently been triggering the drum sounds from my Yamaha DTX kit and although most sounds were in the right places, one ore two were not.
E.g. The crash cymbal played open HH. So I easily swapped the sample to a crash, but when I hit the crash, the HH pedal still closes the sample ( as if it were a HH).
How do I change that?
I would appreciate any guidance for drummers using Live 9 that may be out there too,
Cheers,
Mark
Want to join the discussion?
Create an account or login to get started!