
EQs and a Compressors have a lot more in common than you might think. An EQ is basically a fixed (if it's not being automated) volume control for a specific frequency range, while a single band compressor controls volume as a blanket for a short period of time, that is determined by the various setting in the compressor. A Multi-band Compressor can be thought of as dynamic EQ. Since you can specify the frequency range, and set separate thresholds for each band... frequency specific volume reduction can be obtained.
While mixing, compression is used to contain loud transients in a particular sound. It helps you hold in only the higher volume areas, so they're closer in volume to the lower volume areas. When a signal reaches over the compressor's threshold, the volume overall is reduced for that point in time. Based on your compressor's Ratio, Attack and Release settings, you might be reducing more than you actually were aiming for.
So what if there's just one loud note or sound in a recording that you'd like to control? A good example of this would be drum loop with a loud hat sound, or an instrument recording with a single obnoxious note. In my example, I'll be containing a loud drum sound in a loop with Equalization, and not compression. Not everything needs to be compressed! Not only will your tracks sound more dynamic with simple EQ adjustments, they'll sound cleaner and more musical. In my example, the kick is actually louder than the sound I'd like to contain, so if I was only using a single band compressor, the kick would have been affected too. Keep in mind that the idea behind this article is certainly not meant to suggest replacing compression all together, but that in some situations, a simple EQ adjustment will do the trick.
Step 1 - Drag the Loop to the Arrange Window
In Logic, open the loop browser by hitting the O key on you're Mac's keyboard. Search for “2-Step Snapper Beat 01.” Drag the beat into the arrange window.

Step 2 - Open the EQ and Reset it
Double-click the track's Channel EQ that's already on the track. From the preset's menu on the plug-in itself, select “Reset Setting”, then click the Bypass button to un-bypass it.

Step 3 - Turn on the Analyzer
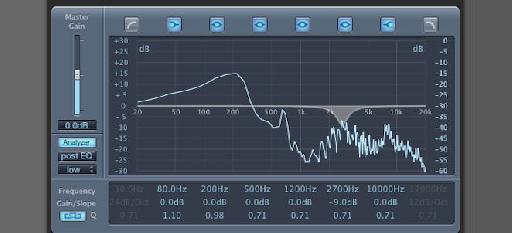
Now turn on the Analyzer and put it into “high” resolution mode. We'll be looking for the loud finger snap sound, and this will literally allow us to see it. Loop the beat so it keeps going while you make the adjustment. So there it is... I can see it right around 2700 Hz.

Step 4 - Lower the Volume on the Specific Sound
Adjust the band that is currently set to 3550 Hz to 2700 Hz. Now pull back the gain to taste (I set mine to about -9.0 db). Try bypassing the band (it's the third band from the right including the already bypassed Low Pass/High Cut) to hear the difference.

So there ya go! We lowered the volume of a single sound without effecting the entire part. I'll say it now, that this is an unusually clear example! When you're working with recorded synth, guitar, and other sounds in the real world, finding the specific frequency a sound/note is occupying will probably not be so easy. Sometimes the sound you're after will contain a much broader frequency space, so you might end up using more than one band to contain. Hope you enjoyed it!

Discussion
Want to join the discussion?
Create an account or login to get started!