
Sculpture is Logic's “Modeling” synth. It doesn't have traditional oscillators like your average subtractive synth, it uses a “model” of actual physical material like Nylon, Wood, Steel and Glass. Sculpture is an incredibly deep instrument, and way beyond the scope of a single article, so we'll only be looking at its somewhat underused Morph section. Even this section is quite feature packed, so think of this as an introduction to this section that will hopefully peak your interest.
Step 1 - Morph Pad
Sculpture's Morph sections consists of two main areas. The Morph Pad, and the Morph Envelope. First, let's take a look at the Pad. Select the “Bamboo Air Stings” preset, under “Modeled Pads”. Let's enable the Morph Pad by clicking the Pad button under the Mode menu. When you do this, a red dot will appear in the center of the pad. Behind the dot, is a target. This target, and the quarter targets in each corner are called morph points (5 in total). Each of these points are like snapshots of any parameter in Sculpture that can be morphed. Only orange colored parameters can be morphed.

Step 2 - Morph Points
Click into each point, then adjust the filter cut-off differently for each point. Now grab the red dot in the center, and move it around the morph pad. You should hear a constantly changing tone. Try enabling the Waveshaper now, and position the Input Scale and Variation knob differently for each point. The red morph dot can easily be recorded as standard logic automation data, but let's try recording it inside Sculpture instead.

Step 3 - Record the dot in the Morph Pad
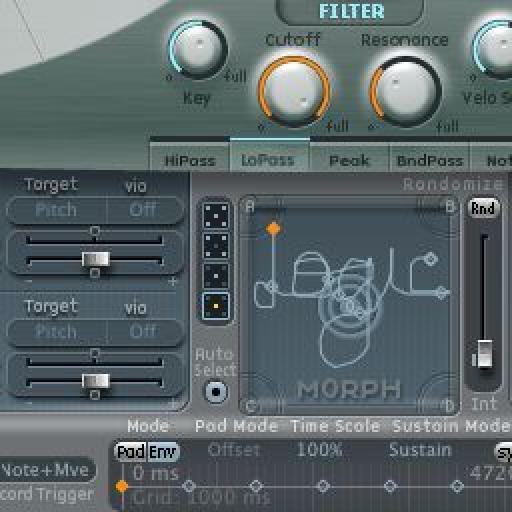
Let's record the movement of the Morph Pad now. Click the R button in the Record Trigger menu. Play some notes on your keyboard/controller and move the dot around the morph pad so it passes over the various morph points you set in step two. To stop the record process, stop playing all notes, then tap a single note on your controller. Hold some notes now and watch the Morph Pad... you'll not only see the path you drew in, but also a small red dot that follows it through. If you don't see the red dot, wait for the sound to come to a complete stop first (the string animation will stop moving).You may have noticed that it doesn't play back at the same speed you actually recorded it in as. This can be adjusted.

Step 4 - Morph Envelope
You can adjust the speed overall with the Time Scale function. The default percentage is 100%, and ranges from 10% to 1000%. The individual nodes all have independent lengths too. You can click and drag them left/right and the value in milliseconds will appear. If you click on the sync button on the top right corner of the envelope, you can adjust the individual nodes by tempo synchronized musical values.

Step 5 - Erase the recording and draw in manually
If you want to erase the recording you've made, right-click inside the envelope and select “clear morph envelope.” It will default to 4000 milliseconds or two musical bars of 8 quarter notes. This way you can manually click an envelope node, set its time by dragging left/right, set a position in the morph envelope, and repeat for the remaining nodes.

Step 6 - Tips
You can randomize each Morph Point! Click any of the 5 morph points (Not the envelope nodes), adjust the “Int” slider for the amount of randomization, then click the “Rnd” button. Right-click the “Rnd” button to exclude various morph-able parameters.

Discussion
Want to join the discussion?
Create an account or login to get started!