
You may have an instrument or vocal sounding exactly like you want it 95% of the time, but 5% of the time, it makes you cringe. You could go to the time and trouble of automating EQ for each irritating event, or you could use tools that mastering engineers routinely depend on: multi-band compressors, de-essers and side chain limiters.
These work like conventional compressor / limiters with two possible differences:
- The signal used to trigger the gain reduction is filtered and / or
- The resultant sound will be equalized ONLY above a certain dynamic threshold.
One of these tools is a de-esser, found in most basic plug-in collections. It was intended to reduce sibilance on vocals, but I use it for a variety of things, such as reducing mechanical noises and room bleed on instrumental tracks.
De-esser
The Waves Renaissance DeEsser is shown in figures 1 and 2 in two of four possible modes: split—shelving (fig. 1) and wideband—peaking (fig. 2). Let's say an acoustic bass player slaps his fingerboard too hard or there is a piano or trumpet in the same room bleeding into the bass mic. Set the frequency to 2 kHz in split and shelving mode. This “split” function permits high frequency audio above 2 kHz, such as fingerboard slaps and piano bleed to be limited allowing bass below 2 kHz to pass undisturbed. This allows the bass sound to be full spectrum when the bleed or slap is not present. If it's used to reduce bleed from high pitched instruments, the momentary high end loss on the bass will likely by masked by the recorded tracks of the brighter instruments anyway.

Figure 1 - Acoustic Bass fix: The Waves De-Esser shown in split—high shelving mode indicates any audio with high frequencies above 2 kHz and louder than the threshold setting will be attenuated according to the magenta shaded area. In other words, any loud sounds that are not in the bass range will be brought down while those below 2 kHz will always pass unaltered.
Try the setting in figure 2 for the finger squeaks on acoustic guitar (wide band and notch). Loop the section of the music where the finger squeak occurs, bring down the threshold and sweep the frequency. You will notice one spot will have maximum attenuation. Then, continue playing the song and back off the threshold until only the squeaks are limited.
 according to the magenta shaded area. It simply reduces the volume without changing its tonal quality.")
Figure 2 - Acoustic Guitar fix: The Waves De-Esser shown in wide band—notch mode indicates any audio in a narrow range around 3 kHz that exceeds the threshold setting will cause the full spectrum audio to be reduced (ducked) according to the magenta shaded area. It simply reduces the volume without changing its tonal quality.
By using wideband limiting, the fidelity of the guitar sound doesn't change unlike the bass example, it just reduces the volume of the guitar each time a squeak happens. Wide band is also the best mode for using the tool as a sibilance control; de-essing in split mode sounds like someone putting their hand over their mouth for every S consonant.
Multi-band Compression for Plosives
As we know, vocal problems aren't limited to sibilance; plosives like P popping are a nuisance. Use a multi-band compressor with all bands except the low-end shelf in bypass. Set the bandwidth so that everything below 150 Hz gets limited. This way you can keep the warm EQ your singer wants without your subwoofer coughing up a hairball every time the singer picks a peck of pickled peppers. Yes, you could go through the file and automate every P pop, but not if the client is watching the clock like a taximeter.
I have also had singers who have a lovely, breathy tone when they sing soft, but a piercing nasal ping when they hit hard. Darkening the voice would render the breathy parts dull, but there is a better way to do it. I can use one band to find the center of the nasal ping and then use the threshold and range tool to make the plug work only when that specific range dominates. See figure 3 for these examples.

Figure 3—Vocal fixes: The Waves C6 show three discrete solutions: Band 2 shows attenuation of all frequencies below 150 Hz, specifically to reduce “P” pop plosives or stand rumble from a foot tapping musician. Band 5 shows attenuation of frequencies above 6 kHz to control sibilance. Band 6 shows targeting and attenuating around 3.5 kHz to reduce a particularly shrill vocal passage.
Multi-Band Compression for Instruments
Multi-band compressors are very useful for instruments as well. Recently, I had a beautifully played violin solo that had some sonic flaws. I wanted it to have a warm rich sound overall, but to achieve that, the microphone placement caused one low note to resonate and speak louder than the others. At the same time, the solo soared into the upper octaves and got a little too biting and harsh. Two totally opposite problems can be solved using one dynamic EQ plug-in. By sweeping the dual parametric function in solo, I found the center of the overly resonant low note on the low band and the most strident part of the upper midrange with the high band. I then used the threshold and range controls to attenuate the two separate frequency ranges only when needed (see figure 4).

Figure 4—Violin fixes: The Waves C6 shows bands 1 and 6 are engaged with bands 2 through 5 in bypass. Band 1 is set to attenuate loud sounds at around 320 Hz while Band 6 will attenuate sounds at around 2.8 kHz. Notice each band has an “S” button that is a solo button. This permits you to put that one range in solo to hear exactly what range is being targeted and reduced, also shown in the magenta shaded area.
Gates & Expanders
These same principles also work for gates and expanders as well. A frequent application for gates is for the kick drum and tom channels. Without “tuning” the trigger key, you could be getting false dynamic triggers from the snare and cymbals. Use the key EQ to peak the resonant frequency of the toms or the kick to get fewer false triggers (see figure 5).

Figure 5 – Tom Gate: The Waves RChannel shows the audio EQ curve used for a tom and then a blue shaded bell curve under it. The shaded area represents the EQ used to filter the gate trigger so that it resonates around 600 Hz. Sound below this range would allow the kick drum and kick rumbling the toms to cause false triggers. High end from the snare and cymbals would cause the same problem. Notice the “EQ -> Comp” section, it shows it is operating for the gate in a bell curve centered at 625 Hz and if you select the LISTEN button, you can hear what the trigger filter sounds like to tune it.
Limiters
If you want to pump up the volume of your overall mix, please step away from the Maximizer. Simply crushing the dynamic peaks in order to raise the effective volume is a ham handed solution that generally sucks the life out of the mix. I have a Waves L-16 multi-band peak limiter at the end of my stereo buss and I seldom exceed 2–3 dB of gain reduction. It's because I try to use more musical methods of increasing volume and track density, rather than just chopping off the tops of peak waveforms like mowing the lawn.
Much of what people like about analog tape is how it behaves when it is hit hard. As tape approaches the saturation point, it compresses the loudest dynamics in a non-linear way, meaning the high frequencies are absorbed first. The end result is the hard you hit tape, the warmer it gets, which prevents the sound from getting harsh as it gets louder.

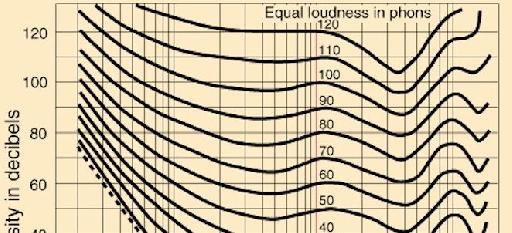
Figure 6 – The Fletcher-Munson Curve: If you are seeing this for the first time, look it up on-line and commit its effects to memory. I could write a whole article on just this one graphic. It is vital that every audio engineer knows what it means and uses daily, especially when it comes to monitoring volume. In this context, it is meant to show that the human ear perceives the 3–4 kHz as slightly louder than others and this phenomenon increases with volume.
If you look at the Fletcher Munson loudness curve (figure 6), you will notice that our own ears become more responsive to high frequencies at 3–4 kHz as volume increases. This makes the non-linear compression both musical and desirable as it inverts the non-linear characteristics of our own hearing.
So if you own a multi-band compressor, you don't need a tape simulator to get near this effect. Find the frequencies in your mix that get harsh as the song gets louder and adjust more gain reduction in that range. This will give you an “analog” effect. For instance, you may also find that the musical arrangement has more space and warmth in the verse and too many sibilant keyboards and power chord guitars in the chorus, so the overall spectral balance of the song is too schizophrenic. Using a blanket EQ would make one section suffer over the other. Using the “analog” approach will leave the verse untouched, but will smooth out the harshness of the chorus without sapping its punch and drive.

Discussion
Want to join the discussion?
Create an account or login to get started!