
In my humble opinion, markers are the single best way to navigate through a project with either the sequencer running or stopped. Creating, editing them, and making them visually appealing is a breeze and as always with Logic Pro, there are a number of ways to create and manipulate them
On your mark, get set, go!
In Picture 1, you can see that I have opened a short instrumental song I wrote.

Pic 1: A short instrumental song I wrote.
Although it is short, nonetheless it has a distinct structure and I may want to expand on it later. Markers will be the perfect way to navigate through it as I compose, arrange, and mix. There is an eight bar intro, followed by a verse beginning at bar 9; then a bridge at bar 23; and another verse at bar 32; and finally, an outro beginning at bar 42. I want to create markers for each.
Customizing the Toolbar
One way is to add the functionality to the Toolbar, as the choices in there are Logic Pro preferences and thus will be available in past, present, and future projects. If you Control-click in the Toolbar, you will see that you can choose Customize Toolbar, as I have in Pic 2.

Pic 2: The Customize Toolbar option.
This brings up a dialog box with all the buttons I can have in the Toolbar simply by dragging them into the blank area. In Pic 3, notice the two buttons that concern marker creation and navigation that I have highlighted. In Pic 4, the buttons are in the Toolbar after I dragged them in and clicked Done.

Pic 3: The Toolbar's marker buttons.

Pic 4: You can customize the Toolbar by dragging the buttons.
Creating Markers
Now I can create or delete markers by a simple mouse click on the Create Marker button either by using the Go To Position key command or by grabbing the Playhead to go to the desired bar. You can also create markers on the fly while the sequencer is running by clicking on the button when the playhead reaches the appropriate bar. You need not worry about being very precise as to when you click as with the Toolbar's Create Marker button, it will round the marker's position to the downbeat of the measure. This is usually a good thing for song projects, but less so for film/TV cues. More on that later...
In Pic 5, you can see that I have created my markers. I can start the sequencer running and navigate through my project in real time or while stopped by clicking on either the Previous or Next Marker button in the Toolbar.

Pic 5: All markers are created.
They look and are named nothing like I will ultimately want them to be, but for now, I will focus on alternative methods for creating them.
The Marker Global Track
If you open the disclosure triangle for the Global Tracks at the top of the Arrange window's track list, you will see that a Marker Global Track is part of the default set. As you can see in Pic 6, if you open the disclosure triangle for the Marker track, the markers are bigger and some other options become available.

Pic 6: More options are available in the Marker Global Track.
There is a Create button, which will create a marker at whatever position the Playhead is at. The "From Regions" button will create markers at the positions of all currently selected regions WITHOUT rounding the markers off to the downbeat. There is also an Alternative drop-down menu. As you can see in Pic 7, holding down the mouse on “1” brings up 9 alternative global marker tracks you can create without ever losing your original one.

Pic 7: This drop-down menu lets you switch between marker alternatives.
The Marker track is very handy for editing and moving markers, regardless of the method used to create them. You can simply drag them to a new Playhead position, as you see me doing in Pic 8. Notice that the duration of the other markers that are affected by the move will automatically adjust.

Pic 8: Moving markers in the Marker track.
If I decide to delete a marker either from the Toolbar or by selecting it in the Marker track and hitting Delete on my computer keyboard, as I have done in Pic 9 with Marker 4, Marker 3 will adjust in duration to continue until the next marker. Previously it was named Marker 5 but now it has automatically renamed itself Marker 4, as Marker 4 was deleted.

Pic 9: Deleting a marker will adjust the duration of the preceding marker.
Renaming Markers
It is time to start making this markers more what we want. I double-click on the first marker (or use the Text tool) and I am given a text field to type in a new name for Marker 1, in this case, Intro (Pic 10). I rename all the others and the result is as I want it to be (Pic 11).

Pic 10: Double-click a marker to rename it.

Pic 11: All markers are now renamed.
Coloring markers
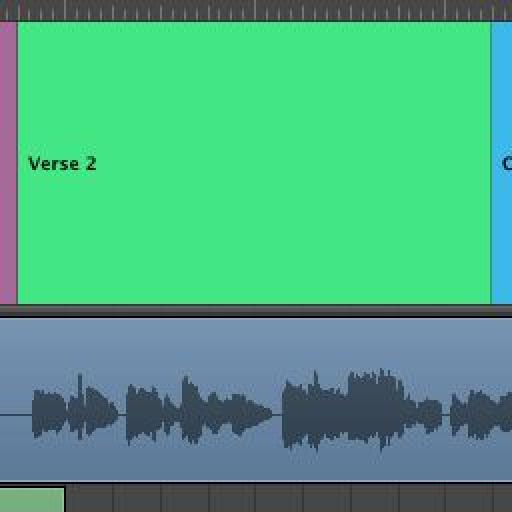
But man, these things do not pop very much visually do they? It is time to give them some color. Pressing Option-C opens the Color Palette floating window. Now it is simply a matter of selecting the marker in the Marker track and clicking on a color in the palette. Don't be alarmed that it does not seem to colorize it. If you deselect the marker, you will see that it has. In Pic 12, I have assigned the same color to the intro and outro, another to the two verses, and third to the bridge.

Pic 12: Give your markers some color with the Color Palette.
I then close the Color Palette and close the Global tracks by pressing G, and now my markers are in the area directly below the bar numbers (Pic 13).
NOTE: With most color choices, the text will be black but with certain color choices, the text will be white, as apparently Apple has decided it is more visible that way. There is no way to override Apple's choices.

Pic 13: All markers are colored.
Changing fonts?
Sweet! However, being a picky guy who is also blind as a bat, I cannot help but wish the text were bigger or maybe a different font. Surely I can do this, right? Sadly, no. The font in the Marker track is the font in the Marker track.
You can however, resize the Marker track itself. If you hold the mouse down on the lower border of it, you can drag it down to resize it, as is visible here in Pic 14.

Pic 14: It's possible to resize the Marker track.
What if I want more text in my marker, for instance, a second paragraph with a tempo description like Ad Lib? Under the Options window, navigate to Marker > Open Marker Text (or Open Marker List to see them all) and see what appears.

Pic 15: The Marker > Open Marker Text option.
I click on the word “Intro”” or choose the Pencil Tool, and hit return to go to the next line and type in Ad Lib. That is now what you see in the Marker track although the color is different for the second paragraph and unfortunately there is no way to change that (Pic 16).

Pic 16: The Marker Text window.
Hey, Jay, wait a minute, I see a letter A button. In most Mac apps, that leads to font choices. Maybe you're wrong! OK, I highlight the text and click the A button and a window appears with font choices. I reassign it to Verdana 18 and this floating Marker List, (and in the full Marker List in the Lists area) I see the font choice reflected... but not in the Marker Global Track. Gee, Jay, sorry, how could I have doubted you!

Pic 17: Changing the font in the Marker Text window is not reflected in the Marker Global Track.
Look Ma, no mouse!
So clearly, while the Marker track is powerful, it does have its limitations. Nonetheless, it is a great way to get around your project.
Those of you who either know me or have read my articles know that my motto is “never do with a mouse what you can do with keystrokes” and most of what we have done so far has involved a lot of mousing around. Let's explore our key command options for creating and deleting markers and navigating to and from them.
Press Option-K to open your key commands and in the search field, type the word marker, as I have done in Pic 18.

Pic 18: Many key commands are available for markers.
Notice the full array of key commands available for marker creation, deletion, and navigation, including the highlighted Create Marker without rounding. This one is vitally important for film composers who want to use markers at hit points. Personally, I use Create Marker, Create Marker without rounding, Go to Previous Marker and Go To Next Marker so often that I have assigned them to function keys on my Mac keyboard. In my opinion, it is by far the most efficient method, but hey, if you like using a mouse or a track pad for these tasks better, well, horses for courses, as they say!

Discussion
Want to join the discussion?
Create an account or login to get started!