
I'm sure you have all read a few articles on how to go about creating side-chaining effects. You can get some great results, but what is more interesting is when you create these side-chains edits manually. This way you have more control over the effect, but it does require a bit more work. I find that more interesting results can be had with this technique. I will take you through the steps on how to achieve this in Logic and Ableton, but the same principles can be applied in other DAWs as well.
Step 1 – Creating Manual Side-Chaining in Logic
I have written a simple drum loop using Ultrabeat. This is what the loop sounds like:
And here is the MIDI note pattern of the beat.

Next, I am going to create a new instance of the ES2 Instrument. I have called up the 'Dark Pad 2' preset and I have tweaked it slightly as shown below:

I have drawn in a simple MIDI pattern on the ES2 for demonstration purposes.

Long sustained chord notes will work best for this effect.
Here is what the synth pad sounds like before I begin the manual side-chaining editing process.
Next I'll discuss how to achieve this manual side-chaining effect with Automation.
Step 2 – Making use of Automation in Logic
Grab the Marquee Tool from Logic's Toolbar (Esc-E)

You can also assign it as your secondary tool, so that when you hold down Command, it will switch to this tool. This will make the automation editing process faster.
Press A to view your Automation lane (or choose View > Track Automation).
We are going to be working on the volume automation of the ES2, so make sure that the Volume lane is chosen for automation on the ES2. With the Marquee tool we are going to draw in regions on the ES2 where the Kick hits. If you need to zoom in a bit so that you can see where each Kick sits on the Ultrabeat MIDI region. So using the Marquee Tool draw in regions at the same point but on the ES2 channel. This will create 4 Node points. You can then use the pointer tool (Esc-1) to drag the node points. I have dragged these regions all the way down, as seen below:

If you listen to this it will sound a bit drastic and sudden. Not very musical. This is where a creative approach comes in. Start dragging these node points around, to create a varied side-chaining or ducking effect. I find that its best to drag the first node point up slightly so that it is not all the way to zero. Then with the next point drag this up slightly higher. This will create a nice smoother ducking effect.
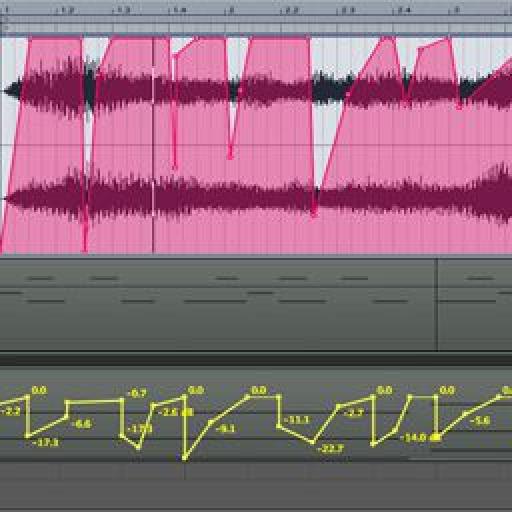
Where the magic comes in is that each region can be different, as you can drag the node points to where you desire, therefore creating a different ducking effect at each kick hit. Here is what I automated in:

As you can see, you can dial in ducking volume automation that would not be as easy to do with a compressor with a side-chain feature. With this method you have much more control over the side-chaining effect. It does take a bit more work from the automation side, but you can get much better results if care is spent dialing in specific automation.
Here is what my synth sounds like after the automation:
And here is what it sounds like together with the drum loop:
Step 3 – Creating Manual Side-Chaining in Ableton
You can achieve the same results with Ableton. I will show you how to use Ableton's Envelope Editor to make the same manual volume automation on Ableton's audio clips. I have exported out the same drum loop from Logic for demonstration purposes. I exported the Kick, Snare, Hats and Synth out separately from Logic and have placed these loops all on their own separate channels.

Next I want to move onto the Envelopes Editor view of the Synth clip. Double-click on the Synth audio clip to bring up the audio window on the bottom. Next click on the E to bring up Ableton's Audio Editor window.

Step 4 – Using Events to draw in these Side-Chain Sounds.
On the Envelopes section make sure Mixer is chosen and under that Track Volume is chosen.

Do the same as we did for Logic. Check where the Kicks reside on the Kick audio channel, then draw in some nodes at the same area on the Synth Envelopes section. You can also do the same as I did in Logic and draw in some interesting Volume curves to create the ducking volume effect on the Synth line.
Take a look at the automation that I wrote in for the Synth Track Volume Envelope.

Take a listen to the Side-chain effect I created with Ableton.
Conclusion
As you can see you can create some interesting manual side-chaining effects with automation in Logic and Ableton. You have more control over the effect as opposed to a compressor plugin with a side-chain setting.
So get creative with your manual side-chaining effects, and bring them into your future productions. You can use these tricks in other elements in your productions. For example, when your vocal comes in you can automate a ducking effect on your lead synth lines. Or you can create manual side-chain effects on your reverb so that it feels like the reverb has a 'pumping-effect' on some sections. Try it out, and it may spark different ideas in your productions and arrangements.
Discussion
Want to join the discussion?
Create an account or login to get started!