
Omnisphere is the dreamchild of Spectrasonics and the wonderful Eric Persing. On the surface, Omnisphere seems like another wonderful sounding software instrument with a great library of sounds, great effects, and a sweet synth engine. The interface is uncluttered and easy to navigate compared to other synths, but under the surface... lies a beast.
Some people are happy with Omnisphere's top-level user interface. 'Oh, I have an Amp, Filter, and Mod envelope' they say. 'Oh how quaint, I can route the ModWheel to and LFO's depth' they say. 'There are 6 LFOs? Wow!'
Then some people look a little closer and see that next to the Envelopes, Modulation and LFO areas, a curious little magnifying glass beckons. Innocently enough, they click on the little symbol, and the revelation within turns their minds to a gloopy jelly. Omnisphere has some serious modulation going on.
A quick recap on modulation. Modulation is when we assign an envelope, LFO, controller, or other modulation source to control a parameter of a synthesizer. For instance, if we have a sine wave LFO assigned to control a pan knob, we'll hear the sound move between the left and right channel according to the speed and shape of the LFO assigned.
For this article—which I could easily stretch into a book, but will hold back—we are going to explore some of the more advanced LFO and Envelope types, and then assign them in the Mod Matrix! Mind melting fun.
Step 1 - Get to Know the Modulation Matrix
The Modulation Matrix can be found by heading over to the Modulation section of the Omnishpere Edit window and selecting the magnifying glass. When clicked, the magnifying glass will reveal the following screen:

Do not be afraid. This screen is going to give us the power we need to route any modulation source to any target. The targets will be any parameter of Omnisphere's Oscillator, Filter, or Amp sections. In addition, we can also assign sources to control parameters of the LFOs, Envelopes, and Morphing inputs as well! More about that later...
Step 2 - Assign an LFO to Panning
Let's start simple. To assign an LFO to modulate the panning of the amplifier, Simply choose 'LFO 1' from the source area, and then assign Amp > Pan in the target area.

Now we have LFO 1 controlling panning, but all the time. This could be annoying, and make us a little seasick after a while of listening. What would be good is to use something like the ModWheel on our controller to control how much the LFO is going to affect panning.
This is called 'Second Order Modulation'. Congrats. You are now officially a sound junkie. Second Order Modulation is simply a modulation source controlling the parameters of another modulation source.
To create second order modulation where the ModWheel is controlling the depth of the LFO, assign 'Wheel' as a source, and 'LFO1 depth' as the target.
We can still hear the LFO altering our panning, but less... and when we turn the wheel up, the panning is accentuated. To have the LFO depth completely zeroed out when the ModWheel is down, simply turn the target parameter slider to the left until it reads '0'.
We can hear now that the panning isn't as extreme as it was before... try altering the 'Depth' parameter of the Wheel in the Mod Matrix. Now we have the LFO back to its full range of motion.
Step 2 - Getting to know your LFOs
To get out of the Mod Matrix, simply click the magnifying glass next to 'Mod Matrix Zoom' again. Head over to the LFO section, and make sure LFO 1 is selected.
To change the LFO waveshape, simply click on the up and down arrows next to the LFO wave. Change it to a sine wave shape:

Now check out the little blue '+' symbol above the arrows we were just clicking. When lit, this means the LFO is moving in only a positive direction, in the case of panning, we would be getting center to right. When we turn this parameter off, the sound will now pan in both a positive and negative direction, panning through the full stereo field. Have a look in the Modulation area, and we can see how the LFO's range changes.
Below the waveform, we can see that the LFO is set to 'Legato'. This means the LFO will only retrigger if we lift our finger off of a note and strike a new note. If we hold a note down, and move to another note while it is held, the LFO will simply continue. There are 3 other modes:
- Free—The LFO runs without retriggering
- Note—The LFO restarts on every new note pressed
- Song Position—When the DAW song starts, so does the LFO
When the LFO is set to 'SYNC', it will follow the tempo of our song.
Delay will delay the oncoming LFO, Rate is for the speed, and Depth is basically the 'how much?' knob.
Okay. Now for some envelope action.
Step 3 - Get to Know Your Envelopes
The envelope that will always be assigned to a synth is the Amplitude Envelope. Let's head over there now.
How simple! ASDR... Attack, Sustain, Decay and Release. These are the most popular stages of an envelope.
- Attack - How long the envelope takes to come on
- Decay - How long it takes to reach the Sustain stage
- Sustain - What value the Envelope will hold at while a MIDI key is pressed
- Release - How long it takes for the envelope to return to a zero state
Now, let's look under the hood. Click that little magnifying glass next to the 'Envelopes' sign and...

Now we're talking. Let's add some points on the line by or right-clicking in the envelope line area, and mess around a bit. Notice that when right-clicking we get a list of some interesting preset line shapes:

Try adding some of these types and listen to what they do. Alter the curve between points by simply grabbing the line between the dots, and pull up or down. Now we can create whatever shape of envelope we like
Step 4 - Use Preset Envelope Shapes
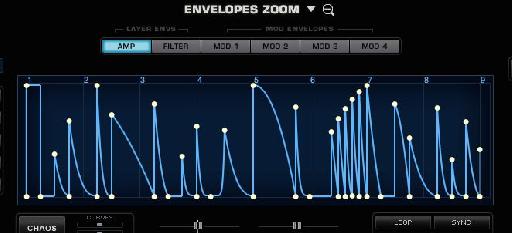
Now for the crazy stuff. Click and hold on the disclosure triangle next to 'Envelopes Zoom' and choose Rhythmic Envelopes > Fancy Groove. Check out that crazy envelope!

Hold down a note and listen to it. Interesting, huh? Now let's sync the envelope to our song by selecting the 'Sync' button on the lower right. When recording in a DAW, the envelope will now sync to the song. As you can imagine, this makes for some very interesting possibilities if we were to head back over to the Mod Matrix!
Step 5 - Go Nuts!
With these tools, go back over to that Mod Matrix and GO CRAZY! We have 6 LFOs and 6 Envelopes, for goodness sakes. Imagine the possibilities!

Discussion
Want to join the discussion?
Create an account or login to get started!