
Bitwig has introduced some interesting MIDI functionality that you may not have been aware of. One of the new features is Note Expression. This allows you to go deeper into your MIDI by editing expression values on a per note basis, giving you more control over your synth sounds on a micro level. Let's explore this feature and see where it comes in handy.
Step 1 '" Adding a Bitwig Instrument
The Note Expression feature works with Bitwig's bundled instruments. With this feature, you can change the per note expression of the Velocity, Gain, Pan, and Timbre of the MIDI notes. First you need to add a Bitwig Instrument to a track; I'm going to demonstrate this with the Polysynth. You can simply drag the Polysynth from the Browser onto an Instrument track and it'll be added. Now record or program in a simple MIDI pattern. Use some chords, because then you'll see how handy this note expression really is.

Step 2 '" Viewing the Note Expressions
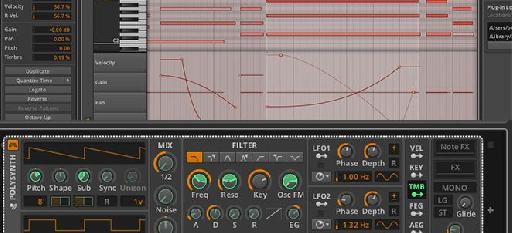
Now double-click the MIDI clip to open up the Note editor, then click on the Key icon at the bottom left to view the Note Expression lanes. You can see that there is a lane for the Velocity, Gain, Pan and Timbre. Now let's look at how this note expression feature differs from the standard automation parameters, using the Pan lane as an example. Select a note from one of the chords you played, then navigate to the note inspector on the left and change the Pan to about 60%. This pans the note to the right. Next, select another note in the chord and pan it to the left by changing the Note Inspector Pan value to -60%. If you played in a triad, leave the third note of the chord in the center. Now play back and hear how these notes pan to the side just for this chord.

How easy is that? To do this with automation you would have to do a lot more steps, plus you'd probably have to incorporate duplicates of the instrument to be able to do this individual note panning. That's the beauty of per note expression, it's quick and easy to edit. You can go in and do the same type of per note edits with the Velocity and Gain. Test these out and see how they can change up your instrument sounds.
Step 3 '" Adding Timbre Modulation
Now let's try an interesting edit'"changing the expression values of the Timbre. To do this you first need to assign a Timbre modulation to a parameter on a Bitwig instrument. I have the Polysynth inserted on my instrument track. On the Polysynth you'll see the TMB modulator, which is the Timbre modulation assigner. Click on this, and it'll start flashing green indicating that you can now assign this to a parameter. How about modulating the Filter Cutoff frequency. When you hover over the Filter Frequency Cutoff parameter, you'll see a double-headed green arrow. Drag either up or down to create a Timbre modulation range. Now you have set the Timbre modulation for the instrument.

Step 4 '" Per Note Timbre Modulation
Go back to the Note Editor, and choose the Timbre lane of the Note Expression. Choose some MIDI notes then drag either up or down to change the timbre. You can also create note points within this note expression lane by clicking in the lane. Try this out, click on the lane to create a new node, and now drag this node in the opposite direction creating either an inclining or declining ramp in the timbre modulation. Jump back to the Polysynth GUI, and play back to listen to your timbre modulation edit. See how the Cutoff Frequency parameter is being modulated by the note expression editing. Also listen out for how the Timbre is modulating the Cutoff Frequency. How cool is that!

You can take this a step further and apply different timbre modulation to each note, especially in notes within a chord. Give each node a different timbre modulation amount. Draw in different nodes, and curve shapes within these nodes. If you hover over a line between 2 nodes and hold down Option (Mac) or Alt (PC) and drag either up or down, you'll see how it reshapes the straight line into a curved shape. See how much control you have within the Note Editor with this note expression? Much more control than if you had to use MIDI automation.

Try this note expression editing out with some of the other Bitwig Instruments. Also try modulating the timbre of other parameters within these instruments.
Step 5 '" Modulation Multiple Parameters
Let's add another tip to your toolbox with the Note Expression. You can even modulate the timbre of more than one parameter at a time. Choose an instrument, then select the TMB modulator. Now, while this is still flashing green, click on a parameter and draw in the range. Then select another parameter and draw in the range in the opposite direction. So if you dragged up on the previous parameter, drag down on this one. You can even go further and select some other parameters if you want to. When you're done choosing your parameters click on the TMB modulator button to end the assigning. Go into the Note Editor and create some note expression edits. Jump back to the instrument GUI, and when you play back see how all the parameters are being modulated by the note expressions. It's crazy how much manipulation you can do on a per note level.

Conclusion
That's how to get deeper into your Bitwig Instruments and MIDI on a per note editing level. Editing these micro note expressions can really give your music productions more detail and add extra textures to your sound design. For further Bitwig Studio tips and techniques, check out the following tutorials:
https://www.askvideo.com/course/bitwig-studio-101-creating-your-1st-bitwig-project
https://www.askvideo.com/course/bitwig-studio-102-effects-and-processing-explored
https://www.askvideo.com/course/bitwig-studio-103-instruments-and-midi-explored
Discussion
Want to join the discussion?
Create an account or login to get started!