
NI's Monark is capable of creating everything from mellow lead tones to full on distorted bass sounds. We go for the latter and use every tool available to make something pretty full on.
Step 1 - Setting Up
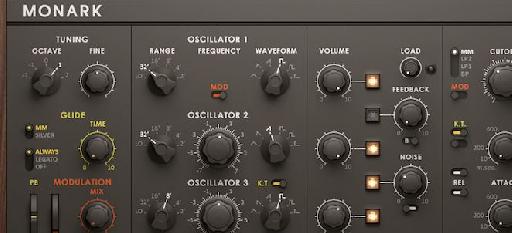
For those of you who are new to Monark, it's essentially a custom ensemble for Reaktor. What this means is that you have to launch Reaktor to get to the synth. Once loaded, the interface is much like any other software instrument, but there is that little bit of legwork to do in order to get to the virtual analog goodness.

Monark initialized and loaded into Reaktor.
Once loaded up, the best thing to do is to choose an initialized patch from the included library. Once this has been done, you should be left with a very minimal patch consisting of a single oscillator and zero modulation, etc.

A basic sequence loaded.
The single oscillator sequence:
Here I have created a straight up pattern and coupled it with some house drums. As you can hear, the sequence works but it needs spicing up a touch. Let's look at how we can take our bassline from zero to hero in a few easy steps.
Step 2 - Simple Layered Oscillators
As our initialized patch featured a single oscillator, the first thing I did here was to layer up. Sometimes a single oscillator is sufficient and plenty of great patches can be born out of simplicity, but here I wanted to really fatten things up, so using multiple oscillators was a no-brainer.

Some oscillator layering.
The first oscillator is actually a square wave so I thought a contrasting saw wave would work pretty well on this occasion. The real trick to creating a richer sonic texture is to produce this contrast through varied oscillator types and settings.
De-tuned layered oscillators:
Apart from the differing waveforms used here, I also used detuning to create width. This is a classic way to fatten up a patch and literally takes seconds. Shift the fine tune of your secondary oscillator and you instantly have a more 'impressive' patch on your hands.
Step 3 - Decorative Oscillators And Noise
With the core of your sound in place, you can now afford to add some more decorative sound sources to the mix. Often a sub oscillator is added at this point and can be the perfect way to add extra depth and low end to a patch. I was actually pretty happy with the low frequency content at this point so I decided to take a totally different route.
I added a third oscillator that is actually a couple of octaves above the main two waveforms and also detuned this. The final effect is pretty rich and works well with this particular sequence. To add a little more edge, some white noise was also added to the mix.

Noise and a third oscillator are added.
The Monark allows you to choose either white or pink noise via a simple two-way switch. Most of the controls on the Monark are this easy, the whole interface opts of simplicity over menus, multi function controls and multiple screens. Everything really is at your fingertips here.
Step 4 - Filters And Envelopes
Monark really shines when it comes to filters. There are a few choices here including band pass, high pass, low pass and an MM mode. The final choice is obviously a Moog filter emulation and that's what I opted for in my patch.
Try cranking the resonance in this mode and you'll get some great harmonic and saturation-based effects. Once engaged, your loaded filter can be tweaked using the envelope section.
The filter and envelopes are tweaked.
The patch with filter and envelope alternations:
There are two envelopes in total, one for the filter and one for the amplitude. I pretty much matched both to produce a snappier version of our bass patch. Short decays and releases produce more impact and add some serious acid squelch to a driven resonant filter.
Step 5 - Slide And Glide
With our patch now starting to take shape, we can think about adding further decorative elements. Glide is always a sure way of making things a little more interesting, especially when using tightly programmed parts like this.

Glide modes chosen and pattern tweaked!
The glide effects in action:
I used the Legato mode coupled with the 'Silver' option. This emulated the classic 303-style glide and is activated by programming overlapping notes. You can see from the shot above that I have deliberately created a few notes that occupy the same space. Using this sort of mode gives you great control over exactly where the glide occurs.
Step 6 - Using The Load And Feedback Circuits
Just like the original Minimoog, Monark has some great tools for adding grit and attitude to your sounds. There are two ways of approaching sonic destruction in Monark: you can utilize the Load control or the Feedback circuit.
The Load control is perhaps the more predictable of the two effects and induces a warm, analog style saturation. In the clips below you can hear it at both moderate and near on maximum settings. I've found that this can be pushed more or less to the limit without stealing any dynamics or low end.

Load at medium.
The sequence with a low Load setting:

The load setting at high.
The sequence with a higher Load setting:
On the other end of the spectrum, there is the Feedback circuit. This faithfully models the method of routing audio from the headphone output back into the input of an original Minimoog. There are two flavors of feedback here but whichever you choose you can guarantee pretty diverse, intense effects.

The feedback circuit.
The feedback effect is added:
You can hear a healthy amount of feedback in my audio clip below. It's worth mentioning here that this effect can destroy the effect of any filtering you apply. So resonance, modulation and automated sweeps may sound completely different by the time you're done!
Step 7 - Automation And Effects
As a final touch here, I added some automation to the filter cutoff. This makes the whole pattern more dynamic and adds some much needed movement. As the filter opens, the release in both envelopes also becomes much more apparent.

Automation is added to the filter cutoff.
The sequence with automation in place:

Some delay effects are added.
The filtered delay effect in the mix:
On top of this, some simple filtered delay was added using a third-party delay plug-in. In around five or six moves we have gone from a single oscillator patch to a much more interesting, dynamic electro bass patch.
And the final sound in isolation:

Discussion
Want to join the discussion?
Create an account or login to get started!