
Ultrabeat ist eine Drum-Synthesizer und Sample-Player, die mit Logic Express und Logic Pro 9 geliefert wird. Es kommt mit sehr eigenen Step Sequencer, die es Ihnen ermöglicht, Muster für jede einzelne davon sind 25 Klänge (auch bekannt als Stimmen) zu erstellen ist. Jede Voice kann eine Probe oder ein synthetisches Klang selbst (oder natürlich auf einer der vielen Presets basieren) optimiert werden.
Eine oft gestellte Frage ist, wie ein Effekt-Plug-in zu einer Stimme nur hinzufügen .... Zum Beispiel können Sie Hall auf die Snare nur hinzufügen, und fügen Sie einen Kompressor nur zum Kick oder fügen Sie etwas Verzögerung ausschließlich auf die hallo-Hüte. Natürlich, wenn Sie das Muster in Logic ziehen Arrangierbereich, sind alle Töne auf einer Spur zugeordnet zu einem Channel-Strip = eine Reihe von Effekten für die Channel-Strip. In diesem Quick Tip wir darauf konzentrieren, wie die Verarbeitung einer einzelnen Stimme hinzufügen von Ultrabeat in Logic.
ACHTUNG: Wenn Sie wissen, wie Sie dies tun, Ihre Drum-Patterns wird nie wieder dasselbe sein ...
Schritt 1 - Legen Sie eine Multi-Output Instanz
Erstellen Sie eine neue Software-Instrument-Spur. Jetzt müssen wir eine Multi-Output Instanz Ultrabeat auf ihn einzufügen. Dadurch werden Sie auf Route Stimmen aus Ultrabeat eigene separate Ausgänge ermöglichen.
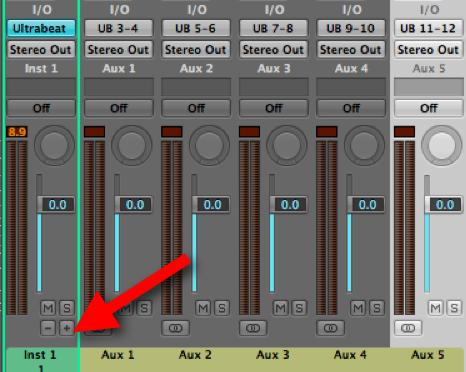
Klicken und halten Sie auf dem Gipfel I / O-Slot und aus dem Menü wählen Ultrabeat
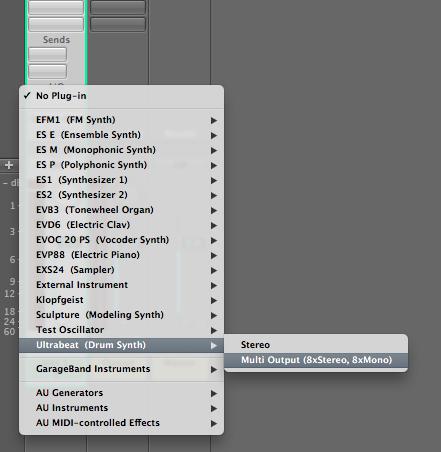
In Ultrabeat, wählen Sie eine voreingestellte und das Muster der Wahl. Ich werde die Standard-Voreinstellung und Muster verwenden.
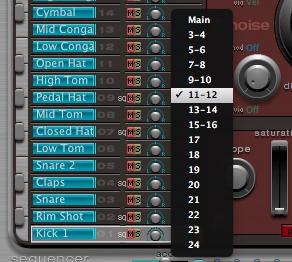
Step 2 - Zuweisen von Ausgängen
Um verschiedene Effekte auf verschiedene Stimmen hinzuzufügen, müssen diese Stimmen sich auf ihre eigenen Kanalzug werden. In der Tat das Signal von uns ausgewählten Stimmen werden geführt, um Aux Channel-Strips zu trennen.
Um dies für die wir brauchen, um auf Ultrabeat Voice-Zuordnung Bereich (links) zu konzentrieren. Hier können Sie Mute, Solo, ändern Sie die Ebenen und Schwenk-und Route zu jeder Stimme eine eigene Ausgabe. Sie werden bemerken, dass jede Stimme ist derzeit auf der Main-Ausgang (oder das Software-Instrument-Channel-Strip) eingestellt.
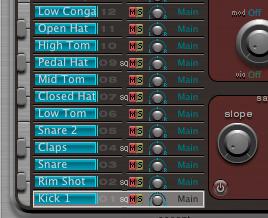
Ich werde Kick 1, Rim Shot, Claps, Closed Hat und Pedal Hat (die alle Sequenzen enthalten) zu Aux-Kanäle trennen, damit wir sie getrennt zu verarbeiten zuweisen können.
Klicken Sie auf das Wort Main (Output-Bereich) für eine Stimme und aus dem Dropdown-Menü die von Ihnen ausgewählten Stimme (n), ihre eigene Leistung.
Beachten Sie, dass Sie 8 Stereo-(einschließlich der Main-Ausgang) und 8 Mono-Ausgänge haben.
Schritt 3 - Erstellen von Auxiliary-Kanäle
Öffnen Sie Logic Mixer (Sie können die Ultrabeat GUI Fenster zu schließen, wenn Sie möchten, oder drücken Sie V auf der Tastatur zu verstecken Umschalten / Zeige alle Plug-in-Fenster).
Jetzt müssen wir Aux-Kanälen für jeden Sound zu verlegen erstellen. Sie können Aux-Kanäle in eine Reihe von Möglichkeiten zu schaffen ... aber wird die folgende Methode sicherzustellen, dass Sie erstellen Aux-Kanäle mit der richtigen Routing-Setup von Ultrabeat.
Klicken Sie auf die -Taste auf der Unterseite des Ultrabeat Kanalzug. Dadurch wird eine Aux-Kanal mit dem Eingang auf den Ausgang, den Sie in Ultrabeat erstellt. Tun Sie dies für so viele Aux-Kanäle als erforderlich.
Excellent! Sie haben nun Ihre gewählte Geräusche / Stimmen aus Ultrabeat verschiedene Aux-Kanäle, die es ein Kinderspiel für jeden Aux-Kanal mit verschiedenen Effekten Prozess wird geführt,
Final Thoughts
Man könnte, um die Wiedergabe Ihrer Ultrabeat Pattern an dieser Stelle und beginnen Einsetzen Auswirkungen auf die verschiedenen Aux-Kanäle. Es ist eine gute Idee, jede Aux-Kanal durch einen Doppelklick auf den Namen auf den Namen. Außerdem für jeden Aux-Kanal können Sie die Pegel, Balance, Solo, Mute, ein Weg zu weiteren Ausgängen, fügen seltsame und wunderbare Effekte ... die Welt ist nun Ihre ultrabeat Auster!
Wenn Sie weitere benötigen Hilfe auf dieser oder einer anderen Logik oder Mac Software-Problem besuchen Sie uns auf www.macprovideo.com/forum/
Interested in learning more about Ultrabeat and unleashing the drummer inside? These tutorials will help you to become proficient whether you are starting out or looking for advanced tips, tricks and techniques! We'd love to hear from you. Let us know what you think by writing a comment below!

Discussion
Thanks!
Glad you found it useful :)
I've got Logic Express 9.0 on my MacBook Pro. It's going ok, but I'm a bit stuck on one thing. I think it must be something really simple but I can't find the answer on the net anywhere.
I have made patterns in ultrabeat then dragged them to the arrange window. I would like to then re open that same pattern in ultrabeat and change it slightly still using the same kit and on the same channel. After editing or creating other tracks, when I re open ultrabeat on say the Latino kit that I used, my pattern that I created doesn't come up in ultrbeat. When I play the pattern, I can see the blue keys on the side lighting up and I can see the beats in the piano roll. How can I see these in ultrabeat where the blue lights keep flashing?
Thanks
Once you've dragged a pattern from Ultrabeat to Logic's Arrange area you can't edit it in Ultrabeat's Step Sequencer. It's a shame... if Ultrabeat supported 'MIDI region import', I'd be so happy!! But as it is, once the region is in the Arrange the best you can do is edit it in the Piano Roll or the Hyper Editor (which once understood is a very powerful drum editor indeed!) Have you checked out Steve H's Ultrabeat Unleashed tutorial? It's the definitive place to go to learn about Ultrabeat IMHO.
Pop by the macprovideo forums also if you need any more help.
Best
Rounik
Thanks again,
Dom
Well, you can edit it in Ultrabeat's Step Sequencer - but think of Ultrabeat as a separate plugin outside of Logic's MIDI Editors. Once you bring it into the Arrange area then it's out of Ultrabeat's hands...
Still I completely agree, being able to import MIDI regions into Ultrabeat seems like a no-brainer. Hopefully that'll happen in a future Logic update or version!
:)
Not too familiar with Garritan Aria Player. How do you have each sound from it routed in Logic? are there 8 stereo outputs from Aria begin routed to their own Aux channels for example?
If so, then you can adjust the balance/pan on those Aux channels in the Mixer.
basically my problem is that I don't hear my other loaded instruments in my Aria player, the plugin instrument. How and where do I select the instrument that I want to record in? I only hear my first loaded instrument that is in the first slot in the instance, channel 1.
Have you inserted the Aria player on a normal Software Instrument track? This could be the problem.
Try creating a new Software Instrument track from Track > New...
This time, make sure the "Multi-timbral" option is checked.
Choose Number: 8 (for 8 stereo sounds from the Aria).
Now you'll find that 8 tracks are created in the Arrange. Each one with it's own MIDI Channels (1-8). However, they all use the same Instrument (Aria) but selecting 2nd track will playback the "2" sound from Aria, etc.
Hope this helps
Rounik
1. (as in this tutorial with Ultrabat) you need to assign the sounds / channels within Aria to an output - and then create Aux channels and use those to control and mix the different elements from the Aria player.
2. There is a method Steve H show cased in his Logic TNT2 tutorial... that uses the Environment - Once you set it up it's very cool... It's videos 18-25 in this tutorial here if you're interested:
http://www.macprovideo.com/tutorial/logic9303tnt2
Hope this helps
Rounik
Want to join the discussion?
Create an account or login to get started!