
Ultrabeat is a drum synth and sample player that comes bundled with Logic Express and Logic Pro 9. It comes with it's very own Step Sequencer which enables you to create patterns for each and every one of it's 25 sounds (known as voices). Each Voice can be a sample or a synthetic sound tweaked by yourself (or, of course based on one of the many presets included).
One often asked question is how to add an effect plug-in to one voice only.... For example, you may want to add reverb to the snare only and add a compressor only to the Kick or add some delay exclusively to the hi-hats. Of course, once you drag the pattern into Logic's Arrange area, all the sounds are on one track assigned to one channel strip = one set of effects for that channel strip. In this Quick Tip we'll focus on how to add processing to an individual voice from Ultrabeat inside Logic.
WARNING: Once you know how to do this, your drum patterns will never be the same again...
Step 1 - Insert a Multi-Output Instance
Create a new Software Instrument track. Now we need to insert a Multi-Output instance of Ultrabeat on it. This will allow you to route voices from Ultrabeat to their own separate outputs.
Click and hold on the top I/O slot and from the menu choose Ultrabeat > Multi-Output (8xstereo, 8xMono).
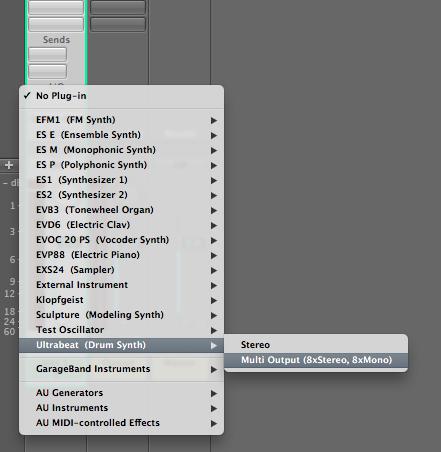
In Ultrabeat, choose any preset and pattern of choice. I'm going to use the default preset and Pattern.
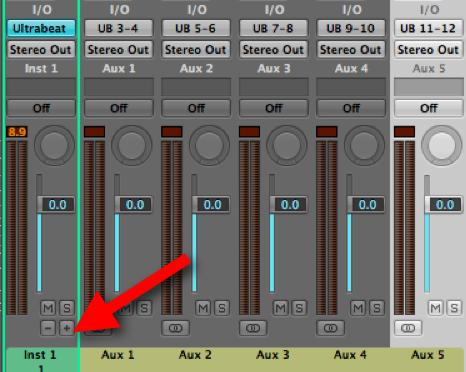
Step 2 - Assigning Outputs
In order to add different effects to different voices, those voices need to be on their own channel strip. In actual fact the signal from our chosen voices will be routed to separate Aux Channel strips.
To set this up we need to focus on Ultrabeat's Voice Assignment area (on the left). Here you can mute, solo, change the levels and pan and route any voice to it's own output. You'll notice that each voice currently is set to the Main output (or the Software Instrument channel strip).
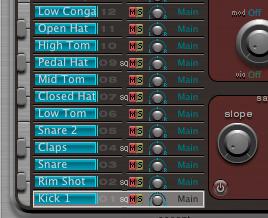
I'm going to assign Kick 1, Rim Shot, Claps, CLosed Hat and Pedal Hat (which all contain sequences) to separate Aux channels so we can process them separately.
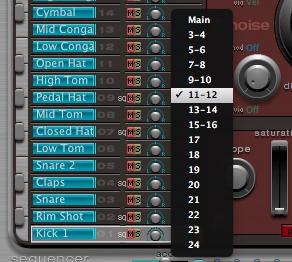
Click on the word Main (Output area) for a voice and from the drop down menu assign your chosen voice(s) to their own output.
Notice that you have 8 stereo (including the Main output) and 8 mono outputs.
Step 3 - Creating Auxiliary Channels
Open Logic's Mixer (you can close the Ultrabeat GUI window if you wish or press V on your keyboard to toggle hide/show all plug-in windows).
Now, we need to create Aux channels for each sound to be routed to. You can create Aux channels in a number of ways... but, the following method will ensure you create Aux channels with the correct routing setup from Ultrabeat.
Click on the + button on the bottom of the Ultrabeat channel strip. This will create an Aux channel with the input set to the output you created in Ultrabeat. Do this for as many Aux channels as required.
Excellent! You've now routed your chosen sounds/voices from Ultrabeat to different Aux channels which will make it a breeze to process each Aux channel with different effects,
Final Thoughts
You might like to playback your Ultrabeat pattern at this point and begin inserting effects onto the different Aux Channels. It's a good idea to name each Aux Channel by double-clicking on the name. Furthermore for each Aux Channel you can adjust levels, balance, solo, mute, route to further outputs, add weird and wonderful effects... the world is now your ultrabeat oyster!
If you need further help on this or any other Logic or Mac software issue visit us at www.macprovideo.com/forum/
Interested in learning more about Ultrabeat and unleashing the drummer inside? These tutorials will help you to become proficient whether you are starting out or looking for advanced tips, tricks and techniques! We'd love to hear from you. Let us know what you think by writing a comment below!

Discussion
Thanks!
Glad you found it useful :)
I've got Logic Express 9.0 on my MacBook Pro. It's going ok, but I'm a bit stuck on one thing. I think it must be something really simple but I can't find the answer on the net anywhere.
I have made patterns in ultrabeat then dragged them to the arrange window. I would like to then re open that same pattern in ultrabeat and change it slightly still using the same kit and on the same channel. After editing or creating other tracks, when I re open ultrabeat on say the Latino kit that I used, my pattern that I created doesn't come up in ultrbeat. When I play the pattern, I can see the blue keys on the side lighting up and I can see the beats in the piano roll. How can I see these in ultrabeat where the blue lights keep flashing?
Thanks
Once you've dragged a pattern from Ultrabeat to Logic's Arrange area you can't edit it in Ultrabeat's Step Sequencer. It's a shame... if Ultrabeat supported 'MIDI region import', I'd be so happy!! But as it is, once the region is in the Arrange the best you can do is edit it in the Piano Roll or the Hyper Editor (which once understood is a very powerful drum editor indeed!) Have you checked out Steve H's Ultrabeat Unleashed tutorial? It's the definitive place to go to learn about Ultrabeat IMHO.
Pop by the macprovideo forums also if you need any more help.
Best
Rounik
Thanks again,
Dom
Well, you can edit it in Ultrabeat's Step Sequencer - but think of Ultrabeat as a separate plugin outside of Logic's MIDI Editors. Once you bring it into the Arrange area then it's out of Ultrabeat's hands...
Still I completely agree, being able to import MIDI regions into Ultrabeat seems like a no-brainer. Hopefully that'll happen in a future Logic update or version!
:)
Not too familiar with Garritan Aria Player. How do you have each sound from it routed in Logic? are there 8 stereo outputs from Aria begin routed to their own Aux channels for example?
If so, then you can adjust the balance/pan on those Aux channels in the Mixer.
basically my problem is that I don't hear my other loaded instruments in my Aria player, the plugin instrument. How and where do I select the instrument that I want to record in? I only hear my first loaded instrument that is in the first slot in the instance, channel 1.
Have you inserted the Aria player on a normal Software Instrument track? This could be the problem.
Try creating a new Software Instrument track from Track > New...
This time, make sure the "Multi-timbral" option is checked.
Choose Number: 8 (for 8 stereo sounds from the Aria).
Now you'll find that 8 tracks are created in the Arrange. Each one with it's own MIDI Channels (1-8). However, they all use the same Instrument (Aria) but selecting 2nd track will playback the "2" sound from Aria, etc.
Hope this helps
Rounik
1. (as in this tutorial with Ultrabat) you need to assign the sounds / channels within Aria to an output - and then create Aux channels and use those to control and mix the different elements from the Aria player.
2. There is a method Steve H show cased in his Logic TNT2 tutorial... that uses the Environment - Once you set it up it's very cool... It's videos 18-25 in this tutorial here if you're interested:
http://www.macprovideo.com/tutorial/logic9303tnt2
Hope this helps
Rounik
Want to join the discussion?
Create an account or login to get started!