
In this article, we'll look at Logic 10.1's new “golden button” for selecting either Track or Region based automation, and why you should use either one. Although this is a new way to access these options, this is not actually new… the ability to embed automation into your regions has existed in Logic for years, but was somewhat hidden—and definitely underused by most. It's not surprising that this button is now prominently displayed on all your tracks. Apple understands that automation is no longer strictly a “mixing” thing. In today's EDM productions, it's commonplace to use automation creatively while producing, composing and designing sounds. So what is the difference between these two types, and how do you utilize them in your songs? Read on, I'll describe them both, and show a few new 10.1 automation features along the way.
Track-Based Automation
Open an existing song, and press the letter A to toggle the automation view. You'll notice a new gold colored button on all of your tracks. When you click the button, it toggles the view between the familiar track-based automation and the lesser-known region-based options. Track automation is the default, and can be thought of like a transparency; like a layer sitting above the regions below it. This default mode is great for mixing and mastering since it allows you to take control over everything on the track as a whole. You can either draw in automation, or record it by choosing either Touch or Latch mode, or by using key command Control-Command-A.

Trim and Relative Modes with Track Automation
Below and to the left of the new 10.1 Track/Region Automation select button, is the Automation mode button (where Touch and Latch mode are selected). There are two new 10.1 features here. Say you've written some pretty extensive volume automation over a track in your song, but you've realized you may have overdone it at certain points. In addition to choosing either Touch or Latch from the automation modes menu, you can also check off “Trim” or “Relative.” Now you can play the track and make live adjustments that raise or lower the overall value without losing your original peaks and valleys. It's like automation for automation! When Trim is chosen it directly adjusts the existing data, and when Relative is chosen a new layer/automation lane is added that can be directly adjusted itself.

Region-Based Automation
Click the gold selection button so it reads “Region” now. Wether you're creating movement by adjusting a synth's parameters, alternating the speed of an LFO, or adding width by panning a sound rhythmically, region-based automation is the way to go for this. Unlike track-based automation, the data is within the region itself. This allows for easy looping, moving and re-arrangement of your regions without worrying wether the automation has come with it. When you loop the region, the automation loops with it.

Embed Region Automation into Loops Live
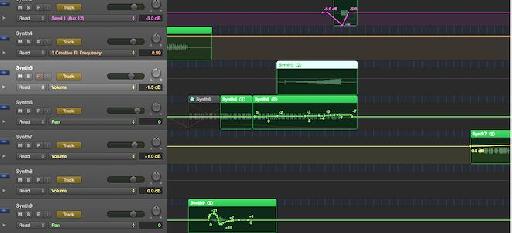
Ever created a cool sounding automation shape and wished you could just loop it (as you loop the region)? With track-based automation this is possible by copy/pasting the automation, but the process to do this can put a halt on your creative flow. This is where region-based automation shines. Try this simple and fun little trick. Go to a looping region in one of your songs and set a cycle around it that includes several of the loops themselves in addition to the original region. Click the track/region selection button to change it to Region automation. Start playback first, then begin to automate various parameters. In my example image, I automated an AutoFilter's Cutoff and Resonance. Watch what happens when you do this… the automation is only recorded when the timeline crosses over the original region and ignores all other movements over the loops. The automation is “embedded” into the original region and is looped right along with the region itself.

Track and Region Automation Work Simultaneously?
It's important to understand that you can use both track- and region-based automation on the same track by toggling between them; it's not an “either/or” situation. However there's one exception… when data exists (of the same parameter) in both region- and track-based automation, Region data takes precedence until the timeline moves over an area that no region data exists on. For example, if volume information exists in the region, and you then switch to track-based automation, and add some points/nodes above the region, your track-based data is ignored. Even though the gold selection button currently shows “track” automation, the region data is what plays back.
Tips
It's easy now to “mute” individual automation parameters. There's a power button next to each selected automation parameter (when data exists on it). When using track-based automation, you have options on how data is handled. From the “Move Track Automation with Regions” menu (under the Mix menu), you can choose wether Logic will always “Ask” you if you'd like to move the data, always move it, or never at all.

Thanks for reading!

Discussion
Want to join the discussion?
Create an account or login to get started!