Logic Pro中使用自动化模式在你的歌

Automation is often a big part of most Logic projects. In this tip Darren Burgos shows you how to create your own preset patterns you can apply to any automation parameter. A must read!  

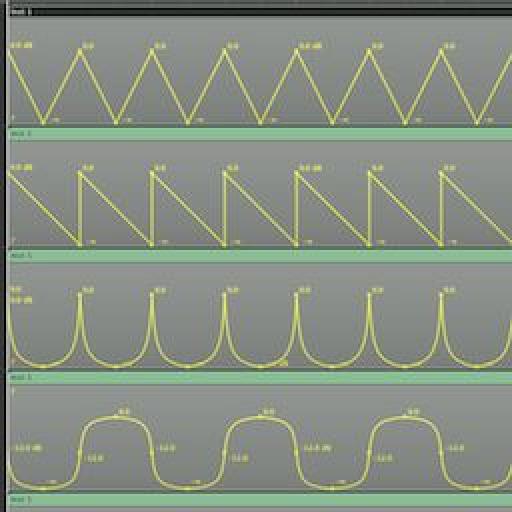
在当今世界的电子音乐作曲,更不是简单地控制你的轨道的音量自动化。几乎你能想到的每一个参数都可以通过自动化控制间距一样,LFO速率,滤波器的截止频率,共振,EQ,声像等等。创建的节奏模式与自动化增添了生命和质感,你的歌。难道是很好,如果有一个图书馆的自动化形状,你可以在你的轨道上下降?

当IM生产,我经常拉从一个小的形状香港专业教育学院,并保存到一个逻辑专案库。我可以很容易地复制这些图案到我现有的歌曲,因为他们已被保存在一个标准的地区。这也可以很容易地拉伸或压缩的自动化,但井盖,在短短位!

library of shapes


香港专业教育学院包括逻辑专案


步骤1 - 复制的自动化

打开自动化形状的逻辑模板和复制你的选择“带命令行-C的地区,然后回到进入的歌曲,你会增加自动化。


第2步 - 创建一个克隆的轨道

点击你要添加的自动化仪器/音频轨道的轨道,然后从轨道菜单,选择“新建”相同的通道条/仪表。这是一个很酷的功能,没有多少人使用。克隆选定的曲目,但实际上并没有做一个新的。它仍然是相同的轨道您开始使用,但现在你有一个新的车道,在我们的例子中添加一些东西,如自动化。

New with Same Channel Strip/Instrument


第3步 - 粘贴自动化

当您创建新的轨道,将时间安排,你会像自动启动,并命令-V将其粘贴。

Paste the Automation


第4步 - 重复自动化

自动化只持续了一间酒吧,但我想持续4条自动化。我把它复制选项,点击拖动该地区的3倍。
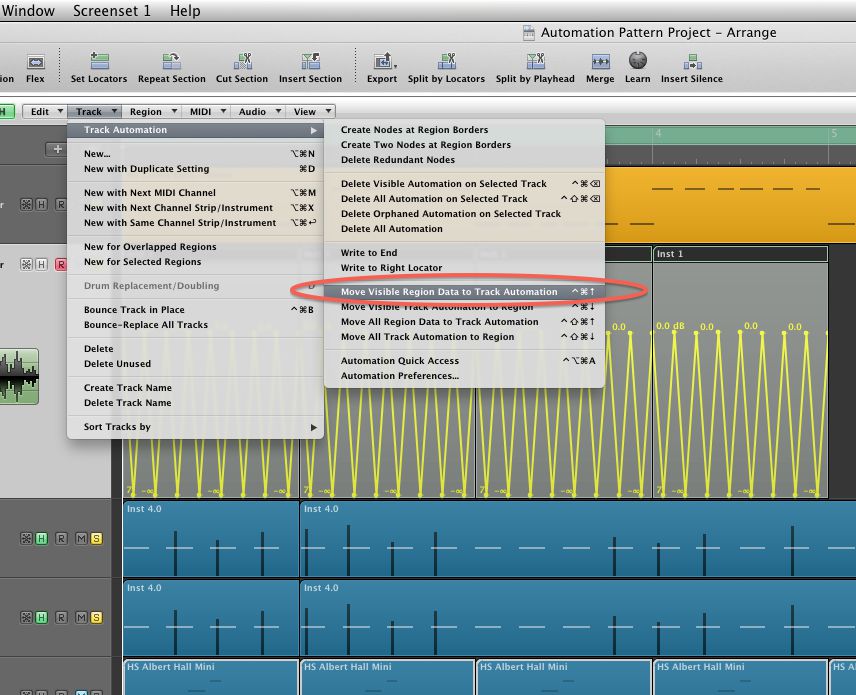
Option-Click-Dragging the region 3 times


第5步 - 转换自动化跟踪基于

所以,我可以重新分配自动化的任何参数我的选择,我需要自动化的基于区域的自动化,并进入轨道为基础的自动化。选择4个区域(或然而,许多有),然后选择


第7步 - 将自动转换到另一个参数

现在让我们重新分配到不同的参数的自动化。在按住Option键同时单击一个轨道自动化选择菜单。继续按住该键,直到你找到你会像复制的自动化的参数,然后选择它。将出现一个窗口,询问是否你会像只转换,或复制和转换。选择“转换”。现在,自动化的形状转换为您选择的参数!

Convert automation


第8步 - 时间伸缩的自动化

现在让我们说你已经决定的模式是太快了,你会喜欢它播放慢。首先确保“自动选择”菜单中显示正确的自动化,然后回去的空白区并选择它们。 控制的地区合并在一起,用关键的命令第一,然后选择曲目


希望你喜欢的文章!


Darren started making music on computers when he was a teenager in 1987. His first computer was an Amiga, and when he realized the power of computer-based production, his addiction for making electronic music began. Darren switched to Mac in 1994 and started using Logic Pro. He's been involved in many music projects over the years incl... Read More

Discussion

vibrance
great tutorial- I get it all except the time stretching.

If you just copy the region with automation into a track and option drag it, it stretches the region but not the automation inside. What am I missing?

thanks
Darren Burgos
Cool! Glad you like it. :) Make sure to pull the automation BACK into the region before Option - Click - Dragging. Click the region you want to contain the automation, click the local Track menu, then Track Automation, and select "Move Visible Track Automation to Region." That should do it ...once it back inside the region, the Option - Click - Drag should stretch the automation too.
lostinthesound
Darren,

Words cannot express how grateful I am for not only the fantastic tutorial, but the invaluable project file! My production partner and I are automation junkies, so this "library" will save us loads of time with regards to drawing basic automation. We've often dreamed of a built-in shape library similar to Massive's Performer and hope that the fine folks at Apple will include it in Logic X when it's finally released sometime in the next 100 years. :-)

Cheers!
Darren Burgos
Hi Lostinthesound, that is great to hear! I appreciate your response so much, and yes, this could be an amazing feature added to the next Logic. Let's hope they read this! :)
Mat Monteiro
Cool Darren! Thanks a lot.
theupgrade
It's retard that Logic does not have a solution similar to Studio One. No workaround needed.

Please consult http://cl.ly/image/2R0v2o2q1Q2y

Mordichi
Wow, that looks fantastic, submitting feedback right now. You should too!
Mordichi
Hi, great tutorial! I managed to successfully follow through all the steps, but when I got to Step 8, I couldn't get the automation to 'time stretch'. Any ideas?
Rounik
Hi Adriane,

Are you holding down the Option (Alt) key when stretching the automation? Make sure your release the mouse button before releasing the Option key.

Hope this helps :)
Mordichi
Yes, I am. Still not working.. :(
Mordichi
Rounik, I'm a little confused here... in Step 8 above, it says to 'drag the region', but in your question to me, you asked whether I'm 'holding down the Option key when stretching the automation'. Which one is it? Do I drag the region or do I drag the automation? While holding down the Option key and clicking on the top right of the region to drag it, the cursor always turns into the Loop cursor, and I'm unable to drag the region.
Darren Burgos
Hi Adriana, this is the author of this article Darren. Since this was written, somewhere along the way of Logic updates it may have changed a bit. This worked perfectly at a point (see comments above it, and even the screen shot of me actually doing it), but you're right, stretching at the top of the region no longer seems to work.

Do this to get it to work: After you've moved the data back into the region, go to the Arrange window's local "view" menu, then to HyperDraw, then to OFF. You'll now be able stretch the region (and it's automation data) by Option clicking the BOTTOM right corner instead.
Mordichi
Hey Darren, you were right! I'm using Logic 10.0.3, that's probably why it didn't work using the steps from the tutorial. When I did what you wrote in your comment above, it worked! Thank you for your helpful reply and your very helpful tutorial! :)
Mordichi
Hey Darren, you were right! I'm using Logic 10.0.3, that's probably why it didn't work using the steps from the tutorial. When I did what you wrote in your comment above, it worked! Thank you for your helpful reply and your very helpful tutorial! :)
Darren Burgos
Hi Adriana, That's great that's it's working for you now :). Apple must have changed it's behavior in the last version of 9 and now in X ...you may have noticed the name is no longer HyperDraw ...it's now MIDI Draw in Logic X. Thanks for checking out the article!
Eric
Hi, I'm having trouble with step four. Every time I Option-click-drag it stretches my automation to a larger version of the pattern. There's still eight peaks of volume swell but now stretched over 2 bars instead of what I want: 16 peaks over two bars. I tried looping the automation but it doesn't transfer to moving the visible region data to track automation... please help! Geez I wish logic would just have automation-shape tools.

Want to join the discussion?

Create an account or login to get started!