
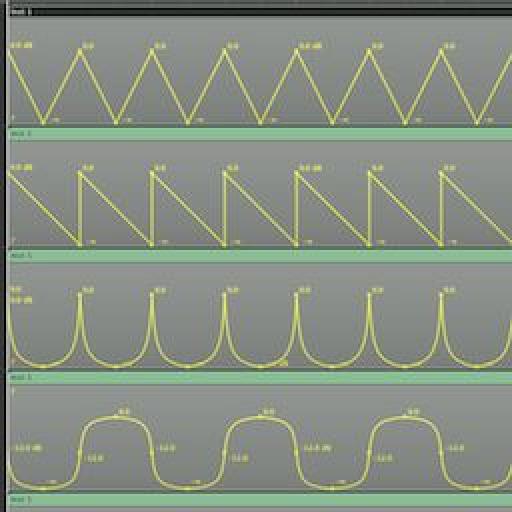
В современном мире электронные музыкальные композиции, автоматизации используется для гораздо большего, чем просто контролировать громкость ваших треков. Почти каждый параметр вы можете думать можно управлять с помощью автоматизации, как смола, LFO скорость, частоту среза фильтра, резонанс, EQ, панорама и многое другое. Создание ритмических рисунков с помощью автоматизации можно добавить жизни и текстуры для ваших песнях. Wouldnt было бы хорошо, если бы была библиотека готовых автоматизации формы вы можете заглянуть на ваши треки?
Когда Im производства, Ill часто тянуть с небольшой библиотекой форм Ive сделали и сохранили в логике проекта. Я могу легко скопировать эти готовые шаблоны в моей существующей песни, потому что Theyve был сохранен в стандартном региона. Это также позволяет легко растянуть или сжать автоматизации ..., но хорошо, что охватывает чуть позже!

Ive включены Logic проект под названием
Шаг 1 - Скопируйте автоматизации
Откройте Logic Автоматизация Форма шаблона и скопировать область по вашему выбору с Command-C, а затем нажмите обратно в песне вы будете добавлять автоматизации.
Шаг 2 - создание клона трек
Нажмите на дорожке инструмента / аудио трек, который вы хотите добавить автоматизации, то из треков меню выберите новый с той же полосе канала / инструмента. Это крутая функция, что не многие люди используют. Это клоны выбранного пути, но фактически не новый. Его до сих пор точно такой же трек, который вы начали, но теперь у вас есть новая полоса добавить такие вещи, как автоматизация в нашем случае.

Шаг 3 - Вставить автоматизации
После создания нового трека, разместите шкале, где Яд, как автоматизация, чтобы начать, и Command-V, чтобы вставить его.

Шаг 4 - Повторите автоматизации
Автоматизация длится всего один бар, но я хочу автоматизации продлится 4 бара. Ill скопировать его Option-Click-Перетаскивание области в 3 раза.

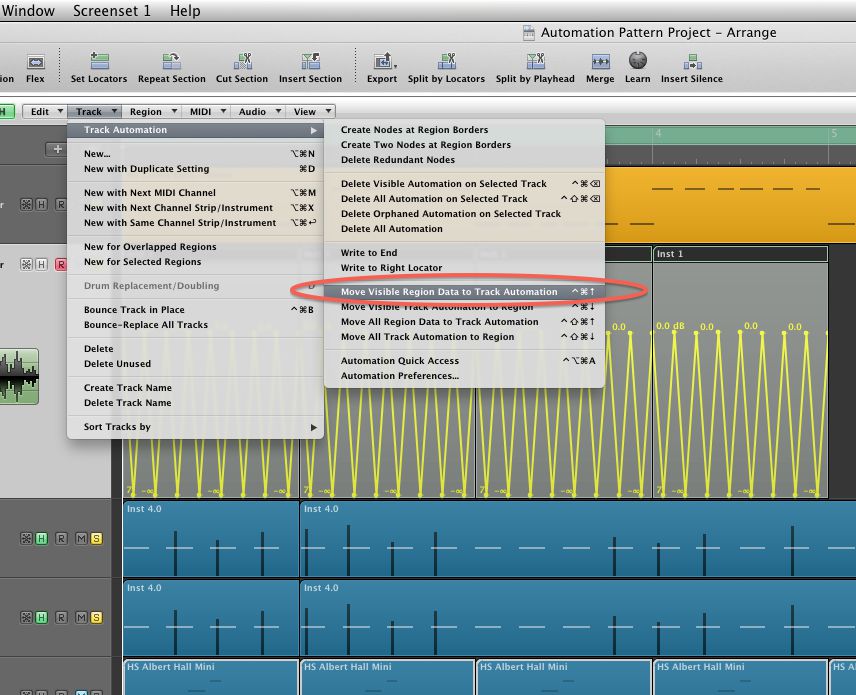
Шаг 5 - Преобразование автоматизации для отслеживания основе
Так что я могу переназначить автоматизации любого параметра мой выбор, мне нужно, чтобы получить автоматизации из области автоматизации на базе, а в треке на основе автоматизации. Выберите 4 регионах (или сколько есть), и выберите

Шаг 7 - Преобразование автоматизации к другому параметру
Теперь давайте повторно назначить автоматизации различных параметров. Выберите один из треков меню автоматизации выбора, удерживая кнопку Опция. Продолжайте удерживать кнопку, пока не найдете параметр Яд, как скопировать автоматизации, затем выберите его. На экране появится окно с просьбой, если Яд как только конвертировать или копировать и преобразовывать. Выберите Convert. Автоматизация форма теперь преобразован в параметр выбора!

Шаг 8 - Time Stretch автоматизации
Теперь давайте говорить Youve решил, что картина слишком быстро и Йоуд, как это воспроизвести медленнее. Сначала убедитесь, что в меню автоматизации выбора правильного отображения автоматизации, а затем вернуться в пустой области и выберите их. Слияние регионов вместе с ключевыми команду Control-= первый, затем выберите трек

Надеюсь, вам понравилась эта статья!

Discussion
If you just copy the region with automation into a track and option drag it, it stretches the region but not the automation inside. What am I missing?
thanks
Words cannot express how grateful I am for not only the fantastic tutorial, but the invaluable project file! My production partner and I are automation junkies, so this "library" will save us loads of time with regards to drawing basic automation. We've often dreamed of a built-in shape library similar to Massive's Performer and hope that the fine folks at Apple will include it in Logic X when it's finally released sometime in the next 100 years. :-)
Cheers!
Please consult http://cl.ly/image/2R0v2o2q1Q2y
Are you holding down the Option (Alt) key when stretching the automation? Make sure your release the mouse button before releasing the Option key.
Hope this helps :)
Do this to get it to work: After you've moved the data back into the region, go to the Arrange window's local "view" menu, then to HyperDraw, then to OFF. You'll now be able stretch the region (and it's automation data) by Option clicking the BOTTOM right corner instead.
Want to join the discussion?
Create an account or login to get started!