
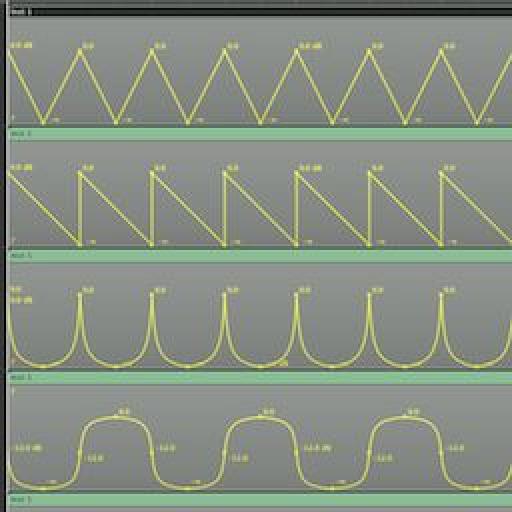
Dans le monde actuel de composition de musique électronique, l'automatisation est utilisé pour beaucoup plus que de simplement contrôler le volume de vos pistes. Presque tous les paramètres que vous pouvez penser peut être contrôlé grâce à l'automatisation comme de la poix, le taux de LFO, de coupure du filtre, résonance, EQ, panoramique, etc. Création de motifs rythmiques avec l'automatisation peut ajouter de la vie et de la texture à vos chansons. Wouldnt il pas merveilleux si il y avait une bibliothèque de formes d'automatisation pré-faites-vous pourrait tomber dedans sur vos traces?
Quand Im production, Ill souvent tirer à partir d'une petite bibliothèque de formes Ive faites et enregistrées dans un projet Logic. Je peux facilement copier ces modèles pré-faites dans mes chansons existantes parce theyve été enregistrées à l'intérieur d'une région standard. Cela rend également facile à étirer ou de comprimer l'automatisation ... mais bien couvrir que dans un tout petit!

Ive inclus un projet Logic appelé
Étape 1 - Copiez l'automatisation
Ouvrez le modèle logique d'automatisation Forme et copiez la région de votre choix avec Command-C, puis cliquez de nouveau dans la chanson youll soit en ajoutant l'automatisation de.
Étape 2 - Créer un clone de la piste
Cliquez sur la piste de la piste d'instrument / audio que vous souhaitez ajouter à l'automatisation, puis dans le menu Track, sélectionnez New avec même bande de canal / instrument. Il s'agit d'une fonction de refroidissement que peu de gens utilisent. Il clone de la piste sélectionnée, mais ne font vraiment une nouvelle. C'est toujours la piste exactement le même que vous avez commencé avec, mais maintenant vous avez une nouvelle voie pour ajouter des choses comme l'automatisation dans notre cas.

Étape 3 - Coller l'automatisation
Après avoir créé la nouvelle piste, placez la timeline où le youd comme l'automatisation pour commencer, et Cmd-V pour coller.

Étape 4 - Répétez l'automatisation
L'automatisation ne dure qu'un bar, mais je veux l'automatisation pour durer 4 bars. Ill copier par Option-Clic-Glisser la région 3 fois.

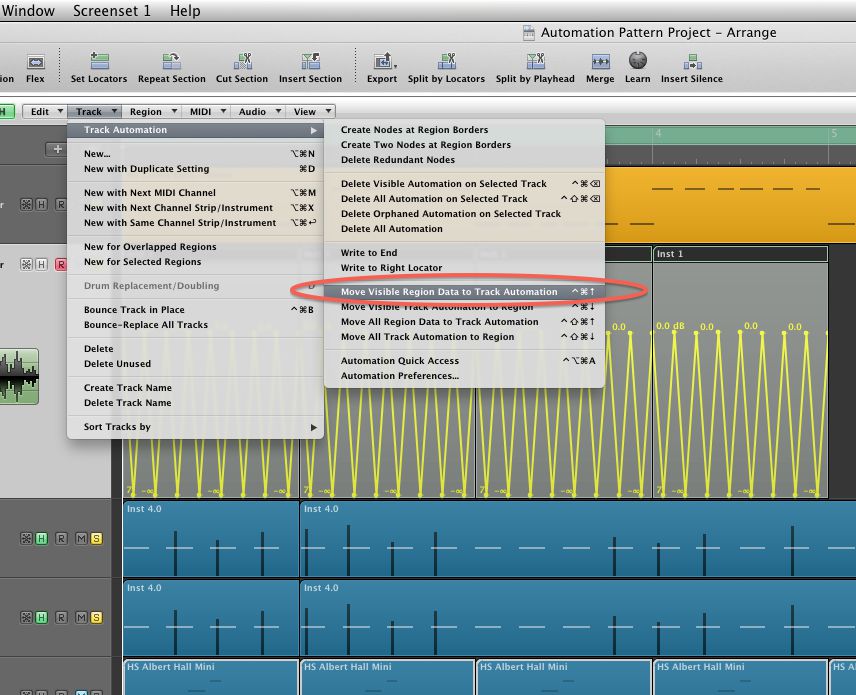
Étape 5 - Autre automatisation basée à suivre
Donc, je peux ré-affecter l'automatisation à n'importe quel paramètre de mon choix, j'ai besoin d'obtenir l'automatisation de l'automatisation basée sur la région, et dans l'automatisation basée sur piste. Sélectionnez les 4 régions (ou soit le nombre que vous avez), et sélectionnez

Étape 7 - Autre automatisation à un autre paramètre
Maintenant passons à réaffecter l'automatisation à un paramètre différent. Cliquez sur l'une des pistes les menus de sélection d'automatisation tout en maintenant la touche Option enfoncée. Continuez à maintenir la touche jusqu'à ce que vous trouviez le paramètre youd comme pour copier l'automatisation à, puis sélectionnez-le. Une fenêtre apparaîtra vous demandant si youd aiment à seulement convertir, ou de copier et convertir. Sélectionnez Autre. La forme d'automatisation est maintenant convertie à votre paramètre de choix!

Étape 8 - Time stretch l'automatisation
Maintenant, supposons que vous avez décidé que le modèle est trop rapide et il youd aiment à lire plus lentement. Premièrement, assurez-vous que le menu de sélection de l'automatisation est l'affichage de l'automatisation correcte, puis revenir vers les régions vides et les sélectionner. Fusionner les régions avec le raccourci clavier Ctrl-= abord, puis sélectionner la piste

J'espère que vous avez apprécié cet article!

Discussion
If you just copy the region with automation into a track and option drag it, it stretches the region but not the automation inside. What am I missing?
thanks
Words cannot express how grateful I am for not only the fantastic tutorial, but the invaluable project file! My production partner and I are automation junkies, so this "library" will save us loads of time with regards to drawing basic automation. We've often dreamed of a built-in shape library similar to Massive's Performer and hope that the fine folks at Apple will include it in Logic X when it's finally released sometime in the next 100 years. :-)
Cheers!
Please consult http://cl.ly/image/2R0v2o2q1Q2y
Are you holding down the Option (Alt) key when stretching the automation? Make sure your release the mouse button before releasing the Option key.
Hope this helps :)
Do this to get it to work: After you've moved the data back into the region, go to the Arrange window's local "view" menu, then to HyperDraw, then to OFF. You'll now be able stretch the region (and it's automation data) by Option clicking the BOTTOM right corner instead.
Want to join the discussion?
Create an account or login to get started!