'Logic's Environment cordial?' You may ask. Well, before you start thinking that I've had one too many, read on to find out how the Chord Memorizer can provide powerful music making opportunities for my Special Needs students as well as enhance any musician's sound.
Who Needs the Environment, Anyway!? (No, that's not a political statement)
If you already use Logic, but don't use the Environment, you're missing out on a tremendous amount of power and flexibility that can greatly speed up your workflow and enhance your performance. If you use a DAW other than Logic, the Environment could provide solutions to problems you've been having. Any musician, at any level, in production or live performance, can benefit from using even one or two simple Environment Objects.
Live performers can enhance their sets and sound in many creative ways and will find it liberating to be able to trigger these Objects live and on the fly, enabling them to add more excitement and richer textures to their performance. Producers can find many ways to speed up their workflow and increase productivity. This excellent Hub article by Jay Asher is just one good example of this. (To find many more, just enter 'Environment' in the Hub's search field). And, where my students are concerned, it has given them a whole new dimension to what they are able to do with their talents. This is true for any student, at any level, making music in modern music classrooms and performance venues.
Environmental Hazard!

You've been warned. Get your hazmat suits on 'cause we're going in.
Fig 2. Logic's toxic Environment - the innocent looking Clicks and Ports Layer.
So there it is. Pressing Command-8 will bring up this window. Make sure you go to the Clicks & Ports Layer and your Environment Window should look very similar to that pictured in figure 2 above.
Also in figure 2 we can notice that there are already cables (the grey lines going from one Object to another) connecting The Physical Input to Input Notes, Input Notes to Input View, and Input View to Sequencer Input. The Sequencer Input is the Object that sends MIDI information to Logic's Arrange Page. Logic automatically cables these Objects in the Clicks and Ports Layer together so that MIDI data can easily be recorded onto the Arrange Page whenever a new Project is open.
Next we're going to get our Chord Memorizer. Simply go up to the 'New' menu, and select 'Chord Memorizer'.
Figure 3
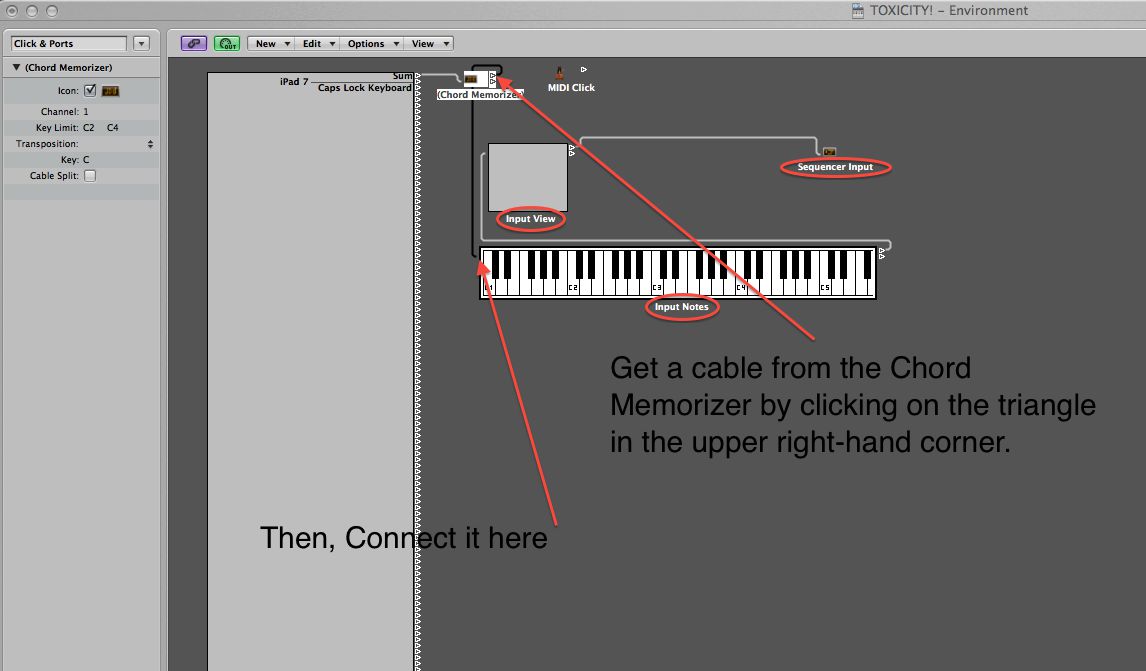
We're going to be routing a cable directly from the Physical Input to the Chord Memorizer. The Physical Input is the place at which all MIDI information first enters Logic. Simply grab the cable that comes out of the topmost triangle of the Physical Input (next to the word 'Sum”) and drag it onto the Chord Memorizer.
Figure 4
Now we need to connect a cable from the Chord Memorizer to the Object that looks like a keyboard, called Input Notes.
Figure 5
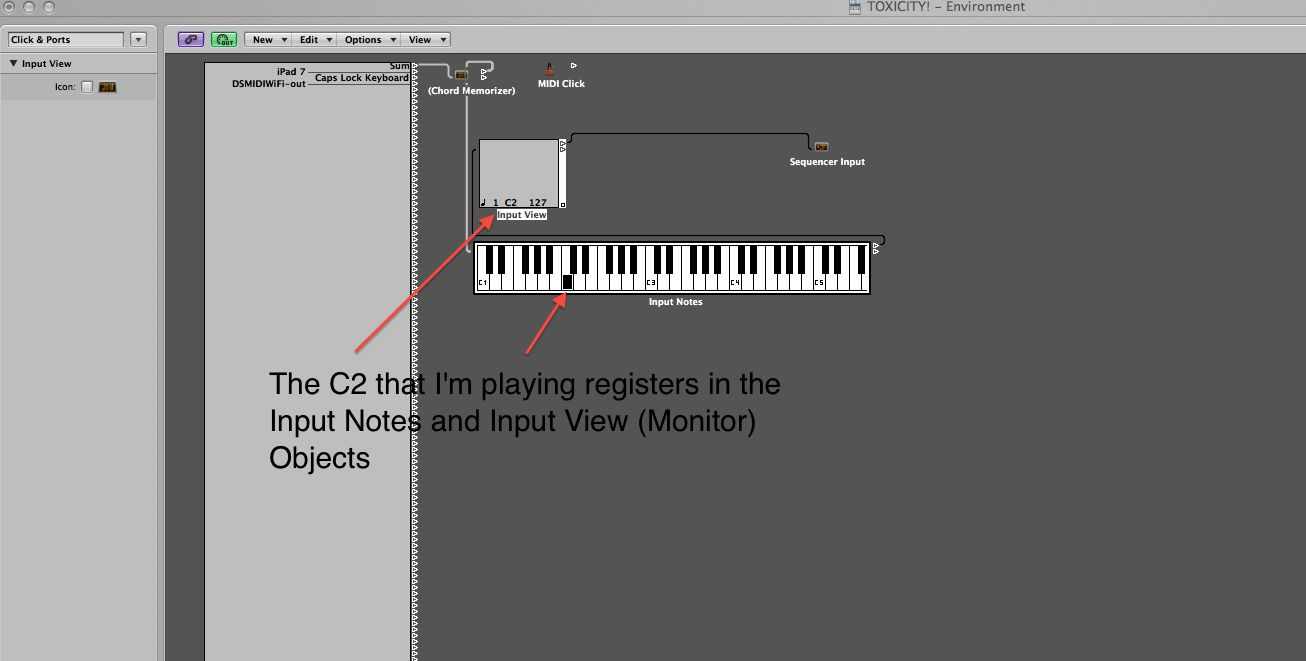
With the Chord Memorizer properly cabled to the other Objects, we're ready to open it up and start programming in some chords. Figure 6 below shows that I'm playing the MIDI note C2 into Logic and that it goes through the Chord Memorizer unchanged, because I haven't programmed it to do anything yet. The 'Input View' Object where the 'C2' appears is actually a Monitor Object. Monitor Objects, which can be selected from the same 'New' menu that I showed you in figure 3, are one of the most useful Objects in the Environment because they can be placed anywhere in Logic's MIDI signal flow to show you exactly what's going on at that point.
Figure 6
Some Cordiality, Please!
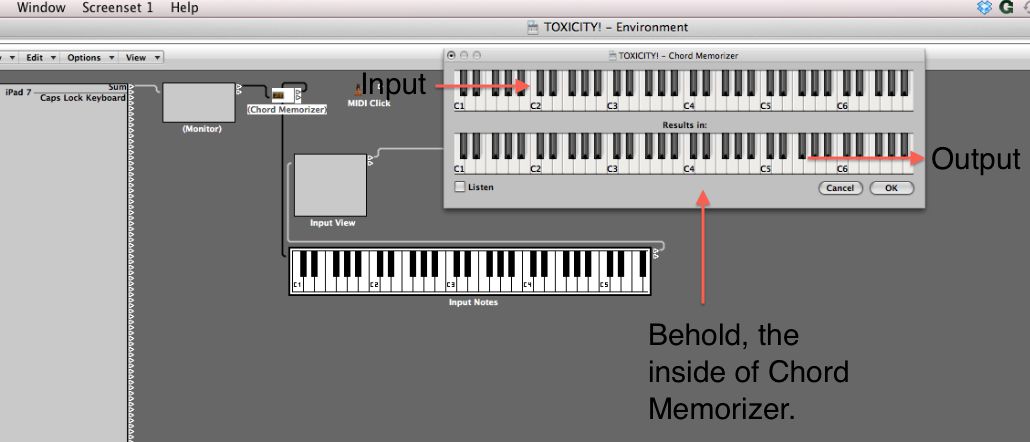
To open the Chord Memorizer up for programming, double click on it and two keyboards will be revealed.
Figure 7
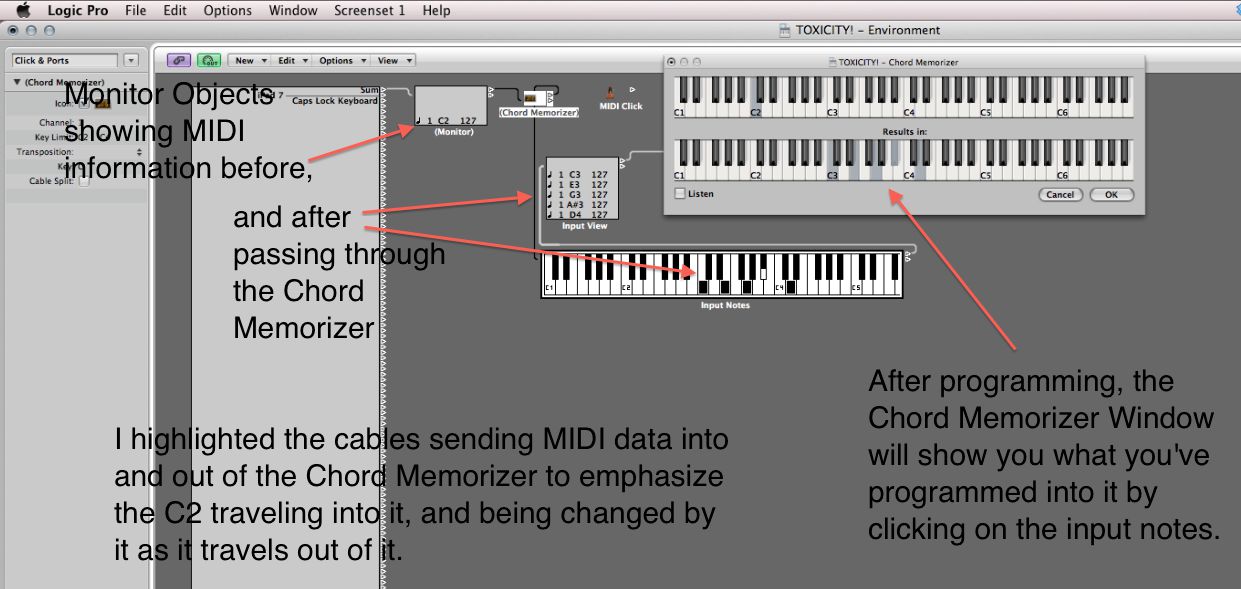
The top keyboard is the input, the bottom, the output. Inputs can be designated to result in any desired output, whether single notes, chords, or even no notes at all. In figure 8 below, I chose for an input of C2 to result in a C9 chord (C3, E3, G3, Bb3, D4). Also notice that I chose for the C2 to not be heard. I did this simply by Clicking the notes on the output keyboard to select or deselect them. In addition, I added a new Monitor Object right before the Chord Memorizer so you could see the MIDI data before and after going through it.
Figure 8
And it sounds like this:
Let's Progress
Now that you can turn a single note into a chord, let's try a progression. I'm going to use the descending notes C2, B1, A1, G1 and F1 to create a descending dominant progression starting with the same C9 that we already have. I chose stepwise descending notes to trigger the chords because it's easy to play on keyboard. If a hardware MIDI device is being used, many of them have pads that are already programmed with descending notes. One more very important reason I've chosen these trigger notes is that they go out of the Chord Memorizer's default Key Limit range. When selected, the Chord Memorizer's parameters appear in the inspector, in the upper left-hand corner of the Window. That's where you'll find the Key Limit parameter, as in Figure 9.
Figure 9
MIDI notes outside of this range will not be processed. So, I must click on the C2 and slowly drag down to lower it sufficiently to accommodate the range of notes that I'm going to play. Now I've shown you an important feature of the Chord Memorizer, and we can continue programming in chords thusly:
- C2 = C3, E3, G3, Bb3, D4
- B1 = Bb2, D3, F3, Ab3, C4
- A1 = Ab2, C3, Eb3, Gb3, Bb3
- G1 = G2, B2, D3, F3, Bb3
- F1 = C2, G2, Bb2, D3, F#3, A3
Simply enter the input notes (those to the left of the equals sign) on the upper keyboard, and then program the corresponding output notes (right of the equals sign) on the lower keyboard. Do it chord by chord; input, then output. Also notice that every time you enter a note on the upper keyboard, it is automatically entered on the lower one. In this case, we will be deselecting those.
A Sound Conclusion
And there you have it. Now when you play the input notes, in descending order on your MIDI device, it should sound like this:
Once you have that, you can replace the very basic EVP88 default patch with something a little more interesting, like the channel strip setting 'Funk Horn Section'. I've added some reverb to that setting using the GoldVerb Reverb Plug-in. I've also added an Apple Loop; 'Downtempo Funk Out Beat', and my own baseline, so that it sounds like this:
Now try programming some of your own chords. Experiment, and have fun!


 © 2024 Ask.Audio
A NonLinear Educating Company
Discussion
Glad you're finding ways to use Logic's Environment to give you access to more music making possibilities. I like the cable switcher/transposer routing idea!
Want to join the discussion?
Create an account or login to get started!