
In this article I'll show you an easy way to use the ES2's Vector Envelope to make great sounding - perfectly timed - sweeps. This method works much better than using a tempo synchronized LFO2… the Vector Envelope starts on each note press (instead of starting at the top of LFO2's bar count). Even if you have no intention of making sweeps, this article is a useful introduction to the Vector Envelope itself.
Step 1
Open an ES 2 and start from the preset called Analog Bass Clean in the Tutorial Settings folder. Turn off Oscillator 1 by clicking its number, and turn on Oscillator 3 the same way. Move Oscillator 3's waveform to “Noise” and adjust the Triangle so it's only in the Osc 3 position.

This is how is sounds at this point:
Step 2
Lower the Sine Level all the way down.

Step 3
Pull Cutoff 2 all the way down.

Step 4
So that nothing in the Router will affect the sound, hit the Bypass button on each of the targets.
At this point, you won't hear anything until later in the article.

Step 5
Click the “Vector” button on the right. The Vector Envelope consists of “points”. Each point can be defined with a length of time (either milliseconds or a percentage). In this lesson we'll only be looking at time as a tempo synchronized percentage.
What can these “points” actually do? Ever wondered what that X/Y square was for in top right corner of the ES 2? Well, each point you create in the Vector Envelope can be assigned to an independent position on that square. The X/Y coordinates themselves can then be assigned to a target like Filter Cutoff, Pan, Amplitude, etc. Excited yet? Totally confused? Let's just do this; it'll all become clear!

Step 6
First, assign the horizontal X Target to Cutoff 2, and raise the “Int” field below it all the way up to 1.00. In the same area, change the Vector Mode drop-down menu from "Mix & XY" to "XY" only.
If the square in the Oscillator Triangle moves after this step, pull it back down to Osc 3 only.

Step 7
Click on the first point: It will turn green when it's selected (see the image from step 5 above). Now click on the second point in the Vector Envelope (they're numbered above each point) and move the green square in the X/Y box horizontally so it's half way between its original position and the right edge of the box.

Switch between point 1 and 2 while watching the X/Y square. It moves because every Vector Envelope point allows you to set the position of the X/Y square differently. Click on the third VE point and set the X/Y square all the way to the right edge of the box.

Step 8
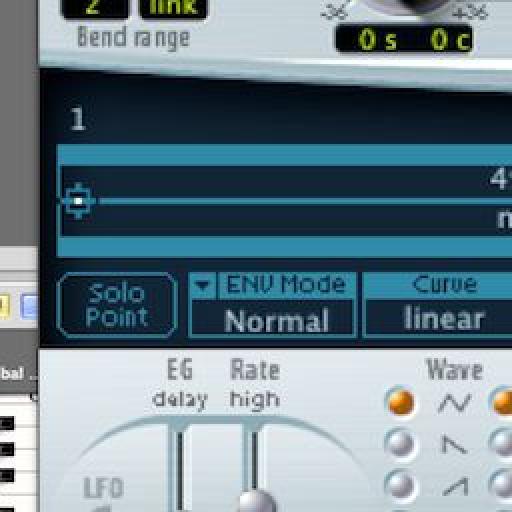
Click the “Solo Point” button to turn it off.

Step 9
Click the blue strip above the third point to set the sustain point.

Step 10
Change the Loop Mode drop-down to Forward, pull the Loop Smooth value all the way down to 0.0%, and set the Loop Rate to 8 bars.

Step 11
You'll notice a click when releasing the key on your keyboard. To fix this, raise the attack on Env 3 and pull the release all the way down.

Step 12
Create an empty region on the track and stretch it to 8 bars. Draw in a note that lasts the entire length or the region. You now have a perfectly timed sweep that lasts exactly 8 bars and Cutoff 2 will peak right at the end of the 8-bar loop.

Here's what it sounds like:
Pitch Sweep Tip
- Change the Loop Rate to 32 bars (the longest possible) for those crazy builds.
- Add the Y coordinate to the VE and choose “Pitch 123” as the target. Turn Osc 1 back on, then move the triangle square between Osc 1 and 3. Adjust point 2 and 3's vertical axis in the X/Y square for an insane pitch sweep!
Here's what applying the tip above sounds like:
Enjoy!

Discussion
Want to join the discussion?
Create an account or login to get started!