There seems to be so many synths, sample libraries, effects and plugins to choose from these days. Sometimes it is easier to minimalize things and use the 'less is more' approach. A good practice is to choose one synth and write a whole track using only this synth. Using a combination of oscillators, and envelopes you can emulate many of the instruments that are available today, and in the process you will learn much about synthesis. I am going to be using Logic's ES2 to demonstrate this, but you can choose any other synth. As long as it has more than 2 oscillators, and either one or more envelopes.
Step 1 – The Kicks
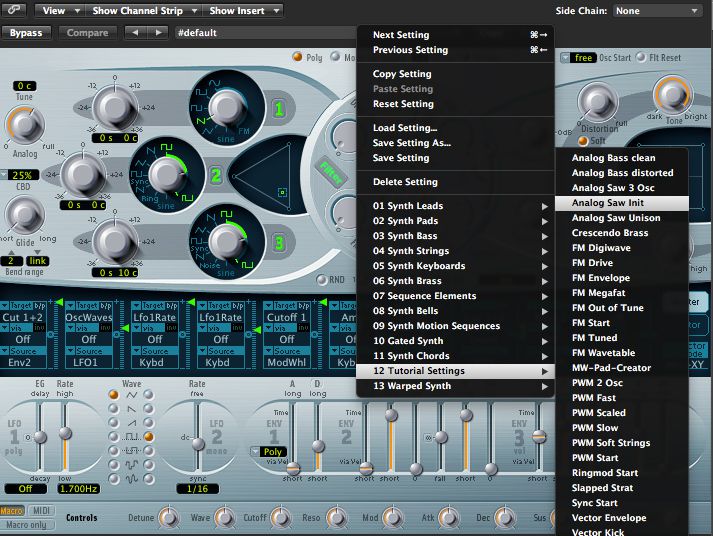
For each sound I will start by using the ES2 Analog Saw Init preset (this can be found under 12 Tutorial Settings > Analog Saw Init).
Let's start with designing a Kick sound. Kicks normally have a very fast initial attack and then a quick release to the sound.
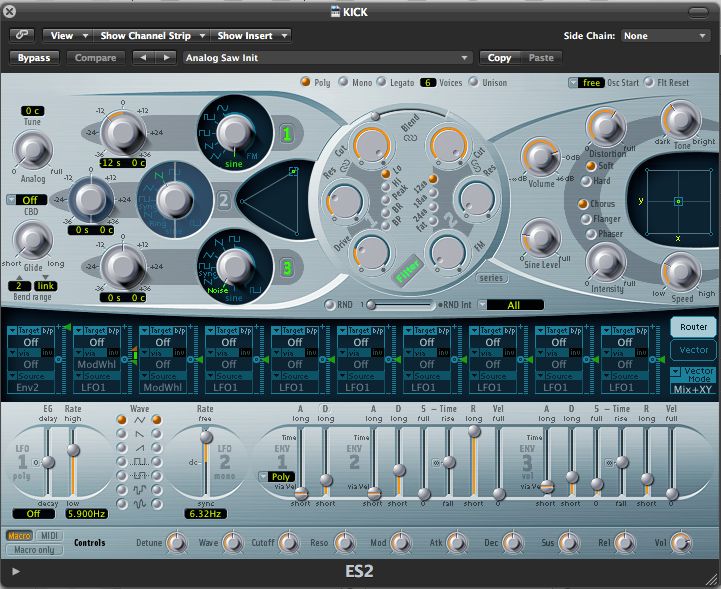
I have initialized Osc 1 with a Sine waveform. I have pitched the sound down by -12st. I have added Osc 3 with a Noise waveform. Use the Triangle Mix window to get the best mix between the two oscillators. The Noise waveform adds some higher harmonics, which are not available with the Sine waveform.
Next I have moved onto Envelope 3. Here I use a very short attack (A), and lowered the Decay (D) and Sustain (S). Also lower the Release (R), so you hear the attack of the oscillators but the release keeps the sound short to give it the 'Kick-Like' sound.
On the Filter section I have added some drive to saturate the kick sound, and I have opened up the Cutoff all the way, but you can tailor this to the kick sound required for your track.
I have increased the Sine Level, to reintroduce some lower bass frequencies and I have added a fair share of Distortion to color the sound. You can also tweak the Tone knob. I have leaned it more towards the dark side to subdue the kick.
Take a listen here to what the synthesized kick sounds like:
Step 2 – Snare It Up
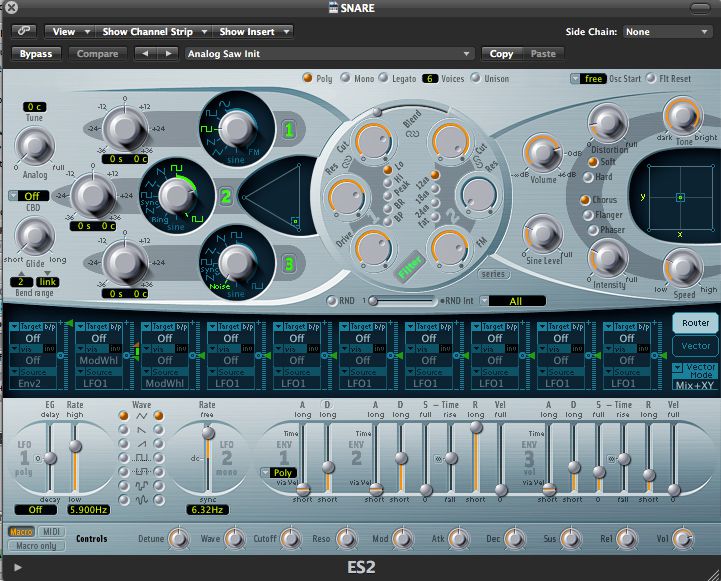
Snares sit in a higher register to kicks, so I am going to combine a mix of oscillators to give that spectral snare sound. On Osc 1 I have added a square waveform. Osc 2 is a blend between two different square waveforms to add some variance to the square waveform sound. I have introduced some Noise with Osc 3. White noise can really give your sound a 'snare-like' character due to the harmonics it contains. I have blended these oscillators together in the Triangle Mix window.
On the Filter section, I have included some drive and FM. I have set the Filter Blend slider all the way to the left, but you can move it to the right if you want to introduce the filter 2 sound.This will give the sound a saturated digital character. I have cutback the filter with the Cutoff frequency, and I have added a high Res amount.
I have brightened the sound with the Tone knob, and I have added some slight Distortion.
To spread the Snare sound I have added a Chorus effect with a slow Speed and have increased the Intensity till the effect sits nicely with the Kick.
On the Envelope 3, I have turned down the decay (D) and Sustain (S), and have added a slight Release (R).
Take a listen to my snare here:
Step 3 – Take Your Hats Off
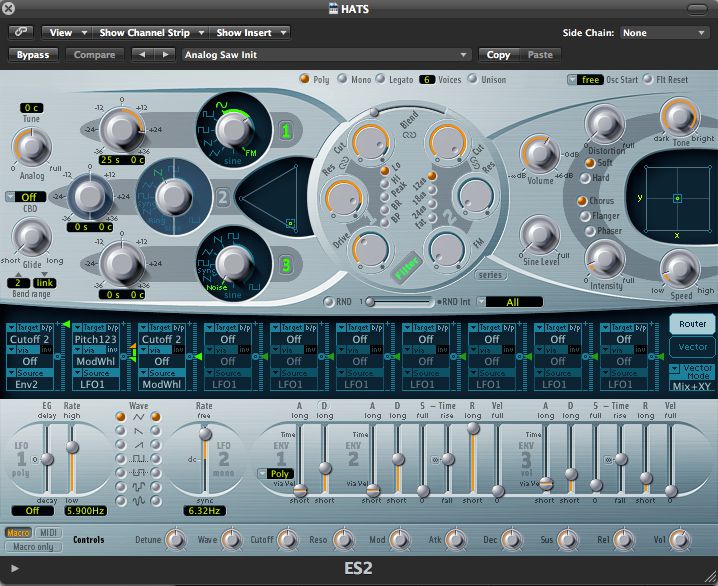
Hats can also be created using a Noise oscillator waveform. I have used one, but have also mixed a Sine/FM waveform combination with the noise oscillator. A mix of different waveforms can really go a long way to creating realistic instruments and sounds.
I have added some slight Chorus with a low Speed and Intensity to modulate the sound. You can also saturate your hats with some Drive. In Envelope 3, turn down the Decay (D), Sustain (S) and Release (R) to get a closed hat sound.
Take a listen to my hat sound :
Step 4 – Give Me Some Bass
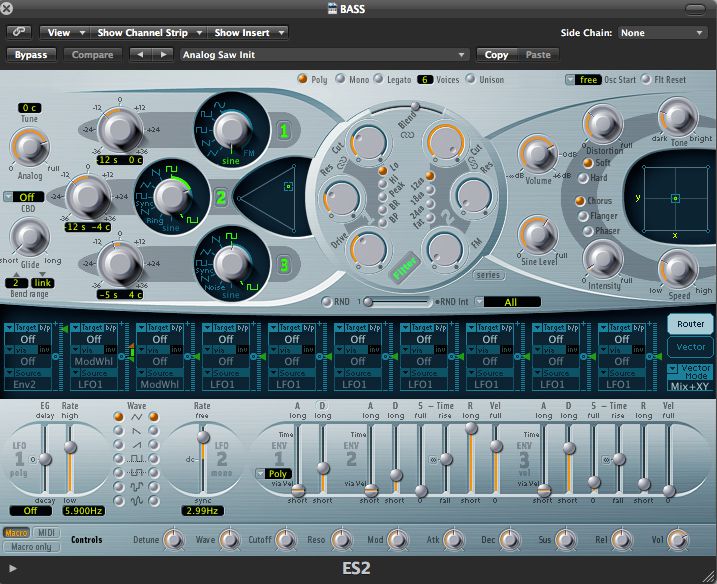
With the Bass I have used 3 different oscillators: a Sine wave detuned by -12st, a Square wave combination detuned by -12st -6c, and another square waveform detuned by -5st 4c. The differing detuning of the oscillators creates depth with the bass sound.
I have added some Analog to the synth, and have mixed these 3 oscillators together.
On the Filter I have blended two different Cutoffs together to get the desired sound, and have included some Drive to color the sound.
I have again increased the Sine Level to add some lower bass registers, and some Distortion to the sound.
Tailor the envelope (Env 3) to your liking. But short attacks and releases work the best to retain the bite of the bass sound.
Here is what my bass sounds like:
Step 5 – Pimp My Pad
What works with pads are slower attack rates, and longer sustain and release times.
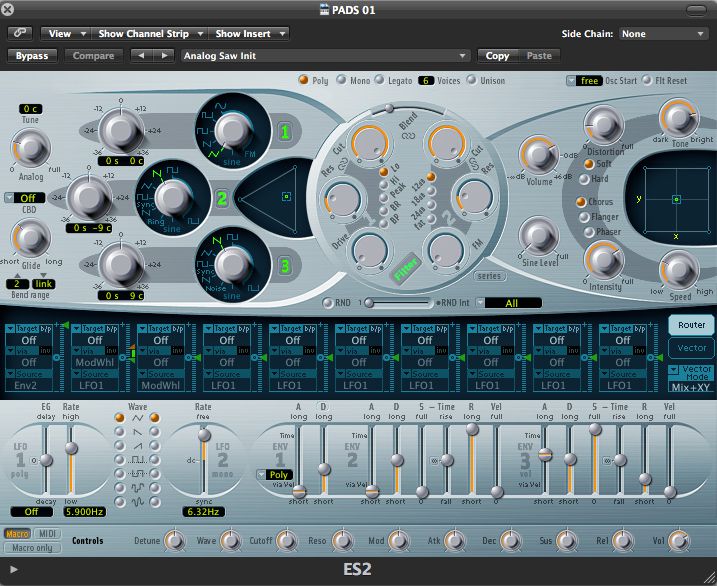
For my first Pad sound I have used one triangle and two sawtooth waves. I have slightly detuned Osc 2 and Osc 3 to widen to synth sound. I have added some Analog and Glide to the sound.
As you can see I have a high Attack, Sustain on the synth.
For the effect I have added a Chorus with a high Intensity and slow Speed.
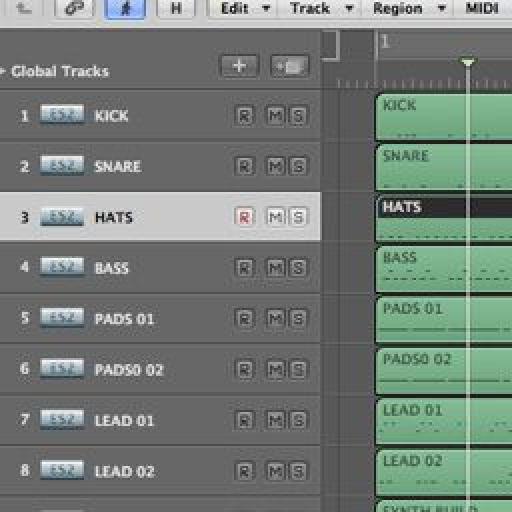
I have duplicated this Pad to another channel (Command-D), and have altered the parameters slightly to create some differentiation between the pads.
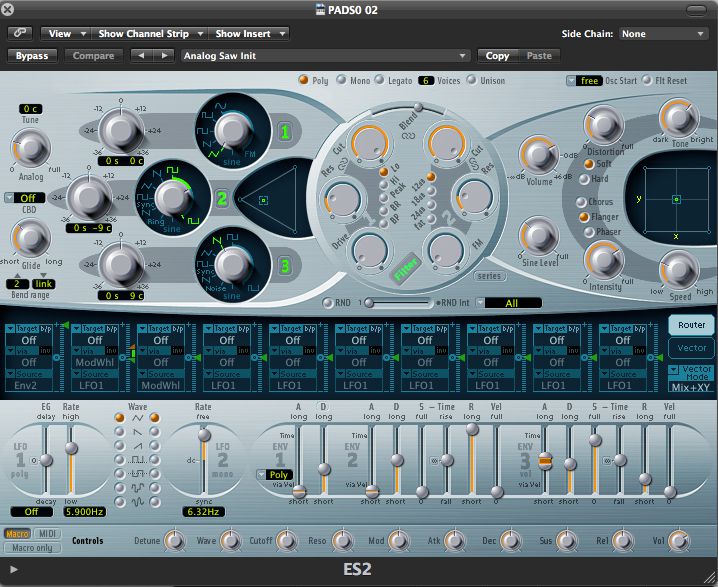
I have used a combination of triangle and square waveforms with some Distortion.
Again on the Envelope I have a high Attack, and Sustain setting.
I have used a Flanger effect on the synth with a high Intensity and slow Speed.
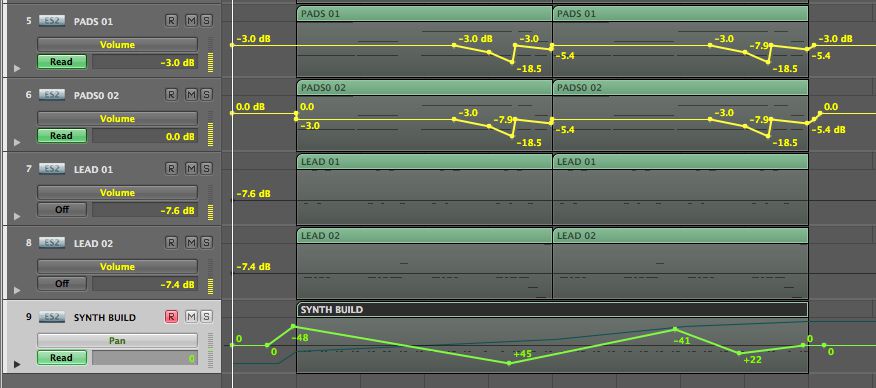
I have panned the pads to different sides on the stereo field to create interest.
Here are my two Pad sounds I have created:
Step 6 – Lead The Way
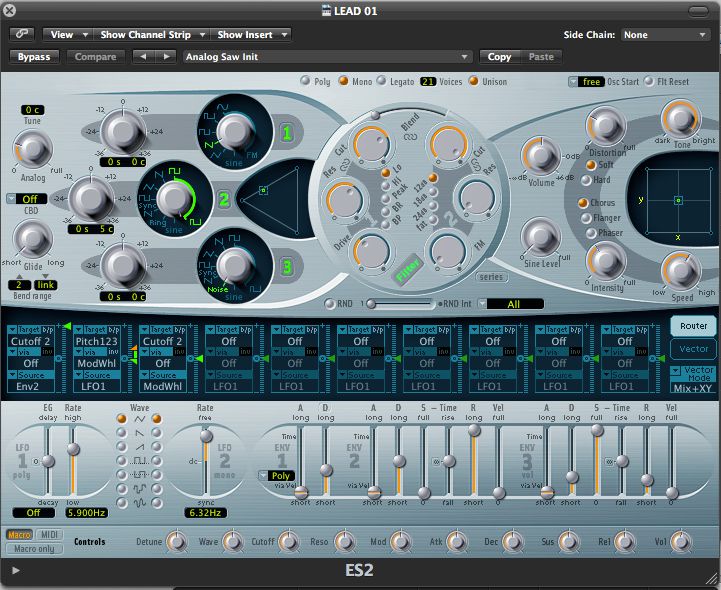
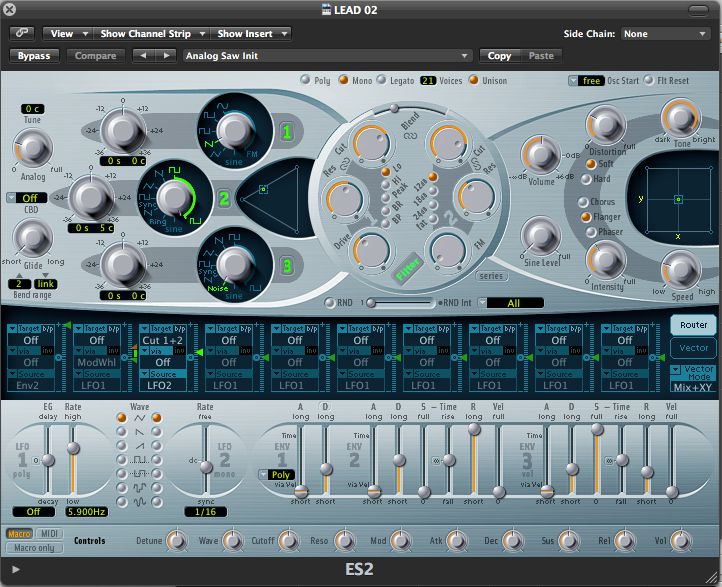
Onto the Leads. Leads need to pierce through the mix and provide the melodic content of the track. I have built upon what I have covered above to create a synth with three different oscillators.
Lead 01 contains a Saw, Pulse, and Noise waveforms. I have added some chorus modulation. With the Envelope I have a short attack, a long sustain, and a short release. The keyboard mode is set to Mono, Unison is turned on, and Voices is set to 21 to give a fatter sound.
Here is my first Lead Synth:
With Lead 02 I have used the same oscillators, but have slightly changed the filter settings and have added a flanger instead of chorus. I'm using LFO 2 set to 1/16 to modulate Cutoff 1 and 2.
I have panned the leads to different sides of the stereo field.
Step 7 – Build up
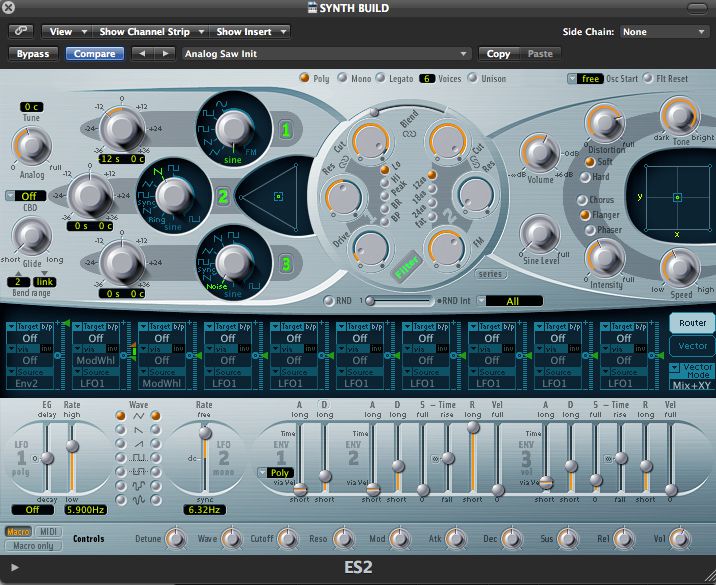
The last element I have added to the mix is a simple, sound effect build up. The ES2 contains 3 oscillators again (Sine, Triangle, and Noise).
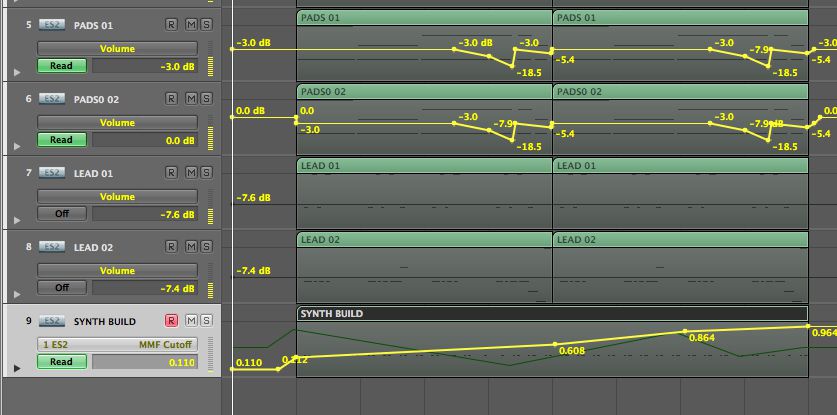
There are some Distortion and Flanger effects applied. But over the course of 4 bars I have panned the sound around via automation, and I have automated the cutoff filter of the ES2.
The Pan Automation
The Cutoff Automation
Take a listen here:
And take a listen here to all the instruments together:
Conclusion
As you can see, quite a bit can be achieved if you start to explore the capabilities of your synths. By doing this, you will open up sound design opportunities for yourself. By increasing your knowledge on synthesis, you can start replicating sounds via sound design instead of going straight for samples or sample libraries.
I hope this tutorial will encourage you to explore the oscillators, filters, and envelopes further on your synth plugins.
Next time, instead of jumping for a sample or sample library, try your hand at synthesizing the sound instead. You could come up with a more interesting idea than the already used samples you have.
For further sound design tips make sure you look at the following tutorials:
Native Instruments 201 — Razor
Native Instruments 210 — FM8: FM Synthesis and Sound Design
Live 8 402 — Designing Sounds for Dance Music


 © 2024 Ask.Audio
A NonLinear Educating Company
Discussion
...thanks!
Limiting yourself to one synth is a good way to learn the ins and outs of a synth. Its all too easy to jump for the presets.
But when you learn the synth interface and its settings, thats when you can really start designing your own presets and sounds.
Want to join the discussion?
Create an account or login to get started!