
Sometimes even the best vocal line or guitar part can sound thin or weak in a mix. Traditionally, for vocals, adding more singers singing the same melody or recording multiple takes by the same singer can enrich the sound and add presence and depth to the performance. For many years chorus effects pedals have been used by guitarists to create a double-track effect (two players playing in unison) or more weird and wonderful shimmering, rich and even psychedelic sounds.
A chorus effect works by re-creating the original sound but at a slightly different timbre or pitch by doubling and delaying the original signal . Let's explore some ways to add chorus effects to your tracks in Logic. The basic principles here can be applied to any DAW...
I've chosen to use an Apple Loop: Sophie Melody 04 from the Vocal Jam Pack Library.
Method 1 - Duplicate and Delay
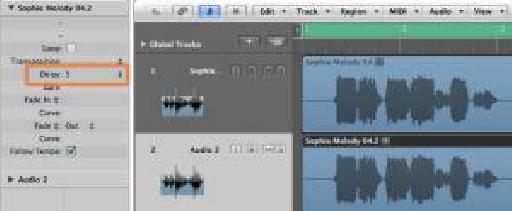
Duplicate the Audio track and copy the Audio region onto the duplicate track. Make sure you adjust the levels of both audio channels or your Output channel, as this will basically increase the volume.
Select one of the loops and in the Region Inspector you'll see a 'Delay' parameter. Double-click in the empty space to the right of the word 'Delay' and type in a small number. Try '5'. Press Enter.
Small delays will create a subtle chorus effect. I tend to use values between 1 and 10 but you can explore how different delay values can create extremely varied effects.
Method 2 - The Chorus Plugin
This does essentially the same thing as in method 1 plus more. There is no need to duplicate the track and region because the Chorus Effect delays the original signal and mixes it with the modulated or delayed signal. Logic's Chorus effect uses an LFO to determine the amount of timing delay and you can increase the intensity and mix of the dry and processed signals.
Place the Chorus effect as an Insert effect on the channel strip. In this example, I've chosen to mix the dry and processed signals equally and set the value of the Mix to 50%.
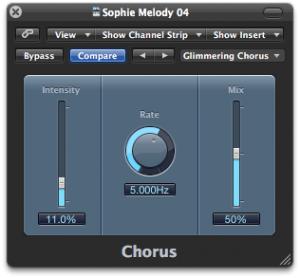
I've set the Intensity to 11% to avoid the 'warbling' effect as my aim is to thicken the vocals and add a feeling of multiple signers performing in unison.
Finally, I've set the 'rate' to 5Hz. This defines the amount of delay and thus pitch and timing effect. Try adjusting the level of intensity and rate to get a feel for how they interact and affect the sound.
Want an even richer sound? Check out the Ensemble insert effect. This allows up to eight chorus effects and can seriously thicken your original signal!
Method 3 - The Pedal Board
New in Logic 9 is the Pedal Board plugin in the Amps and Pedals section. Within Pedal Board are two useful chorus effects 'Retro Chorus' and 'Heavenly Chorus'. Both are worth checking out whether you are a guitarist or not. 'Retro Chorus' is great for a very subtle chorus effect. You have a simple interface for the Rate and Depth only.
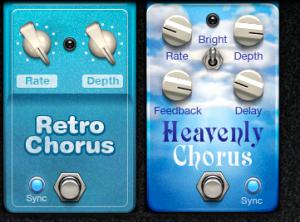
The Heavenly Chorus provides many more options. The rate of modulation can be synced to Logic's tempo or run freely. Delay sets the delay between the original and processed signals. Depth set at 0% is almost like bypassing the effect. 100% and we have a full blown chorus effect! Feedback determines how much of the processed signal will be fed back into the input. This can lead to some very interesting further modulations. Finally, there is a brightness switch to accentuate the higher frequencies.
In Part 2, we'll explore how to create varied and wonderful chorus and harmony effects using Logic Pro's Delay Designer...

Discussion
Steve
Also, when using the delay trick in method 1, don't forget you can use negative numbers too...this gives pre-delay, if you know what I mean. This can add interest.
Yes, negative delay numbers for a 'pre-delay' effect can work great too!
Want to join the discussion?
Create an account or login to get started!