
Quindi, avete finito di comporre, registrare, arrangiare, mixaggio e mastering la vostra canzone / musica in Logic. E poi? Beh, si potrebbe giocare i brani musicali finito in Logic ... tanto quanto io amo logica, non è il mio lettore musicale della scelta! Si potrebbe desiderare di ascoltare la traccia finita in macchina, nel bagno, sul vostro iPod tramite iTunes ... o forse hai più grande aspirazioni e vuole condividere via YouTube, MySpace, Facebook o masterizzarlo su un CD come demo o per prepararlo per uno studio di mastering! Come si può vedere l'elenco si allunga sempre più. Quello che fai con la tua musica dopo aver finito il processo creativo è interamente a voi ... ma la grande domanda è come ottenere la vostra musica fuori dalla logica e nel resto del mondo. In questo tutorial Hub tratteremo solo come farlo in entrambi Logic 8 e Logic 9.
Fase 1 - Lasciare O ut
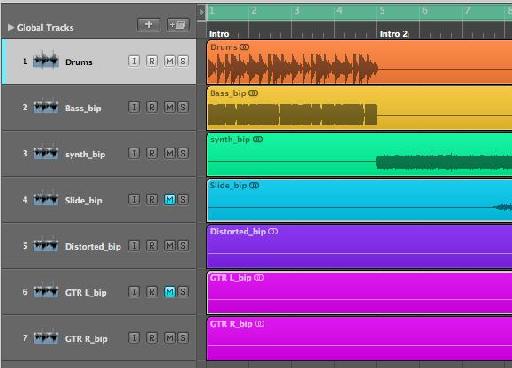
Il primo aspetto è quello di scegliere quali parti del vostro finestra Arrange si vuole essere presenti nel mix finale. Una regola generale è che tutto ciò che si può sentire dal canale stereo Logic uscita 1-2 appariranno nel file audio esportato.
Così ora è un buon momento per disattivare tutte le tracce o regioni non volete nel vostro mix finale!
Fase 2 - Non E sporta, Bounce
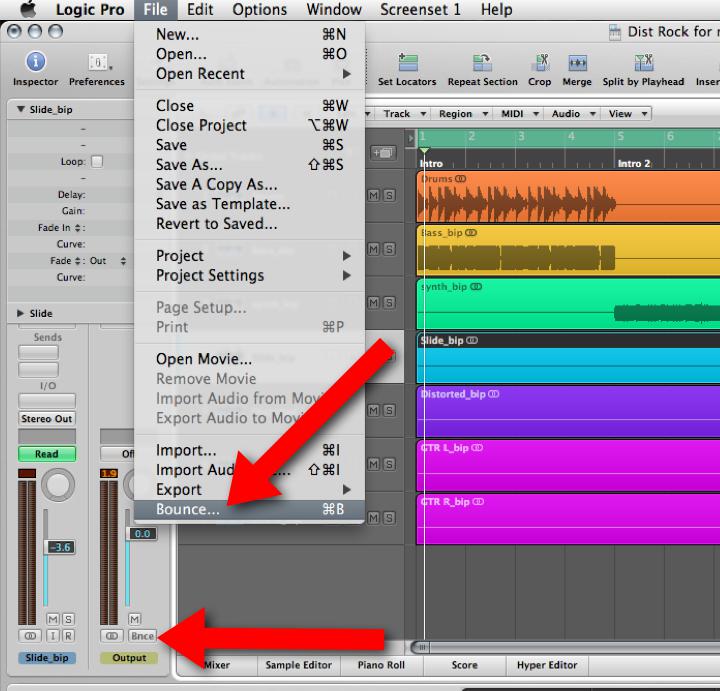
La prima volta che quasi tutti, me compreso, ha voluto esportare la loro canzone finita da Logic hanno cominciato a cercare il comando export ... Fermarsi proprio lì! Questo non è ciò che si desidera in questo caso. Il File
Quello che vogliamo fare è di mescolare-down o rendere tutti i brani udibili in un unico file audio. Nella logica di questo processo è noto come "Bounce". Troverete questo nel file
È anche possibile vedere il pulsante Bnce sulla Striscia di canali di uscita nella finestra di ispezione e / o la finestra Mixer.
Fase 3 - La finestra Bounce Demy stified
La finestra Bounce è un incrocio tra un normale "Salva con nome ..." dialogo e una vasta gamma di possibili variabili e opzioni tra cui scegliere. Se avete familiarità con i computer Mac e, probabilmente stare bene con la metà superiore della finestra. Qui è possibile scegliere il nome del file rimbalzato e scegliere la posizione che verrà salvato.
La metà inferiore della finestra occasioni il rimbalzo con la destinazione, i formati di file e il tipo di rimbalzo che si desidera eseguire. La prima area di concentrarsi su è sotto la casella di destinazione. Qui possiamo decidere quale area della zona Arrange sarà rimbalzato
Nota: Se si imposta una zona Cycle nella vostra disposizione prima di rimbalzare i punti di inizio e fine sarà automaticamente impostato sul locatori sinistro e destro rispettivamente.
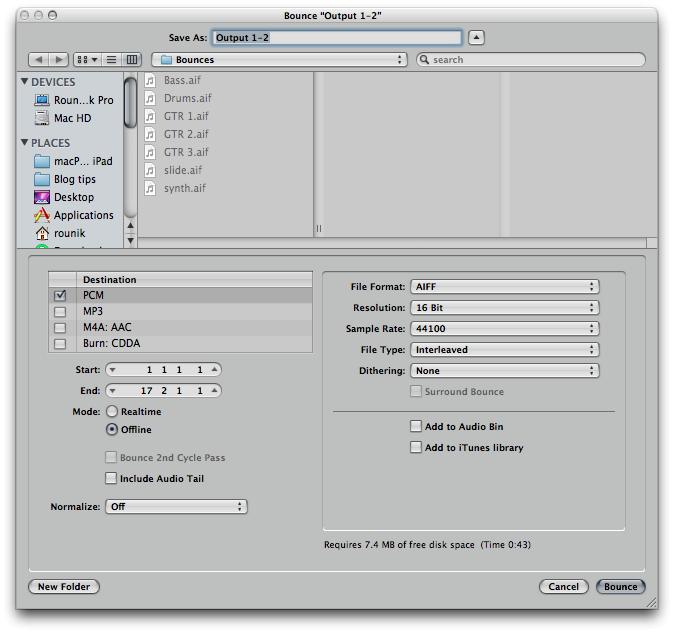
La modalità di rimbalzo può essere modificata in tempo reale tra o non in linea. Normalmente linea sarà più veloce, ma non sarà in grado di sentire il rimbalzo come si svolge. Anche se si utilizzano alcuni oggetti in tempo reale in Logic Organizzare zona come Linee di ritardo e arpeggiatori che potrebbero non apparire in finale rimbalzato file audio.
Includi coda audio è utile se alla fine della vostra canzone ci possono essere ritardi o riverbero che è ancora udibile al di là del punto finale. Questa caratteristica gli permetterà di essere catturato rater di tagliare alla fine della canzone.
Infine la funzione Normalizza normalizza o aumenta il livello dell'audio finale per renderlo più forte perceivably. Io di solito mantenere la mia posizione OFF come preferisco mixare e masterizzare alla mia impostazioni personalizzate prima di rimbalzare il progetto. Altre opzioni includono On e Protezione sovraccarico solo. Questa opzione in seguito può essere molto utile se rimbalzare un mix resoconto di accertarsi che i livelli non è mai clip o creare distorsioni.
Fase 4 - Destinazione wn Unkno
La destinazione del file audio finale dipende molto da come si vuole distribuire o ascoltarlo. Selezione di una destinazione aggiornerà le opzioni di formato a destra della finestra Bounce.
PCM: PCM o Pulse-code modulation, è un modulo standard per l'audio digitale. E non è compresso e in grado di fornire alta qualità. Si dovrebbe utilizzare questa destinazione per archiviare la vostra canzone e / o passare un mix a uno studio per Mastering e di rimbalzo su CD.
Qui si può scegliere il formato file (AIF e WAV sono ancora i due più popolari e ampiamente accettata al momento della scrittura).
Risoluzione (spec CD è 16-bit, per fornire una Casa Mastering con il tuo mix si consiglia di utilizzare 24-bit).
Assicurarsi che la frequenza di campionamento o è lo stesso progetto o, se necessario, cambiarlo per la frequenza di campionamento richiesta. CD è 44,1 kHz. Audio per il cinema vengono richieste ad una frequenza di campionamento di 48 kHz.
Tipo di file interleaved metterà i canali destro e sinistro nello stesso file audio. Ci può essere il momento in cui si desidera che il lato destro e sinistro del campo stereo diviso a lavorare bene con Pro Tools ...
Le opzioni di dithering vengono utilizzati quando si riduce la profondità di bit del progetto da 24-bit a 16-bit. Si aggiunge una piccola quantità di rumore. E 'oltre lo scopo di questo post del blog di delineare i diversi algoritmi disponibili qui ... Non esiste una taglia unica. Provare a giocare e ascoltare di nuovo per avere un'idea di quello che suona meglio all'orecchio.

Fase 5 - MP3 e M4A / AAC
Se siete interessati a creare gli mp3 o qualità inferiore versioni compresse della vostra musica per la distribuzione tramite MySpace e altri siti di condivisione di MP3 ... o semplicemente da inserire nel tuo iPod, abilitare l'opzione MP3!
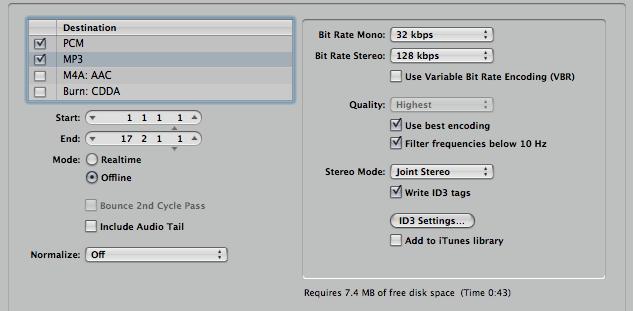
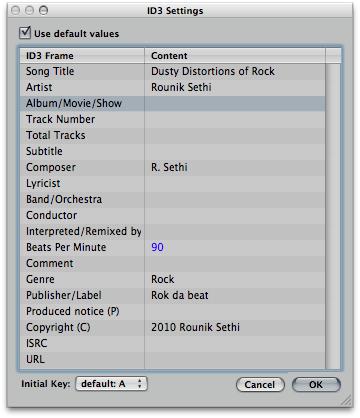
After enabling the MP3 option, make sure the MP3 destination is highlighted so the Format options are updated to reflect that. Here you'll be able to change the quality of the Bit rate, encoding and even set the ID3 tags. These are tags that will be written to the mp3 file, for example the composer, artist, copyright, etc.
Si hanno meno opzioni sotto la destinazione AAC, ma forse sono meglio qualità mp3. Per entrambi gli mp3 e M4A/AAC si può anche scegliere di aggiungere alla vostra libreria di iTunes.
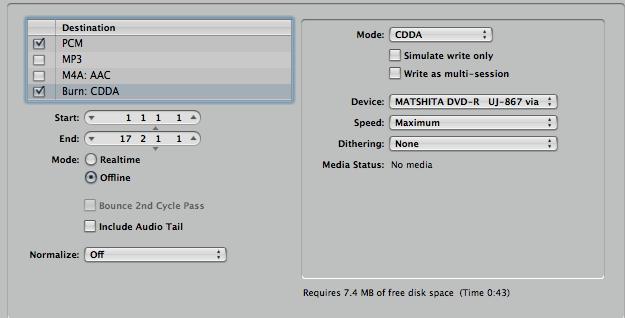
Fase 6 - su CD
Anche se può sentire come i CD sono sulla loro via d'uscita ... purtroppo ... Ci sono momenti in cui si consiglia di bruciare la traccia diretta un CD audio da Logic. Questo è esattamente ciò che la masterizzazione: opzione di destinazione CDDA ti permette di fare.
È possibile scegliere di masterizzare a CDDA (CD Digital Audio) o DVD-A (DVD Audio) dalla modalità menu a discesa.
Le altre opzioni sono standard per la maggior parte dei software, ma soprattutto è necessario scegliere il dispositivo corretto (CD Burner collegato al Mac), la velocità e le opzioni di dithering. Ricorda che se il progetto contiene tutti i file audio a 24-bit è necessario utilizzare le opzioni di dithering per ridurre la profondità di bit a 16-bit (che è necessaria a causa dell'elevato contenuto tecnologico spec CD).
Ora siete pronti a Fare clic sul Respinto
To learn more about Logic check these tutorials out!
We'd love to hear from you. Let us know what you think by writing a comment below!
.

Discussion
I found this article interesting and enlightening. Well done.
Right now I'm trying to take audio from logic, sync it with video in quicktime 7 and upload it to youtube. I've found tips online suggesting the proper export settings for audio but for some reason I'm getting strangely inconsistent results. For example:
http://www.youtube.com/watch?v=tptZZ1DtGL4
The audio in the video above increases in quality dramatically when the vid is played in HD.
....but, this vid has the same audio in standard and HD but I believe I used all the same settings:
http://www.youtube.com/watch?v=ko5LE9DBtC0
....Can you please shed some light on this?
Thanks so much,
Aram
(what more could you need?)
why is that important? because when you are in the creative flow, the actually very last thing you want to do, is to stop. and then have to use another side of your brain and get technical and follow code and stuff (often frustrating obscure stuff!) to find out why something didn't work... and where is the flow gone?
I see you at macprovideo are making your presentations into an 'information flow', with clear diagrams.. and this is excellent!
Thanks! Glad to hear you find this blog useful! Completely agree that switching from Creative to technical can slow you down in any creative pursuit. Keep checking the Blog and of course the Video tutorials which will help you fly with Logic. Knowing most of technical side of Logic leaves a whole lot more time to experiment and explore the creative side :)
Sorry to have missed your comment... I've tried looking at your first videos... it seems to have been removed from YouTube. If you'd still like some help let me know here or pop by the www.macProVideo.com forums :)
Best
Rounik
Mostly I have this 16 track board and I'm using it for my interface but other than the gain knob for each track, none of the other knobs have any effect on what is being recorded. The faders, highs, mids, and low knobs all have no effect. Just wondering if you knew of any way to fix that.
Thanks for all the help!!
Thanks for the question. I'd need to know the make / brand of the audio interface you're using. Is it a recognised control surface in Logic?
Probably best to post this in a new thread on the Macprovideo Logic forums:
http://www.macprovideo.com/forum/
Much easier to keep track of logic questions there and Myself and other Logic users can help you out more easily.
Thanks :)
Thanks ahead.
Have you tried opening the Logic 4.7 projects in Logic 9? This may (*may*) work... but I imagine if you're using Logic 9.1.5 in 64-bit mode on an intel Mac you'll likely find it impossible.
You will need to find someone with a copy of Logic 7 that will be able to open the Logic 4.7 projects and then save them as version 7 projects. Logic 9 is capable of opening Logic 7 projects.
Hope this helps
Rounik
Great posting. Clear and factual.
You are clearly a great teacher.
Say, I am having an issue that just surfaced.
When I bounced a final mix ot WAV or AIFF...the file sizes increased dramatically.....ie, from 85 mgs to 250 mgs!
What have I done to cause this?
My initial mixes where at 85 mgs...then I added a guitar track and re-bounced and BOOM....HUGE file...
I appreciate your feedback in advance.
Chet
Thanks for the kind words.
A couple of questions:
What file format and bit depth did you originally bounce the project to... and what format and bit depth is the newly bounced file?
Also, did you bounce the entire timeline of the project - or just (using locators) around the song?
Thanks
R
Well, I originally made a WAV file....which loaded into iTunes nicely and using iTunes converter I created an AIFF, an MP3_320 and MP3_128 file. I like to create the files when I am bouncing so I have them available for various uses. The WAV file is 84 mgs, the AIFF is 56 mgs, the MP3_320 is 12 mgs and the MP3_128 is 5 mgs.
After I added an electric guitar track to sweeten the track, I re-bounced the whole song and the file sizes of the WAV, the AIFF, the MP3 grew before my very eyes.
285 mgs, 227 mgs, 85 mgs.....etc.
I am kind of new to Logic. I used it years ago, but discovered Garage Band and became very good with it....but I wanted to do more, so I got Logic Studio and started learning all over again.
I have the resolution set at 24....and the sample rate at 44100. It was this way the first time.
I do see the Surround bounce is checked....could that be the culprit?
I am bouncing the entire timeline....not clear how to use and set and what the locators are.
I am like you....I like a clean mix and want to bounce a track and have it sound exactly like the mix.
(You can check out my music at:
http://www.chetnicholsmusic.com)
I am a longtime composer and singer-songwriter and inductee in The Kansas Music Hall Of Fame....
I want to thank you in advance for your help!
Chet
chet@chetnichols.net
Do I need to reduce the bit rate? Any other ideas?
Want to join the discussion?
Create an account or login to get started!