
Donc, vous avez fini de composer, enregistrer, organiser, mixage et mastering de votre chanson / musique dans Logic. Et après? Eh bien, vous pourriez jouer vos morceaux de musique a terminé dans Logic ... autant que j'aime la logique, ce n'est pas mon lecteur de musique de choix! Vous pouvez écouter votre piste a terminé dans la voiture, dans le bain, sur votre iPod via iTunes ... ou peut-être que vous avez grandiose aspirations et voulez le partager via YouTube, MySpace, Facebook ou le graver sur un CD de démo ou de le préparer pour un studio de mastering! Comme vous pouvez voir la liste s'allonge sans cesse. Qu'est-ce que vous faites avec votre musique une fois que vous avez terminé le processus créatif est entièrement à vous ... mais la grande question est de savoir comment obtenir votre musique à partir de Logic et dans le reste du monde. Dans ce tutoriel nous allons couvrir Hub simplement comment faire cela à la fois dans Logic 8 et Logic 9.
Étape 1 - Laissez-O ut
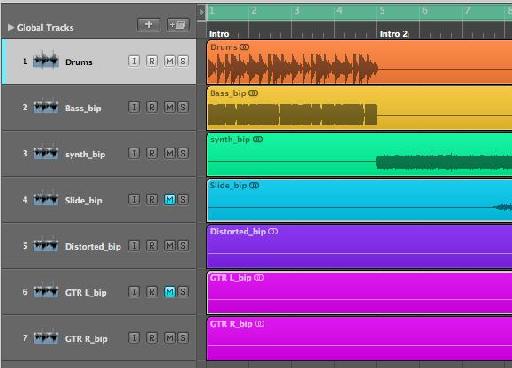
Le premier aspect est de choisir quelles parties de votre fenêtre Arrangement vous voulez être présent dans votre mix final. Une règle de base est que tout ce que vous pouvez entendre stéréo Logic canal de sortie 1-2 apparaîtra dans votre fichier audio exporté.
Donc c'est maintenant un bon moment pour couper toutes les pistes ou les régions que vous ne voulez pas dans votre mix final!
Étape 2 - Non E XPort, Bounce
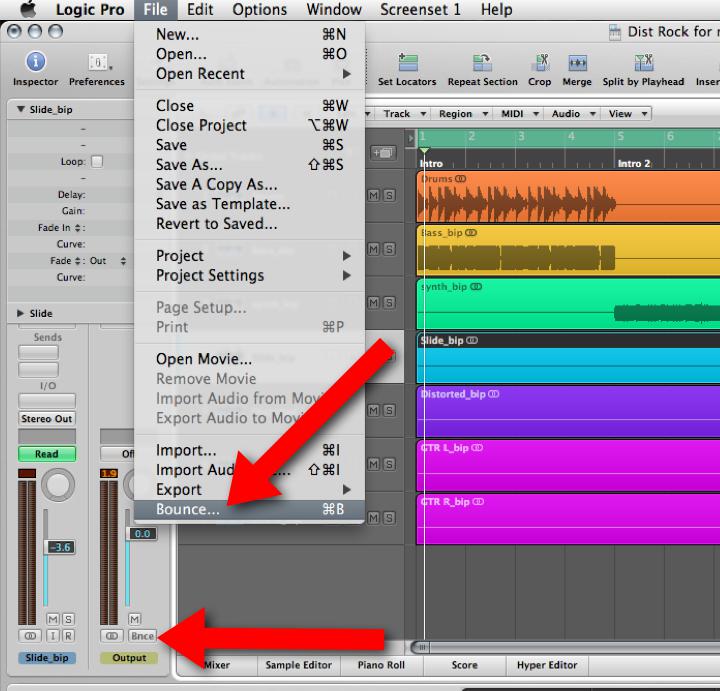
La première fois que presque tout le monde, moi y compris, ont voulu exporter leur chanson finie à partir de Logic-elles commencé la recherche de la commande export ... Arrêtez-vous là! Ce n'est pas ce que vous voulez dans ce cas. Le fichier
Qu'est-ce que nous voulons faire est de mélanger-vers le bas ou de rendre toutes les pistes sonores d'un fichier audio unique. Dans la logique de ce processus est connu comme "Bounce". Vous trouverez dans le fichier
Vous pouvez également voir le bouton Bnce sur la bande de canaux de sortie de l'inspecteur et / ou de la fenêtre de mixage.
Étape 3 - La fenêtre Bounce Demy stified
La fenêtre Bounce est un croisement entre un normal "Enregistrer sous ..." dialogue et un vaste éventail de variables possibles et d'options à choisir. Si vous êtes familier avec les ordinateurs et Macs, vous serez probablement à l'aise avec la moitié supérieure de la fenêtre. Ici vous pouvez choisir le nom du fichier a rebondi et choisissez l'emplacement où il sera sauvegardé.
La moitié inférieure de la fenêtre Bounce les offres avec la destination, les formats de fichier et le type de rebond que vous souhaitez effectuer. La première zone se concentrer sur est inférieure à la zone Destination. Ici, nous pouvons décider de ce domaine de la zone Arrangement sera rebondi
Remarque: Si vous définissez une zone Cycle dans votre arrangement avant de rebondir les points de début et de fin seront automatiquement mis à l'locators gauche et droit respectivement.
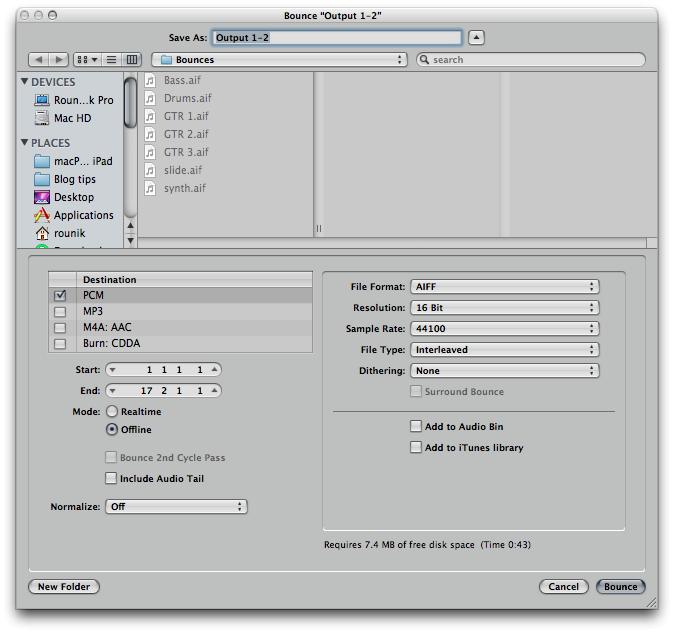
Le mode de rebond peut être changé entre temps réel ou hors ligne. Normalement Hors sera plus rapide, mais vous ne serez pas capable d'entendre le rebond comme elle a lieu. Aussi, si vous utilisez des objets en temps réel dans Logic zone Arrangement, comme lignes à retard et arpégiateurs ils peuvent ne pas apparaître dans la finale rebondi fichier audio.
Inclure Queue audio est utile si à la fin de votre chanson il peut y avoir de retard ou de réverbération qui est toujours audible au delà du point de fin. Cette caractéristique lui permettra d'être capturé à l'évaluateur coupé à la fin de la chanson.
Enfin la fonction Normaliser normalise ou élève le niveau de l'audio final pour le rendre perceptible, plus fort. Normalement, je garde mon OFF comme je préfère mélanger et maître de mes propres paramètres personnalisés avant de rebondir le projet. D'autres options incluent Sur et surcharge seule protection. Cette option peut être plus tard, très utile si rebondir un mélange rapide pour s'assurer que les niveaux n'ont jamais clip ou cause pas de distorsion.
Étape 4 - Destination Unkno wn
La destination de votre fichier audio final dépend beaucoup de comment vous voulez distribuer ou écouter. Sélection d'une destination mettra à jour les options de format sur la droite de la fenêtre Bounce.
PCM: PCM ou Pulse-Code Modulation, est une forme standard pour l'audio numérique. Il n'est pas compressé et peut fournir de haute qualité. Vous devez utiliser cette destination pour archiver vos chansons et / ou passer un mélange à un studio pour le mastering et de rebondir sur un CD.
Ici vous pouvez choisir le format de fichier (AIF et WAV sont toujours les deux plus populaires et largement accepté au moment de la rédaction).
Résolution (CD spec est 16-bits, afin de fournir une Maison mastering avec votre mix, vous devez utiliser 24-bit).
Assurez-vous que la fréquence d'échantillonnage est soit le même que votre projet ou si nécessaire le changer pour le taux d'échantillonnage requise. CD est de 44,1 kHz. Audio pour le cinéma sera généralement nécessaire à une fréquence d'échantillonnage de 48 kHz.
Type de fichier entrelacé placera les canaux gauche et droit dans le même fichier audio. Il ya peut-être temps quand vous voulez les côtés gauche et droite de votre champ stéréo séparée de bien travailler dans Pro Tools ...
Les options de tramage sont utilisés lors de la réduction de la profondeur de bits de votre projet à partir de 24 bits à 16 bits. Il ajoute une petite quantité de bruit. C'est au-delà de la portée de ce post de blog pour présenter les différents algorithmes disponibles ici ... Il n'ya pas de taille unique. Essayez-les et réécouter pour avoir une idée de ce que meilleurs sons de votre oreille.

Étape 5 - MP3 et M4A / AAC
Si vous êtes intéressé par la création mp3 ou de qualité inférieure versions compressées de votre musique pour la distribution via MySpace et autres sites de partage de MP3 ... ou tout simplement à placer sur votre iPod, activer l'option MP3!
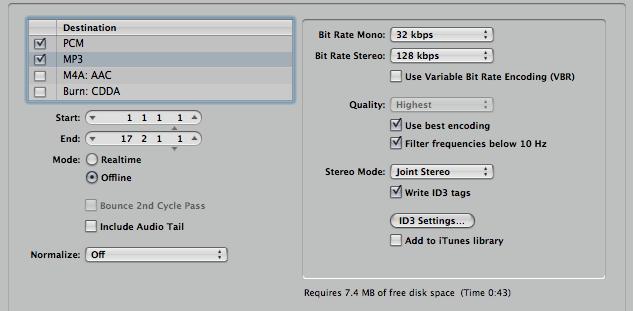
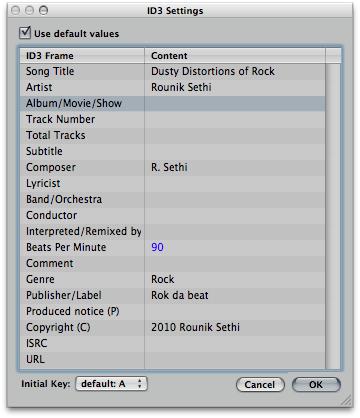
After enabling the MP3 option, make sure the MP3 destination is highlighted so the Format options are updated to reflect that. Here you'll be able to change the quality of the Bit rate, encoding and even set the ID3 tags. These are tags that will be written to the mp3 file, for example the composer, artist, copyright, etc.
Vous avez moins d'options sous la destination de l'AAC, mais sans doute qu'ils sont de meilleure qualité que le mp3. Pour les deux mp3 et M4A/AAC vous pouvez également choisir d'ajouter à votre bibliothèque iTunes.
Étape 6 - sur CD
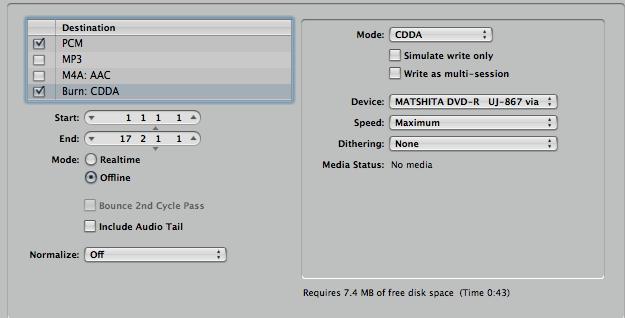
Bien qu'il puisse se sentir comme les CD sont sur leur chemin ... Malheureusement ... Il ya des moments où vous pouvez graver vos route directe vers un CD audio à partir de Logic. C'est exactement ce que le Burn: option de destination CDDA vous permet de faire.
Vous pouvez choisir de brûler au CDDA (CD Digital Audio) ou DVD-A (DVD Audio) à partir du mode menu déroulant.
Les autres options sont standard pour les logiciels les plus brûlantes, mais surtout, vous devez choisir le bon appareil (graveur de CD connecté à votre Mac), la vitesse et les options de tramage. N'oubliez pas que si votre projet contient tous les fichiers audio 24 bits, vous aurez besoin d'utiliser les options de tramage pour réduire la profondeur de bits à 16 bits (ce qui est nécessaire en raison de la spécification CD tech).
Maintenant vous êtes prêt à cliquer sur le rebond ou Bounce
To learn more about Logic check these tutorials out!
We'd love to hear from you. Let us know what you think by writing a comment below!
.

Discussion
I found this article interesting and enlightening. Well done.
Right now I'm trying to take audio from logic, sync it with video in quicktime 7 and upload it to youtube. I've found tips online suggesting the proper export settings for audio but for some reason I'm getting strangely inconsistent results. For example:
http://www.youtube.com/watch?v=tptZZ1DtGL4
The audio in the video above increases in quality dramatically when the vid is played in HD.
....but, this vid has the same audio in standard and HD but I believe I used all the same settings:
http://www.youtube.com/watch?v=ko5LE9DBtC0
....Can you please shed some light on this?
Thanks so much,
Aram
(what more could you need?)
why is that important? because when you are in the creative flow, the actually very last thing you want to do, is to stop. and then have to use another side of your brain and get technical and follow code and stuff (often frustrating obscure stuff!) to find out why something didn't work... and where is the flow gone?
I see you at macprovideo are making your presentations into an 'information flow', with clear diagrams.. and this is excellent!
Thanks! Glad to hear you find this blog useful! Completely agree that switching from Creative to technical can slow you down in any creative pursuit. Keep checking the Blog and of course the Video tutorials which will help you fly with Logic. Knowing most of technical side of Logic leaves a whole lot more time to experiment and explore the creative side :)
Sorry to have missed your comment... I've tried looking at your first videos... it seems to have been removed from YouTube. If you'd still like some help let me know here or pop by the www.macProVideo.com forums :)
Best
Rounik
Mostly I have this 16 track board and I'm using it for my interface but other than the gain knob for each track, none of the other knobs have any effect on what is being recorded. The faders, highs, mids, and low knobs all have no effect. Just wondering if you knew of any way to fix that.
Thanks for all the help!!
Thanks for the question. I'd need to know the make / brand of the audio interface you're using. Is it a recognised control surface in Logic?
Probably best to post this in a new thread on the Macprovideo Logic forums:
http://www.macprovideo.com/forum/
Much easier to keep track of logic questions there and Myself and other Logic users can help you out more easily.
Thanks :)
Thanks ahead.
Have you tried opening the Logic 4.7 projects in Logic 9? This may (*may*) work... but I imagine if you're using Logic 9.1.5 in 64-bit mode on an intel Mac you'll likely find it impossible.
You will need to find someone with a copy of Logic 7 that will be able to open the Logic 4.7 projects and then save them as version 7 projects. Logic 9 is capable of opening Logic 7 projects.
Hope this helps
Rounik
Great posting. Clear and factual.
You are clearly a great teacher.
Say, I am having an issue that just surfaced.
When I bounced a final mix ot WAV or AIFF...the file sizes increased dramatically.....ie, from 85 mgs to 250 mgs!
What have I done to cause this?
My initial mixes where at 85 mgs...then I added a guitar track and re-bounced and BOOM....HUGE file...
I appreciate your feedback in advance.
Chet
Thanks for the kind words.
A couple of questions:
What file format and bit depth did you originally bounce the project to... and what format and bit depth is the newly bounced file?
Also, did you bounce the entire timeline of the project - or just (using locators) around the song?
Thanks
R
Well, I originally made a WAV file....which loaded into iTunes nicely and using iTunes converter I created an AIFF, an MP3_320 and MP3_128 file. I like to create the files when I am bouncing so I have them available for various uses. The WAV file is 84 mgs, the AIFF is 56 mgs, the MP3_320 is 12 mgs and the MP3_128 is 5 mgs.
After I added an electric guitar track to sweeten the track, I re-bounced the whole song and the file sizes of the WAV, the AIFF, the MP3 grew before my very eyes.
285 mgs, 227 mgs, 85 mgs.....etc.
I am kind of new to Logic. I used it years ago, but discovered Garage Band and became very good with it....but I wanted to do more, so I got Logic Studio and started learning all over again.
I have the resolution set at 24....and the sample rate at 44100. It was this way the first time.
I do see the Surround bounce is checked....could that be the culprit?
I am bouncing the entire timeline....not clear how to use and set and what the locators are.
I am like you....I like a clean mix and want to bounce a track and have it sound exactly like the mix.
(You can check out my music at:
http://www.chetnicholsmusic.com)
I am a longtime composer and singer-songwriter and inductee in The Kansas Music Hall Of Fame....
I want to thank you in advance for your help!
Chet
chet@chetnichols.net
Do I need to reduce the bit rate? Any other ideas?
Want to join the discussion?
Create an account or login to get started!