
So, you've finished composing, recording, arranging, mixing and mastering your song/music in Logic. What next? Well, you could play your finished music tracks in Logic... as much as I love Logic, it's not my music player of choice! You might want to listen to your finished track in the car, in the bath, on your iPod via iTunes... or perhaps you have grander aspirations and want to share it via YouTube, MySpace, Facebook or burn it to a CD as a demo or to prepare it for a Mastering studio! As you can see the list grows ever longer. What you do with your music after you've finished the creative process is entirely up to you... but the big question is how to get your music out of Logic and into the wider world. In this Hub Tutorial we'll cover just how to do that in both Logic 8 and Logic 9.
Step 1 - Leave it Out
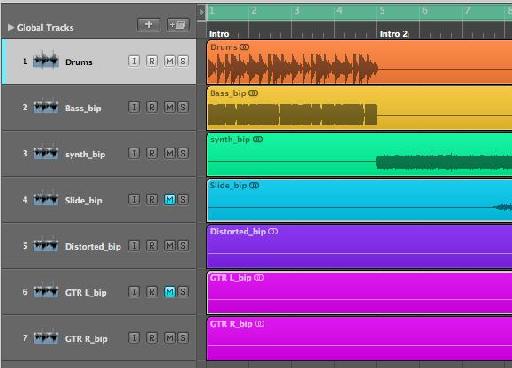
The first aspect is to choose what parts of your Arrange window you want to be present in your final mix. One rule of thumb is that everything you can hear from Logic's Stereo 1-2 output channel will appear in your exported audio file.
So now is a good time to mute any tracks or regions you don't want in your final mix!
Step 2 - Not Export, Bounce
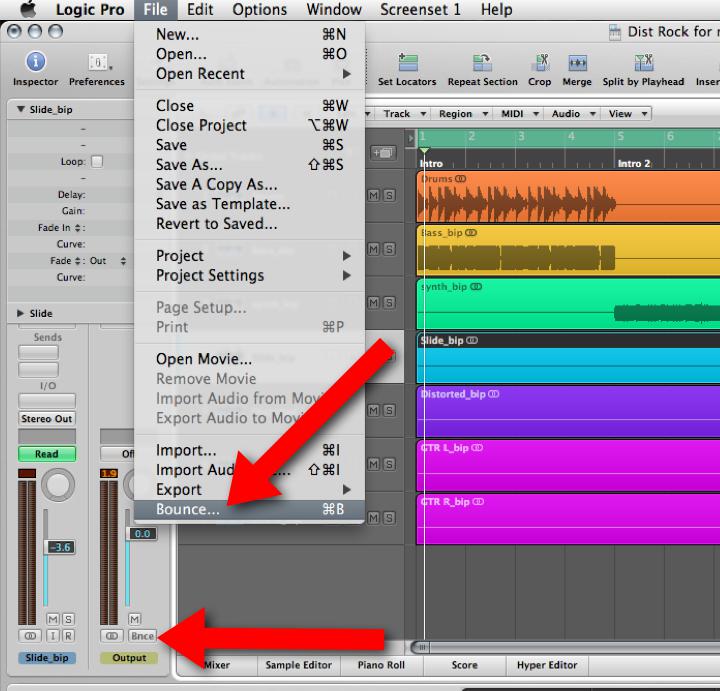
The first time almost everyone, myself included, wanted to export their finished song from Logic they begun looking for the export command... Stop right there! This is NOT what you want in this case. The File > Export... command will only allow you to export selections to a MIDI file and tracks to individual audio files. So if you have 10 tracks in your project then those 10 tracks will be exported to 10 corresponding audio files. Of course, this means in iTunes you'll only be able to listen to one of these tracks at once!
What we want to do is to mix-down or render all audible tracks to a single audio file. In Logic this process is known as "Bounce". You'll find this in the File > Bounce... menu.
You can also see the Bnce button on the Output Channel Strip in the Inspector and/or the Mixer window.
Step 3 - The Bounce Window Demystified
The Bounce window is a cross between a normal "Save as..." dialog and a vast array of possible variables and options to choose from. If you're familiar with computers and Macs, you'll probably be comfortable with the top half of the window. Here you can choose the name of the bounced file and choose the location it will be saved to.
The Bottom half of the Bounce window deals with the Destination, file formats and type of bounce you wish to perform. The first area to focus on is below the Destination box. Here we can decide what area of the Arrange area will be bounced by setting the Start and End points.
Note: If you set a Cycle area in your Arrangement before bouncing the Start and End points will be automatically set to the Left and Right locators respectively.
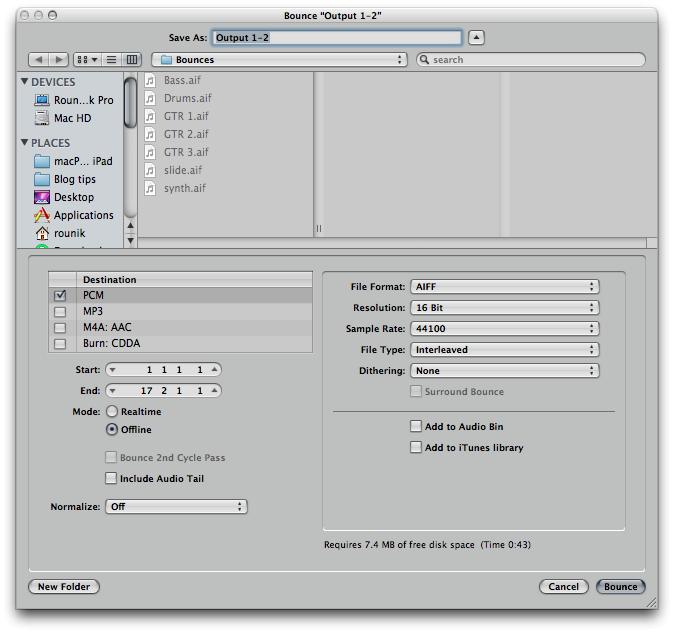
The Bounce mode can be changed between Realtime or Offline. Normally Offline will be quicker but you won't be able to hear the Bounce as it takes place. Also if you use some realtime objects in Logic's Arrange area like Delay Lines and Arpeggiators they may not appear in the final bounced audio file.
Include Audio Tail is useful if at the end of your song there may be delay or reverb that is still audible beyond the end point. This feature will allow it to be captured rater than cut off at the end of the song.
Finally the Normalize feature normalizes or raises the level of the final audio to make it perceivably louder. I normally keep my set to OFF as I prefer to mix and master to my own custom settings before Bouncing the project. Other options include On and Overload Protection Only. This later option can be very useful if bouncing a quick mix to make sure the levels never clip or cause any distortion.
Step 4 - Destination Unknown
The Destination of your final audio file depends very much on how you want to distribute or listen to it. Selecting a Destination will update the Format options on the right of the Bounce window.
PCM: PCM or Pulse-code modulation, is a standard form for digital audio. It is uncompressed and can provide high quality. You should be using this destination to archive your song and/or pass a mix on to a studio for Mastering and to bounce to CD.
Here you can choose the File Format (AIF and WAV are still the two most popular and widely accepted at time of writing).
Resolution (CD spec is 16-bit, to provide a Mastering House with your mix you should use 24-bit).
Make sure the Sample rate is either the same as your project or if needed change it to the sample rate required. CD is 44.1kHz. Audio for film will usually be required at a sample rate of 48kHz.
Interleaved file type will place the left and right channels in the same audio file. There may be time when you want the Left and Right sides of your stereo field split to work well in Pro Tools...
The Dithering options are used when reducing the Bit Depth of your project from 24-bit to 16-bit. It adds a tiny amount of noise. It's beyond the scope of this blog post to outline the different algorithms available here... There is no one size fits all. Try them out and listen back to get a sense of what sounds best to your ear.

Step 5 - MP3 and M4A/AAC
If you're interested in creating mp3's or lower quality compressed versions of your music for distribution via MySpace and other MP3 sharing sites... or just to place on your iPod, enable the MP3 option!
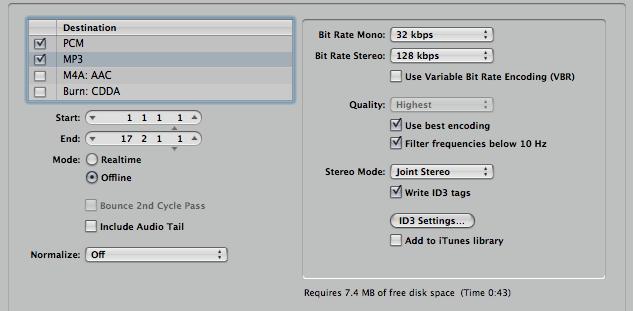
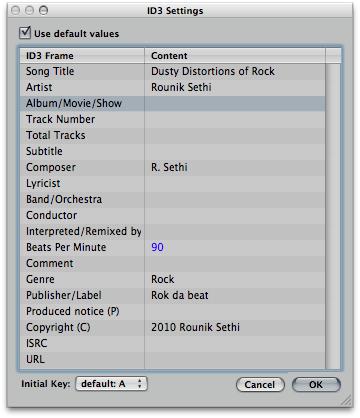
After enabling the MP3 option, make sure the MP3 destination is highlighted so the Format options are updated to reflect that. Here you'll be able to change the quality of the Bit rate, encoding and even set the ID3 tags. These are tags that will be written to the mp3 file, for example the composer, artist, copyright, etc.
You have less options under the AAC destination, but arguably they're better quality that mp3. For both mp3 and M4A/AAC you can also choose to add to your iTunes Library.
Step 6 - Onto CD
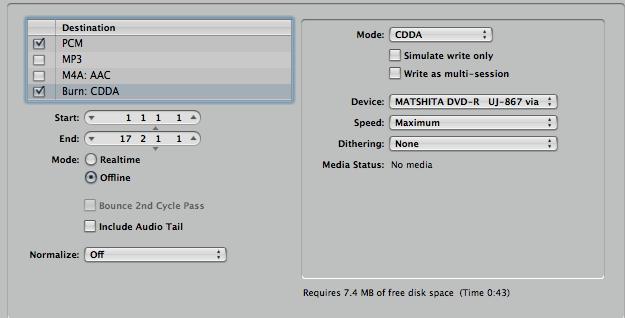
Although it may feel like CD's are on their way out... unfortunately... There are times when you may want to burn your track direct to an Audio CD from Logic. That's exactly what the Burn: CDDA destination option allows you to do.
You can choose to Burn to CDDA (CD Digital Audio) or DVD-A (Audio DVD) from the Mode drop-down menu.
The other options are standard for most Burning software, but importantly you must choose the correct device (CD Burner connected to your Mac), speed and dithering options. Remember that if your project contains any 24-bit audio files you'll need to use the dither options to reduce the bit depth to 16-bit (which is required due to the CD tech spec).
Now you're ready to Click the Bounce or Bounce & Burn button! I hope you enjoy listening to your mixes outside of Logic!
To learn more about Logic check these tutorials out!
We'd love to hear from you. Let us know what you think by writing a comment below!
.

Discussion
I found this article interesting and enlightening. Well done.
Right now I'm trying to take audio from logic, sync it with video in quicktime 7 and upload it to youtube. I've found tips online suggesting the proper export settings for audio but for some reason I'm getting strangely inconsistent results. For example:
http://www.youtube.com/watch?v=tptZZ1DtGL4
The audio in the video above increases in quality dramatically when the vid is played in HD.
....but, this vid has the same audio in standard and HD but I believe I used all the same settings:
http://www.youtube.com/watch?v=ko5LE9DBtC0
....Can you please shed some light on this?
Thanks so much,
Aram
(what more could you need?)
why is that important? because when you are in the creative flow, the actually very last thing you want to do, is to stop. and then have to use another side of your brain and get technical and follow code and stuff (often frustrating obscure stuff!) to find out why something didn't work... and where is the flow gone?
I see you at macprovideo are making your presentations into an 'information flow', with clear diagrams.. and this is excellent!
Thanks! Glad to hear you find this blog useful! Completely agree that switching from Creative to technical can slow you down in any creative pursuit. Keep checking the Blog and of course the Video tutorials which will help you fly with Logic. Knowing most of technical side of Logic leaves a whole lot more time to experiment and explore the creative side :)
Sorry to have missed your comment... I've tried looking at your first videos... it seems to have been removed from YouTube. If you'd still like some help let me know here or pop by the www.macProVideo.com forums :)
Best
Rounik
Mostly I have this 16 track board and I'm using it for my interface but other than the gain knob for each track, none of the other knobs have any effect on what is being recorded. The faders, highs, mids, and low knobs all have no effect. Just wondering if you knew of any way to fix that.
Thanks for all the help!!
Thanks for the question. I'd need to know the make / brand of the audio interface you're using. Is it a recognised control surface in Logic?
Probably best to post this in a new thread on the Macprovideo Logic forums:
http://www.macprovideo.com/forum/
Much easier to keep track of logic questions there and Myself and other Logic users can help you out more easily.
Thanks :)
Thanks ahead.
Have you tried opening the Logic 4.7 projects in Logic 9? This may (*may*) work... but I imagine if you're using Logic 9.1.5 in 64-bit mode on an intel Mac you'll likely find it impossible.
You will need to find someone with a copy of Logic 7 that will be able to open the Logic 4.7 projects and then save them as version 7 projects. Logic 9 is capable of opening Logic 7 projects.
Hope this helps
Rounik
Great posting. Clear and factual.
You are clearly a great teacher.
Say, I am having an issue that just surfaced.
When I bounced a final mix ot WAV or AIFF...the file sizes increased dramatically.....ie, from 85 mgs to 250 mgs!
What have I done to cause this?
My initial mixes where at 85 mgs...then I added a guitar track and re-bounced and BOOM....HUGE file...
I appreciate your feedback in advance.
Chet
Thanks for the kind words.
A couple of questions:
What file format and bit depth did you originally bounce the project to... and what format and bit depth is the newly bounced file?
Also, did you bounce the entire timeline of the project - or just (using locators) around the song?
Thanks
R
Well, I originally made a WAV file....which loaded into iTunes nicely and using iTunes converter I created an AIFF, an MP3_320 and MP3_128 file. I like to create the files when I am bouncing so I have them available for various uses. The WAV file is 84 mgs, the AIFF is 56 mgs, the MP3_320 is 12 mgs and the MP3_128 is 5 mgs.
After I added an electric guitar track to sweeten the track, I re-bounced the whole song and the file sizes of the WAV, the AIFF, the MP3 grew before my very eyes.
285 mgs, 227 mgs, 85 mgs.....etc.
I am kind of new to Logic. I used it years ago, but discovered Garage Band and became very good with it....but I wanted to do more, so I got Logic Studio and started learning all over again.
I have the resolution set at 24....and the sample rate at 44100. It was this way the first time.
I do see the Surround bounce is checked....could that be the culprit?
I am bouncing the entire timeline....not clear how to use and set and what the locators are.
I am like you....I like a clean mix and want to bounce a track and have it sound exactly like the mix.
(You can check out my music at:
http://www.chetnicholsmusic.com)
I am a longtime composer and singer-songwriter and inductee in The Kansas Music Hall Of Fame....
I want to thank you in advance for your help!
Chet
chet@chetnichols.net
Do I need to reduce the bit rate? Any other ideas?
Want to join the discussion?
Create an account or login to get started!