
What's so Important about the Grid?
Most people will start out sequencing in Live and never switch from a 16th note Grid setting. Obviously, this places them in a cookie-cutter grid pattern for a 16th beat'"the most heavily used drum pattern within most modern, drum backed music. The 16th note resolution's popularity is only rivaled in popularity by an 8th beat. And, of course, drummers frequently fluctuate between both resolutions.
When making beats in Live, it's common for people to completely miss the resolution of the Grid, which is always shown in the lower left hand corner. Here is a picture of the MIDI Note editor in Ableton. Notice the Grid lines and the 1/16 in the lower right hand corner, which is usually the default Grid Resolution for an empty Clip.

I tend to prefer to start off in 8th note, as it makes things extremely easy for clumsy fingers to quickly draw in a basic beat. An easy way to switch to an 8th note resolution is by using the Command-2 Widen Grid command. As soon as the shortcut is activated, you'll see the 1/8 indicator at the bottom.

A great way to hear the difference between the two resolutions is with the adjustment Draw Mode, and the Narrowing and Widening of the Grid.
Hearing the Grid
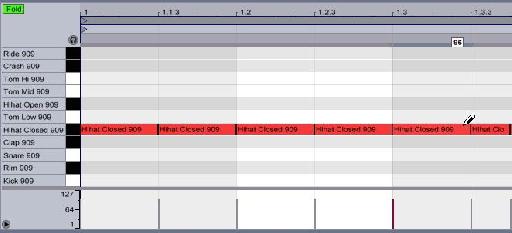
Create a MIDI track, and then drop in a Drum Rack loaded with a drum kit that works nicely for you. I've chosen the 909 kit from the Drum Machines Factory Pack. Make sure you use the Command-1 shortcut to Narrow Grid, or the Command-2 shortcut to Widen Grid, so that 1/16 is displayed within the Note Editor, in the lower right-hand corner.

Now, double-click an empty Clip within the column associated with the Drum Rack of your choice (in my case, the 909 kit) and Press B, so that the Pencil tool appears. On a closed hi-hat row, draw a string of 1/16 notes within the clip.

Now, switch the Widen the Grid using Command-2, so that the resolution displayed is at 1/8 and replace the 16th notes with 8th notes using the pencil tool. Leave a few 16th notes at the end.

Now, when you play this string of notes back, notice the timing difference. Switching between an 8th note timing and a 16th not only introduces some great rhythmic changes within a pattern, but the resolution changes themselves have a different pattern of their own.
Conclusion
As you get better at beat making, try modifying your Grid Resolutions by Narrowing and Widening the Grid. By switching up resolutions a lot, during the creation of a drum pattern, and even going past 8th and 16th notes, into 32nd, 64th and higher, by using the Command-1 and Command-2 shortcuts, you'll find your beats taking on a life of their own.

Discussion
Want to join the discussion?
Create an account or login to get started!