
There are tons of different physical MIDI controllers that you can use to take control of MainStage. In this article we'll be looking at creating a virtual MIDI control surface using the iPad. We'll use a great iPad App called MIDI Designer by Confusionists LLC, this is not the only App of its kind, but I think it's the most straight forward, and quite powerful. The beauty of using this App, is that you can design a layout that matches your MainStage screen controls - try that with hardware! It's the closest thing to actually having an iPad version of MainStage.
Step 1 - Download and install MIDI Designer
First, download the MIDI Designer App from the App store. At the time of this writing, the app was $19 USD. This app works with various iPad MIDI hardware interfaces, but in this article, I'll be showing how to connect it wirelessly via your Mac and iPad's built-in Wi-Fi.
Step 2 - Setup a Computer-to-Computer Network
The trick to getting your Mac and iPad talking to each other is to have them on the same wireless network. When you're at home practicing your set, you can simply connect both your Mac and iPad to your existing wireless router's network. When you arrive at the gig, many venues or clubs will have Wi-Fi, but you can't trust the speed of their connections. You'll definitely want to create a computer-to-computer Wifi network (ad-hoc). After doing this you won't be able to connect to the internet on either the iPad or your Mac, but when you're performing, you probably shouldn't be focused on checking your e-mail or browsing the internet anyway! (Editor's Note: Watching macProVideo.com tutorials would be fine ;-)
On your Mac, click the Wi-Fi menu bar icon, then select “Create Network.” Choose a name for your Network, then choose either 40-bit or 128-bit WEP encryption from the Security menu and select a password (5 character password for 40-bit or 13 character password for 128-bit).


On your iPad, go into Settings, select Wi-Fi, choose the network you created from the list and enter the password you chose.

Step 3 - Establish MIDI Connection
Next let's make the MIDI connection from your iPad to the Mac. In your Applications folder on your Mac, open the Utilities folder, then open Audio MIDI Setup. So you can get to this application easily in the future, drag it to the dock. If you've never opened this application, you'll first only see the audio window and not the MIDI. From the Window menu, select “Show MIDI Window.”

Double-click the Network icon, then on the iPad launch MIDI Designer. After launching MIDI Designer on your iPad, you should see the name of your iPad appear in the Directory display. If it doesn't appear, make sure both of your devices are on the same wireless network. Now from the My Sessions display, click the plus button below it. The default name “Session 1” will appear in the window. Put a check in the box to the left of the name. Now from below the Directory display, select “Connect.” That should do it ... you've now created a virtual MIDI interface that your iPad can send and receive MIDI data on.
In the future when you wan't to connect your iPad, you'll only have to open the Audio MIDI Setup application on your Mac, double click the Network button, and click “Connect.”


Step 4 - Open a MainStage Template
Back in MainStage, we'll start by selecting the Keyboard & One Backing Track template. If you have an elaborate template you've built, feel free to use it instead if you'll be following along. Let's add some more patches to this template so we can switch between them with MIDI Designer. Click the + button at the top of the Patch List and add some more (Pre-Mapped) instruments. I'm adding Silky Strings, and Massive Lead for a total of three Patches.

Step 5 - Build your MIDI Control Surface on the iPad
We'll now jump over to MIDI Designer and start to build an environment that closely matches the screen controls in MainStage. MIDI Designer is quite simple, but powerful. If you click the “more” button at the top of the display, a menu drops down that allows you to enter the Design Mode. Once there, you can tap anywhere and you're presented with the option of creating buttons, knobs, sliders, X-Y pads and more. They can all be labeled, and each control can have a separate MIDI channel and CC number assigned.
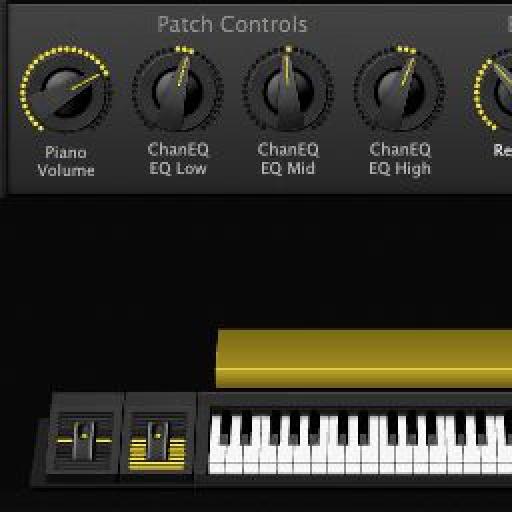
If your MainStage workspace is filled with a complex set of screen controls, MIDI Designer has multiple “pages” you can move through, each with different sets of controls. When you go to assign the CC numbers, the App even tell you wether one has been used already to eliminate duplicates. For this virtual MIDI surface I had to change some of the buttons under MIDI Designer's Type Properties from “toggle” to “ momentary.” For example, if I left the next/previous Patch buttons to toggle, the button would have stayed depressed, instead of being “momentary.” Here's what the MIDI Designer control surface looks like that I created...

Step 6 - Assign the Virtual MIDI Designer buttons to MainStage Screen Controls
Now that we've made our computer-to-computer network, linked up our iPad to the virtual MIDI interface, and built our virtual MIDI control surface, it's time to assign all the virtual MIDI Designer buttons to the virtual MainStage Screen Controls. Back in MainStage now, click into Layout Mode. Select the “Patch (up arrow) button (see image below).

Now click the Assign button (upper left corner), then touch the virtual button back on MIDI Designer. Repeat this step for every equivalent control you created in MIDI Designer!

Congratulations, you've just built your first custom-build MainStage virtual MIDI control surface. Get a sturdy mic stand, and the IK Multimedia iKlip and you're ready perform!

Discussion
Great article. BTW, as a comparison, the logic remote app also works with MainStage 3. It may be worth a look first to see if it suits your requirements.
Also MIDI Designer has a Lite version that is free if you don't mind the advert banners getting in the way.
Thanks for the excellent ideas. this is the first article on this site I have read and so far it looks wonderful.
Want to join the discussion?
Create an account or login to get started!