
With digital DJs increasingly accused of auto-synchronizing their sets and generally taking the low road with regards to onstage work ethics, live electronic performances of improvised original music are truly coming into their own. While Ableton Live has made this possible since its very inception, more and more artists are opting to incorporate analog and other hardware into their live sets for added grit, flavor, and real-time havoc—not to mention the consequent aura of authenticity it lends, further separating them from the herd.
With portable hardware such as the Korg Volca series and Roland's recently announced AIRA squadron now on the market at relatively affordable prices, even more performers are sure to be incorporating gear into their live sets. So how can we integrate all this fresh kit with our existing Ableton Live sets?
Externalize
In case you've never used it before, Live's External Instrument is a handy device that can easily route MIDI to an external output and simultaneously route audio back in through a specified input on your sound card, along with dedicated gain and latency controls, all in one easy-to-use tool. For it to work properly, you'll first need to enable your desired MIDI outputs and audio inputs via Live's preferences.
Here I'll be using my Arturia MicroBrute, which receives MIDI signal directly via USB. I'll navigate to the Instruments folder in my browser and drag the External Instrument onto a MIDI track, where I'll then specify the desired MIDI and audio routing in the dedicated drop-down menus: MIDI To the MicroBrute, and audio back in from input 7 (the MicroBrute is mono, after all) on my MOTU UltraLite.

Pic 1
| PRO-TIP: If you plan to always use the same routing on a given instrument, you can save the External Instrument with those routings under the name of your instrument, so it'll always be ready for action as a preset in your User Library. If you only have one external piece of kit with consistent routings, you could also right- or Control-click the Device title bar and select 'Save As Default Preset' from the contextual menu that appears—so that any time you use the External Instrument device, it will include your desired routings (as well as latency and gain settings) by default. |
Rack Attack
Provided all our preferences are configured properly, at this point, any MIDI clips on the track containing the External Instrument should be triggering the external device, with audio simultaneously routed back through the same track. Latency settings may need to be adjusted based on your rig, but the results should be fairly seamless.
This is all well and good if we only have one instance of an instrument that we might want to use, but in the course of a live performance, it's natural to have at least a few different configurations of any given instrument, taking advantage of different combinations of Live's included MIDI and audio effects and patch program changes on the external gear, if applicable.
At first glance, the easiest way to achieve this—for a fledgling Rack expert, at least—would seem to be to group our External Instrument to an Instrument Rack, duplicate it to as many Device Chains as needed within the Rack, and use our Chain Selector to move between them once they've been configured with all the desired effects. Right? Well, not exactly.
Due to each External Instrument instance being plugged into the same single input (or pair of inputs), even if you're sending to it on a different MIDI channel, the audio will still be routed back through all chains of the Instrument Rack. I suppose this could be mitigated by some intricate Mute mapping within our Clip Envelopes or tied to the Macros—but there's a better way, and it involves a triple-rack nesting, which I'll explain at length below.
Trifecta
To simplify this tutorial, we'll end up creating two default “patches” for our External Instrument Rack. But before we go ahead and create them, I'm going to take a few steps first. Initially, I'll navigate in the browser and place an Audio Effect Rack after my External Instrument Device; then, I'll go and drop a MIDI Effect Rack before my External Instrument Device.

Pic 2
Next, I'll select the MIDI Effect Rack, External Instrument, and Audio Effect Rack, and hit Command-G to group the three devices to an Instrument Rack; the resulting Rack is comprised of a single External Instrument sandwiched between a MIDI Effect Rack and an Audio Effect Rack.

Pic 3
| PRO-TIP: In case you might want to use multiple instances of this sort of External Instrument Device configuration, you could pause here and click the Save button on the Instrument Rack to store it as a preset Rack configuration in your User Library for easier future use. |

Pic 4
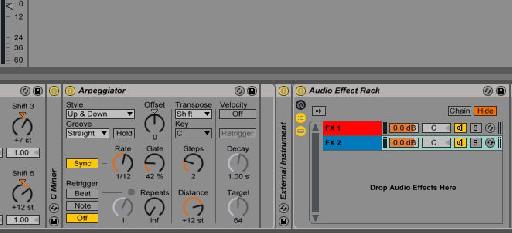
Now that we've got our triple-rack all configured, we can start creating our chains. For the first part of my set, I want to use Live's Arpeggiator followed by a Velocity device, and then process the inbound signal with an Erosion and a Ping Pong Delay, so that's what I've placed on the first chains of my respective MIDI and Audio Effect Racks. To visually help me remember they go together, I've colored them both red by right- or Control-clicking each Chain in the Chain view area and selecting the same color from the selection palette that appears

Pic 5
For the next chain I'll configure here, I'll put a Chord, C Minor Scale and a different Arpeggiator on a new chain of my MIDI Effect Rack, and a simple Phaser with a few tweaks on a corresponding new chain of my Audio Effect Rack. I've colored them both blue.

Pic 6
We can create as many different corresponding MIDI and Audio Effect Chains as we want, but for this all to work smoothly in a live context, we'll want to have our chains assigned to a Macro that allows us to smoothly move between different sets of corresponding chains from our MIDI and Audio Effect Racks.
I'll now open up the Chain Selector of our MIDI Effect Rack and make sure our Chains are assigned to two separate, discrete values on the Chain Selector, in this case, 0 and 1; I'll then Right- or Control-click the Chain Selector itself and map it to the first Macro of our MIDI Effect Rack.

Pic 7
I'll then repeat this process with our Audio Effect Rack, so that the first Macros of both our MIDI and Audio Effect Racks are assigned to their respective Chain Selectors.

Pic 9
Rack Macro assignments are hierarchical. This means that for a parameter within a Rack to be mapped to a Macro of the “top” Rack that contains it, first it needs to be assigned to a Macro within its immediate Rack. In other words, only pre-assigned Rack Macros can be assigned to the Macros of Racks that they're located within.
Since we've already configured our nested Macros as needed, we can now right- or Control-click the Chain Selectors of both those Racks and assign them to the first Macro of the parent Instrument Rack which contains everything we've done thus far.

Pic 10

Pic 11
The result is that even with all our internal devices collapsed from view, the first Macro of our Instrument Rack can now simultaneously scroll through as many coordinated MIDI and Audio Effect Chains as we like—up to a maximum of 128—while routing everything smoothly through our single instance of the External Instrument device.

Pic 12
Given that you're probably not going to want to actually scroll haphazardly through all your intricately devised Chains, a useful implementation would be to control the Instrument Chain Selector Macro value via Clip Envelopes, so multi-Chain “presets” can be switched on a per-Clip basis, as needed throughout your set.

Pic 13
You can have as many clips during a certain portion of your set sent to a particular multi-Chain Selection Macro value, and then, when it's time to switch to your next configuration, program the subsequent clips on that track to reflect the desired value change in their Chain Selector envelopes.
| PRO-TIP: If you have an External (or Virtual) Instrument that stores presets under Banks and Programs and is set up to receive Program Change data accordingly, you can switch between patches on a per-Clip basis by specifying the Bank, Sub-Bank (if applicable) and Program numbers as needed via the corresponding drop-down menus in the Program Change area of the Note Settings of your MIDI Clip. |

Pic 14
Racketeering
Now that you've got the rather heady concepts behind this configuration under your belt—External Instruments, Chain Selectors, and nested Macro routings—you should be well on your way to squeezing a lot more out of your external gear both on stage and in the studio. It's a given that you could, for example, only use multiple MIDI Effect Rack Chains ultimately running through a single Audio Effect Chain (though perhaps with some clever controls assigned)—or vice versa. And we've only touched the tip of the proverbial iceberg in terms of potential Macro assignments throughout multiple devices in multiple chains that can all be ultimately mapped to the Macros of the top Instrument rack for continuous, seamless access to key parameters throughout multiple Chain Selections during your set.
Start incorporating Max for Live devices or third-party audio effects—to say nothing of devious Clip Envelope programming—and the potential expands to infinity and beyond. Get out there and jam!

Discussion
Want to join the discussion?
Create an account or login to get started!