
Studio One has some great MIDI tools available that can really help improve your MIDI programming and give you more realistic performances. There are a couple of different places to look in the MIDI editor to find these tools. Let's take a look at where to find these and how they can be used to improve your MIDI performances.
Step 1 – MIDI Quantize
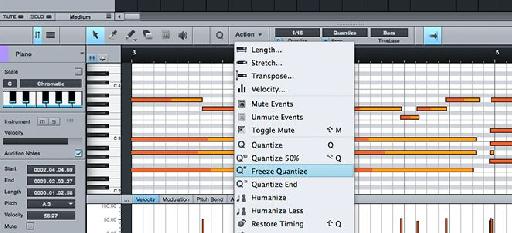
When you record in your MIDI performances, they may sound a bit loose when you play them back through again. Quantize is a great action to help tighten up the MIDI note data to the project tempo. Double-click a MIDI region to bring it up in the MIDI editor. First select the MIDI notes that you want to correct, or if you want to select all the MIDI notes in that region, use the shortcut Command-A (Mac) or Control-A (PC). On the MIDI toolbar there is an Action Menu. Click on this to bring up the options available. You'll see the Quantize option, or you can use the shortcut Q to quantize the MIDI data.

These Quantize settings will be determined by what you have set up in the MIDI toolbar. So choose a grid resolution (for example 1/16) and quantize the MIDI data. The finer the grid resolution, the finer the quantization on the MIDI. Test this out, take a pattern where you have used 16th notes and then quantize it using the 1/4 note grid resolution, and see how this radically adjusts the MIDI notes. So you'll need to have an idea of where the MIDI notes are roughly sitting, be it 1/8 or 1/16 notes, and then use that grid resolution to correct the MIDI timing more accurately.

MIDI Editor Grid Resolution
But sometimes quantizing this hard can make your MIDI performances sound a bit too rigid and on the beat. You do have a few other options. You could choose to Quantize the MIDI data by 50% using the Quantize 50% action.

Or try some of the grid resolution values that have some swing values. This really works well on drums. For example take your kick and quantize this hard with a rigid grid resolution. But on the hats maybe use a quantize value with some swing and take a listen how this can give your MIDI performance a bit more groove.
If you want to edit the swing values more you can click on the Q button next to the Action menu to brings up the Quantize panel with further quantize options. You'll see the grid resolution values on the left, and then you can dial in a swing amount with the swing parameter, or you can even click on the buttons above for triplet, quintole, or septole adjustments to the MIDI notes.

What's also great is you can save different quantize settings by choosing one of the 5 buttons on the right from A-E. So for example make sure A is chosen and change the quantize settings.
Now select B and choose different quantize settings. This will now be saved to B. This is a good way to A-B different quantize setting choices against each other. Maybe you want to compare different swing values and see which one suits the music.

Step 2 – MIDI Humanize
Another way is to use the MIDI Humanize action. This action imposes a less strict quantize setting to the MIDI, and also imparts a form a randomization on the MIDI quantizing. You'll notice this if you zoom in on the MIDI area and then click on the Humanize action. Each time you click on it you notice how the MIDI notes randomly move around by small increments, and as the action name suggests gives a more 'human' quantize value to the action.
This action actually humanizes all the MIDI data related to the MIDI region, so you'll notice that this also 'humanizes' the velocity values as well for further realistic sounding performances. If you feel that the 'humanizing' of the MIDI data has gone too far, you can always use the Humanize Less action.

Step 3 – Conform MIDI to Scale
What I really find handy is the Conform MIDI to Scale feature. You may find at times that you record in some MIDI ideas, but when you play it back with the other tracks in your production there may be some notes that may clash with each other. This is where the Conform MIDI to Scale function comes into play. On the left hand side of the MIDI editor is where this feature can be found. It shows the key and mode. So let's say you wanted to conform your MIDI to the A Minor Pentatonic scale. First tick the box next to Scale to enable the Conform MIDI to Scale function. On the Piano Roll you'll see blue lines on the keys showing which notes reside in the scale. The notes will be A, C, D, E, G. And these will be shown for all the octaves going up and down the Piano Roll.

Now when you move the MIDI notes selected, they'll conform to this scale. Try to move a note on A to B and you'll see that you can't place it there because it's not part of the A Minor Pentatonic scale. Now you can go through your other MIDI tracks and Instruments and make sure that their notes are conforming to that scale as well. A great way to get your MIDI programming to sound cohesive and gel together.
Step 4 – Have Some Fun with the Conforming
You can really have some fun with this feature. Maybe you want to make your song sound more 'blues' sounding. Well then try selecting the Blues Mode. The piano keys will indicate to you which notes reside in the blues scale, and now you can move your MIDI notes around to conform to this.

The Conform to Scale function also works well with building up instrument harmonies. Let's say you have a synth part in C major scale, and you want to have another synth playing a 3rd above this. Then duplicate the MIDI part. You can do this by creating a new Instrument track. Select the MIDI Region, then hold down Option (Mac) or Alt (PC) and drag the region down to the new track to create a duplicate MIDI part. Now assign it to a synth instrument of your choice. Make sure the Conform to MIDI Scale function is enabled, and that the key is set to C and the Mode to Major Scale. The main synth part is starting on C, so to get the duplicate part to be a third above, select all the MIDI notes and the grab the fist note on C and drag it up to E which is the third of C (all the other notes will move up as well because they are all selected, and will conform to the C Major Scale). How neat is that? You can quickly and easily build up harmony parts for your song arrangements.

Conclusion
That's how to use the MIDI actions and tools in Studio One to really improve your programmed MIDI and give them some life. I find that these tools can really help add some realism and dynamics into your MIDI programming. Try these out in your songs and see how they can spice them up.
For further Studio One tricks and techniques check out the following tutorials:
https://www.macprovideo.com/tutorial/songwriters-musicians-toolbox
https://www.macprovideo.com/tutorial/studio-one-102-producers-and-engineers-toolbox
Discussion
Want to join the discussion?
Create an account or login to get started!