
There's an art to beat-making that some musicians simply don't have the patience for. It's not about instant gratification—like pulling a loop from the loop browser, or even using Logic's Drummer Track to generate beats with a dozen or so parameters. It's about making a great sounding groove from scratch that is truly your own creation. Read on for a tour of the new Drum Machine Designer as we create a Hip Hop beat along the way.
Logic 10.1's new Electronic and Hip Hop Drummers are great for creating quick beats. They even create automatic fills for you! This is not what this article will be about however. Those new Drummer genres use another new Logic 10.1 feature we'll be looking at in detail called Drum Machine Designer (DMD).
Here's a sample groove I made while writing the article: |
Step 1: Open Drum Machine Designer and Choose a Kit
Open an empty Logic project and add a new software instrument track. On the channel strip, swap out the instrument to Drum Machine Designer. It's in the list with all the other instruments like the ES2, EXS24 and the rest. Choose it from the list. If you haven't, download the content for DMD you'll need to do this first.

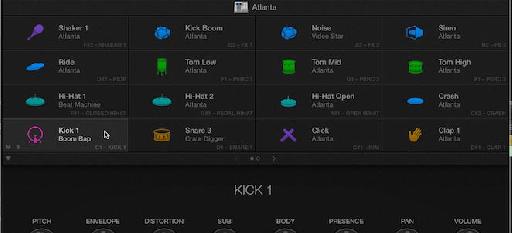
Open the Library if it's not already open by pressing the Y key. Drum Machine Designer folder will be open displaying the 20 or so kits. Try Atlanta, Beat Machine, Boom Bap, or Trap Door. These are all good starting kits. Audition them by playing them on your MIDI controller. Check the kick, snare, and hats for now and pick one of the kits you like best.

Step 2: Swap Out Individual Drum Sounds
Using only the default sounds from a kit might work, but what if you don't like a specific sound in it? You can easily swap out any drum voice. Open the interface for Drum Machine Designer by clicking on it on the channel strip. Click on the cell you want to swap out… if you're not sure which one it is, play the key on your MIDI controller and you'll see it flash in the list of drum sounds. Make sure the Library is open on the left (Y). Look… there's a list of several dozen related replacement sounds! Simply click on any of the choices to swap the drum voice.

Step 3: Set Tempo and Create Empty Region
First, change the tempo to anywhere between 70 and 100 BPM. I went with 85 BPM in the audio example below. Right-click onto measure/bar 1, and choose to create an Empty MIDI region, then stretch the empty region out to 4 bars in length. Set a cycle/loop around it, then open the MIDI region by double-clicking on it. Set a comfortable zoom level for yourself and feel free to close both the Library (Y) and the Inspector (I) if you need more space. Ideally you'll be able to see all 4 bars. Use Command-Arrow Keys to do this.

Step 4: Create the Pattern
Press the T key to switch to either the Pencil tool, or Logic 10.1's new Brush Tool… this great new tool allows you to paint notes/drum hits into the region. In the screen shot below I drew hats quickly across two bars by clicking first with the Brush Tool, then holding Shift (to keep it limited to the drum voice/MIDI note), then Option. While using this somewhat awkward command, you can move up/down with the mouse/trackpad to control each note's velocity! (this is very cool, try it). Place some snares on beats 2 and 4 for all four bars, then start positioning your kick. Add hats, open hats, secondary kicks, and effect sounds. Try changing Logic's Division setting to 1/32 notes… at slower tempos, 1/32 notes (especially on the hats) really help to create cool sounding fills.

Vertically zooming-in, now shows the drum names in Logic 10.1. This is a welcome new feature for beat-makers that allows you see the names of each drum in Drum Kit Designer (and Ultrabeat). Not only can you see the name of the drum you're placing notes/triggers on, but also new in Logic 10.1, is the ability to only see the notes/MIDI notes you're using currently. Sometimes when programming drums for modules like Ultrabeat, Battery and others, there are large separations in where each drum voice is triggered across the keys. By pressing the new Collapse Mode button at the top of the Piano Roll, only the notes currently used are displayed! All the empty keys between are hidden while the button is enabled.

Step 5: Add Swing to the Beat
Once you've created a cool sounding beat, you might want to add a bit of swing to it. Make sure the drum region is selected, and from the Region Parameters (at the top of the Inspector) click the word “Quantize.” Select “Smart Quantize” from the list, then choose 16th notes from the list to the right of it. Did you add 32nd notes to your beat like I did? If you did, they'll be preserved with this new Quantization mode. Prior to 10.1 selecting 16th notes would result in any 32nd or smaller value to be moved to a 16th note position! Thus, burying them under adjoining 16th notes. Now, directly below the quantize Region Parameter, change the Q-Swing parameter to a value above 50%. Those who've used MPC drum modules will feel right at home here. Try a value anywhere from 52 to 60%.

Step 6: Nudge Drums to Perfect the Groove
Sometimes drum hits won't feel like they're “in the pocket” or they'll feel either rushed, slow, or sloppy. Click on the key of the specific drum you want to “Nudge” to select them all. Making small shifts to the MIDI notes of specific drum sounds can really help nail the groove. Right-click on any note/drum trigger in the Piano Roll and from the menu that appears, choose “Tick” from the “Set Nudge Value To” submenu. You can now use commands Option-Left Arrow/Right Arrow to shift a drum back in time, or forward by a very small amount. If a sound feels rushed, try nudging it forward a few times. If it feels slow try back in time.

Step 7: Adjusting the Sound of a Particular Drum
When you click on a specific drum in DMD, “Smart Controls” appear at the bottom area below the drum voices. You can do things like adjust its volume, pitch to the key of your song, adjust its envelope, make it punchier, or add bass.

Set 8: Add Effects to Individual Drum Sounds
Want to add an effect or adjust the ones that are already on a specific drum? This process was much harder to accomplish in versions prior to 10.1, but is beyond easy now. Simply click on the sound you want to process in DMD's interface and the smart strip (the second strip visible in the Inspector) displays the sound's independent audio track! Start adding effects or editing existing ones. If you want the individual drum's audio track to appear in the workspace you can simply right-click on a drum slot in DMD and choose “Create Track.” This makes it extremely easy to switch around between drum channels.

Advanced Tip
Wouldn't it be cool if you could swap the drum sounds out with your own samples? You can! Open the mixer and click on the small triangle at the bottom of the channel. This opens all the individual drum sound tracks. The first one to the right is the actual Ultrabeat drum module we all know and love. Open it up and swap out the voice directly within Ultrabeat. The names of drum samples you add yourself will even appear in DMD, and in the Piano Roll drum names. Your samples will even change with the various smart controls within DMD.

Here's a sample groove I made while writing the article:

Discussion
Want to join the discussion?
Create an account or login to get started!