With a slew of new features and Rack Extensions well on the way, it goes without saying that there will be a lot of new people coming over to Reason. In this new batch of users, you can expect there will be new enthusiasts, new amateurs, and pros.
Despite your level of expertise, and day job, being new to the Reason game, you may decide at some point, that you'd like to contribute to the ever growing amount of presets patches, effects, etc that are already out there. This could be for your own personal amusement, or it could be for financial gain. Whatever the case is, you may want to know a little bit about Refills before you begin. Let's talk about this now.
What are Refills?
In the 90s and somewhat in the 80s, you had to purchase patches, in bulk, via cartridges, cards, and all other manner of obsolescence. Did these cost a ton of money? You bet! But, we all 'ooed' and 'awwed' at the pretty sounds when the keyboard would play the sound back for the first time.
This leads to the question, “Why didn't you guys just make your own sounds?”
Well, in most cases, we did. But, if you've ever tried to create a patch on a synthesizer with an LED the size of a cigarette before, you'll probably remember why you didn't as much back then either.
Soft synths made this much easier, because the editing panes are much bigger, with multiple pages. It's really dreamy, and Reason is one of the easiest out there to design a patch for. So, realistically you have no excuse for not making your own sounds now too. And, this is easily done! Press the Save button on any of the synths, drum machines, samplers, and you're good to go. But, when you buy Reason patches, they always come in the form of Refills.
Refills, visually look like one of the old cards, or cartridges that carried all the sounds back in the day. But, they are actually just files that are compressed so that your sounds stay secure inside the refill, and can only be opened in Reason. They are similar to zip files, but you can only access the contents of the Refill from inside of Reason.
This is great for sound designers, because Refills can be designed that have smaller amounts of content from that bigger library you are actually trying to sell. Just give a few patches away, and every time someone accesses that patch, they see your name, because they have to access your Refill to get to it.
How Do I Make a Refill?
This is the fun, and slightly tricky part. And, it all starts with the Refill Packer, which can be downloaded from the propellerheads website, if you are a registered user. You'll also be happy to know that they do keep earlier versions of the Refill Packer around. So, if you're using an older version of Reason, you're not left out in the cold.
Let's start with the main steps to actually getting ready and actually using the packer.
Step 1. Consolidate your Files
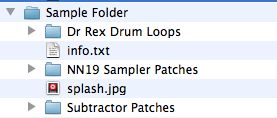
Like every endeavor to create a sound library, always have your files in one directory. Each sub-directory should be clearly labeled with titles like 'Dr. Rex Drum Loops'. In other words, create folders and label them with the names of the device you created patches for.
If this seems confusing, don't worry! When you download the Refill Packer, there is a sample folder that gives you a great example of how everything should look. Pay special attention to the NN-19 folder, as it shows you that sampler patches should have the sample directory within the actual sample patch folder.

For example: NN-XT Sampler Patches folder has a folder within it that holds all of the samples that each sampler patch needs to load properly, and perform.
Bottom line: Be organized and follow the example of the Sample Folder, and you'll be fine.
Step 2. Info.txt
Once your files are organized, make sure that you fill out the Info.txt, as this is what will pop up when people access your Refill. In other words, it's a cheap, free way to promote your hard work, website, etc. And, it's required by the refill packer, and must be in the root directory of your soon to be Refill.
Again, there's a sample of how this should be filled out that looks like this...

And, in the template folder that comes with your refill packer, you'll find a blank version for you as well. It looks like this...

Make sure you include a saved, version of the blank one. You don't want the Propellerheads taking credit for your sound design, right?
Step 3. Splash.jpg
Also, within the template and sample folder, you'll notice a splash.jpg file. This is an image file that can be customized with your own graphics, or image that will appear in the splash screen of your refill.
You don't have to modify the splash image, but it HAS to be included in your refill, in order for the packer to go through with the procedure.
If you modify it, here are the criteria...
- Has to be JPG or JPEG
- Must be 64x64 pixels
- Has to be named splash.jpg
Step 4. Run the Packer
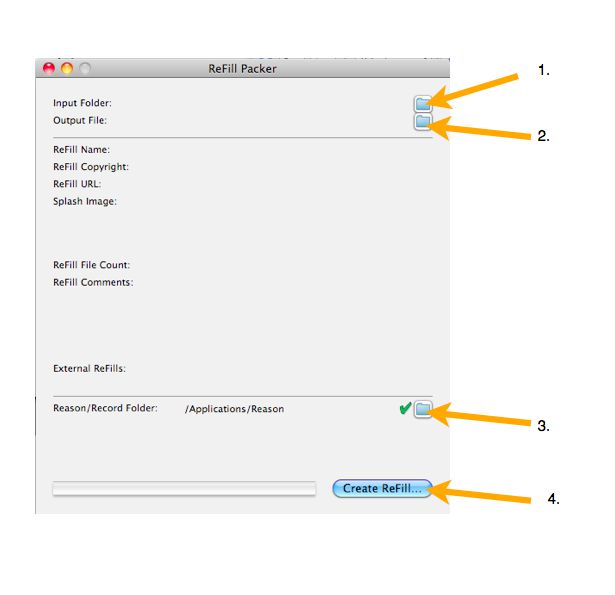
This can either be the easiest part, if you were highly organized. Or, it can be the hardest part, if your directory needs work. Let's take a look at the interface...
The Input Folder- This is the directory/folder that you'd like to be turned in to a refill. Located it by pushing this button, and Choose it.
The Output Folder- This is where you want the Packer to put your Refill, once its work is complete.
Reason/Record Folder- You'll need to locate the Reason folder on your computer in your Applications folder. Find the Reason folder, and Choose it. This information is needed for the Refill packer to work.
Once all the proper folders are chosen, and the Refill Name, URL, etc. look right in the middle, press the Create Refill button. If anything goes wrong, trust me, the packer will tell you. Simply open the Log file, which will generally reference files that were not in the proper place. Just move them in to your directory.
And, that's it! Keep in mind, that unlike many supplementary programs that are out there, there is documentation for the Refill packer that is in plain English. Should you get stuck, take a look at it. And, feel free to leave comments, if you are having problems, too!


 © 2024 Ask.Audio
A NonLinear Educating Company
Discussion
Want to join the discussion?
Create an account or login to get started!