
Logic è un DAW espansiva. Anche dopo l'uso per un periodo di anni, ho ancora trovare nuovi modi di andare su attività di questo interessante pezzo di software. Con lo stato attuale delle produzioni musicali e il livello di complessità coinvolti, stratificazione di strumenti è un must-so compito per le vostre produzioni. Utilizzando 2 o più diverse forme di sintetizzatori insieme possono davvero migliorare la qualità tonale delle produzioni. Questo può essere fatto facilmente in Logic facendo uso di Logics ambiente e usando i suoi cavi virtuali per collegare gli strumenti di insieme. Alcuni di voi potrebbero essere scettici e pensano, ciò che è facile per l'ambiente? Fidati di me, ci vorranno solo pochi passi e poi avrete il vostro synth livelli di attacco. Consente di saltare in Logic e vedere come questo è fatto.
Step 1 Scegli il tuo Sintetizzatori
La stratificazione è una tecnica interessante, in cui si utilizza diversi elementi di suoni differenti e combinarli insieme per formare un suono più grande e più arrotondato. Questo aiuta a trarre vantaggio da ogni sorgente sonora e costruire insieme i suoni per creare un gigantesco synth dal suono o strumento. Ad esempio, è possibile fondere i registri più bassi di un synth un'onda sinusoidale con le armoniche superiori di un synth FM per creare un synth ibrido.
A volte l'aggiunta di synth più nei progetti possono occupare spazio prezioso sullo schermo. Vi mostrerò come la combinazione di questi synth in un unico strumento multi-Logic in grado di restituire un po 'molto ricercato lo spazio sullo schermo.
Ho intenzione di costruire uno strato di quattro diversi synth. Ogni synth avrà una qualità particolare al suo suono rispetto agli altri synth. Layering questi insieme creeranno un interessante assortimento di suoni e di timbri.
Per il primo synth che ho scelto il 88 EVP piano elettrico e hanno programmato in un modello MIDI.

Ho scelto la Suitcase V2 Phaser preset, che utilizza il modello di piano SuitcaseMkI.

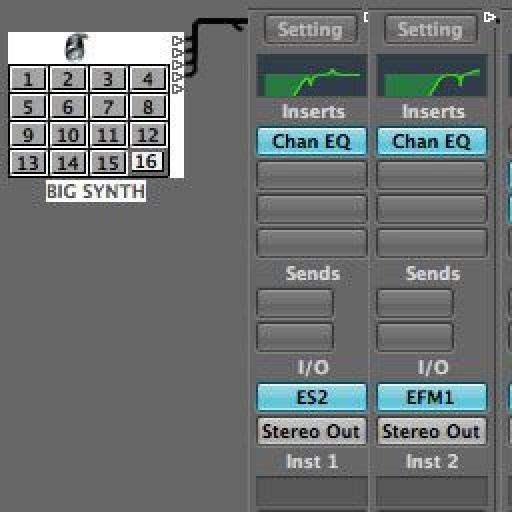
Il synth successivo che è up è la ES2. Ho attivato i 3 oscillatori. Ogni oscillatore ha una forma d'onda diverso assegnato. Ho cambiato la messa a punto leggermente Osc Osc 2 e 3 per rinforzare il suono synth. Ho poi mescolato i 3 oscillatori insieme nella finestra mix triangolo ES2S. Alcuni leggera distorsione e il Coro viene applicato al synth per colorare il suono.

Il synth terza sarà la EFM1. Un synth FM con parziali armoniche sarà bello aggiungere al multi-layered synth. Sono andato per un suono di campana a pizzico (pizzico della Campana preset).

L'ultimo è il synth ES1. Ho creato un semplice suono Sine Bass e hanno introdotto i Sub leggermente sul fader Mix.

Fase 2 Gli effetti di elaborazione
Ora, per ogni traccia che posso iniziare ad aggiungere effetti di elaborazione diversi. Ho inserito EQ dei canali su ogni striscia di canale e hanno adattato le EQ in modo che i synth tutti seduti piacevolmente insieme. Sul EVP 88 ho aggiunto un Overdrive per saturare il segnale e uno Exciter per eccitare alcuni dei registri più alto del suono. Sul ES1 ho inserito un compressore per domare il suono guidato bassi.
Poi ho cambiato anche il volume su ogni synth in modo che alcuni dei synth Non sopraffare gli altri.

Passo 3 Into The Environment
Consente di salto in ambiente Window (Command-8). Dal menu Nuovo scegliere Multi-Instrument. Questo creerà un oggetto Multi Instrument nell'ambiente.

Una finestra di dialogo apparirà chiedendoti Vuoi rimuovere la porta canali impostazione?, Selezionare Rimuovi.

In alto a destra dello strumento Multi vedrete un triangolo che punta a destra. Queste sono le porte dello strumento Multi. Clicca su questa porta e trascinarlo al primo synth, l'ES2. Un cavo poi collegare i due strumenti insieme. Ripetete lo stesso procedimento per gli altri synth collegandoli allo strumento Multi.

Il trucco è essere in grado di assegnare questo strumento Multi come una traccia nella mia finestra Arrangement. Spiegherò questo nella fase successiva.
Fase 4 Spostare lo strumento Multi all'accordo
Creare un nuovo strumento nella finestra Arrangement. Ora aprite la finestra Ambiente e disporre le finestre in modo che si può vedere sia la finestra Arrange e Ambiente. È possibile rinominare questo strumento Multi a qualcosa di un po 'più appropriato al progetto. Ho semplicemente chiamato il mio Synth Big. Selezionate lo strumento Big Synth Multi nell'ambiente e trascinarlo al nuovo strumento nell'accordo. Questo sostituirà lo strumento con lo strumento Multi. Ora è possibile visualizzare il Multi Instrument nella finestra Arrangement.

Oppure in alternativa è possibile fare clic con il nuovo strumento e selezionare Riassegna traccia

Ho spostato il modello originale MIDI ho programmato sul EVP 88 sulla striscia Big canale Synth. È ora possibile ascoltare lo strumento Multi riproduzione di tutti i sintetizzatori in una sola volta.
Passo 5 Nascondere i synth Altri
My Window Arrangement sembra un po 'affollata ora con tutti questi sintetizzatori e lo strumento Multi. E 'fantastico che io possa vedere tutti questi strumenti, ma ho veramente solo bisogno di vedere lo strumento Multi ora. Posso fare questo nascondendo i sintetizzatori altri. Sulla parte superiore della finestra Arrangement accanto alla scheda Edit, è un'icona "H". Questa è l'icona Nascondi. Attivando l'icona Hide ora vedrete le icone H su ogni file di canali. Questo vi permette di scegliere quali file di canali da nascondere. Fare clic sul H sui synth fatta eccezione per la Synth Big di nasconderli.

Ora la finestra Arrangement sembra un po 'meglio. Se io registrare attiva questa striscia di canale e riprodurre un modello, si innescherà tutti i synth e giocare contemporaneamente. Hey piuttosto carino?

Conclusione
Come si può vedere l'ambiente non è un posto spaventoso, dopotutto. Sfruttando l'ambiente che offre una maggiore flessibilità su come gli strumenti comunicano tra loro. Quindi, arrivare lì e cominciare a costruire qualche synth incredibili livelli di Logic Pro!
Discussion
I don't think it will minimize the CPU load. The same amount will be used to process the different plugins.
But it is a great way to combine different software instruments together into one multi-instrument.
Lekker.
Maybe with layered EXS24 samplers works too, and each instance ont the EXS you could specify the key ranges, in the zone edit window.
I lived in South Africa from 1977 to 1989 I used to play in a band called MI5 and played in Durban mostly.
I'm in California now doing mostly video and training at Apple.
Once again a great article.
I currently stay in Durban. Great to know there are some Durbanites at Apple, California.
Cheers!
Cheers
Unhide the Instruments tracks so that you can see them. Jump across to the Mixer Window.
On the Output of each channel send them to a Bus Output. I'd say choose Bus 1.
This will create an auxiliary channel with Bus 1 set as the input. Now all your synths will be sent to Bus 1. You can add an EQ onto this channel, and then automate the high cut frequency band. make sure to right click on the Bus 1 aux track in the Mixer Window and choose Create/Select Arrange Track. Now you will be able to see the aux track in the Arrange window.
Choose to show the Automation (shortcut = A), and now you can choose to automate the high frequency band of the EQ.
Remember to hide your synth tracks again so they don't clutter up your Arrange window.
Want to join the discussion?
Create an account or login to get started!