
Dynamic EQs are like regular EQs on steroids. Usually most Dynamic EQs are quite expensive but there are one or two passable freebies floating around. However, what if I told you that we can build one right inside of Ableton Live using only Live’s native devices and an Envelope Follower that comes free with Max for Live?

The finished article
A couple of months ago, a friend of mine, DJ Soo, sent me his “proof of concept” for an actual dynamic EQ rack of the sort mentioned above! I had to shelve it for a bit, but then last week I got around to giving it a go. MIND BLOWN. It was awesome. So awesome, in fact, I asked him if he minded me doing a full tutorial for you all here on Ask.Audio. He didn’t, and here we are. Thanks, Soo!!
URL: https://www.facebook.com/djsoo/
What is Dynamic EQ?
First, we should talk a little bit about EQs, compressors, and dynamic EQs. If you already know about these concepts, feel free to skip ahead to the main part of the tutorial.
- An EQ is generally static. It boosts, cuts and shapes incoming frequencies in a linear fashion.
- A compressor is non-linear. It “reacts” to incoming signals to boost, attenuate and shape sounds being fed through it dynamically.
- A dynamic EQ takes the best of both worlds and combines them in one place. An EQ that cuts, boosts, or shapes the sound depending on what is being fed into it. So instead of just a frequency node, gain, Q, and filter types we have additional tools like threshold, attack and release which can drive those EQ parameters.
Getting Ready to Start Building the Racks
NOTE: This tutorial is advanced and I highly suggest naming things exactly as I do to cut down on confusion when we start putting racks inside of racks inside of racks!
Also, I will provide you will screen shots of device settings and macro mappings. Use the same as mine to start with. Once you get a handle on what is going on you can go back and tweak what needs tweaking. Keep a close eye on the Min and Max values for the macro mappings in particular. I will be assuming you are at familiar with racks and macro mappings.
All the Live devices used in this project can be found in Standard version of Ableton Live or a higher version. It also requires Max for Live and the specific device used is part of the free downloadable pack on Ableton.com called Max for Live essentials.
URL: https://www.ableton.com/en/packs/max-live-essentials/
Specific Devices used:
- Effect Racks
- EQ 8
- Auto Filter
- Utility
- Gate
- Envelope Follower (max for live)
“Main EQ” Rack
There are several ways to tackle this beast. I found it easiest to start with the last rack in the chain and work from there.
Drop an EQ 8 on an empty channel in Live. Right click the title bar and select “Group” (Ctrl+G). This will place the EQ into a rack.
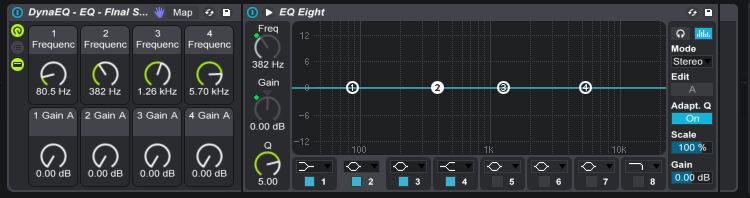
For this version of the Dynamic EQ we are going to use 4 filter nodes – 1 low shelf, 2 bell, and 1 high shelf. Make sure to turn of the other filters as they use CPU power even if they aren’t necessarily doing any EQing.
Next, right click the Frequency of the first filter, the low shelf, and map it to Macro 1. Then map its gain to Macro 5. Repeat this process for the other filters, mapping the frequencies of the 4 filters to macros 1 – 4, and the gains to 5 – 6.
In the end, you should have a rack that looks like this.
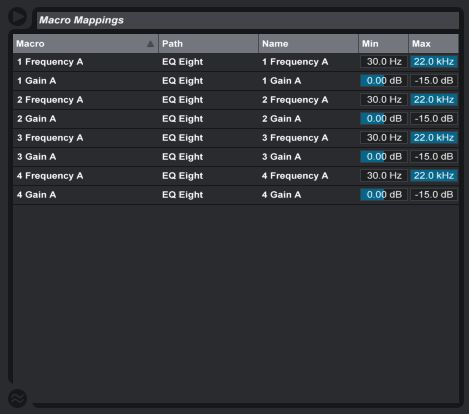
And macro mappings that look like this.
The next thing to do is rename the rack, the macros, and save it to a new folder, or somewhere you can find it later. I named mine “DynaEQ – EQ – Final Stage”.
Once it’s saved go ahead and delete it from the channel. We will come back to it, but right now it will just add to the confusion while we get started on the next rack.
“Band Isolator” Rack
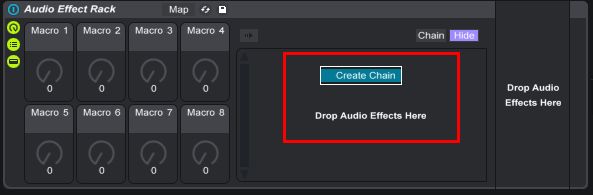
Drop a new Effect Rack onto the channel. Add two chains. Title one “Band 1”, and the other “DRY”.
You can add a chain by right-clicking where it says “Drop Audio Effects Here”.
With the “Band 1” chain selected drop an Auto Filter and then a Utility device after it.
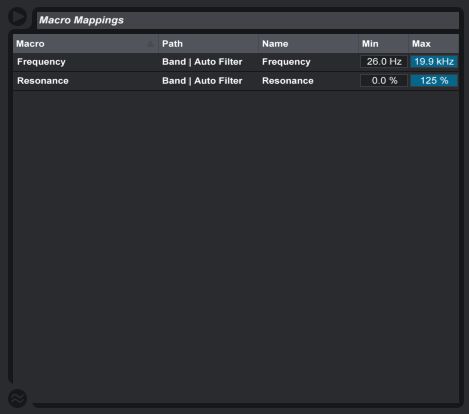
- Auto Filter Settings: Make sure that the Notch Filter is selected. Map the Filter Frequency and Resonance parameters to macros 1 & 2 respectively.
- Utility Device Settings: Check the Phz-L and Phz-R buttons at the bottom of the device.
With the Band 1 chain perfectly out of phase with the DRY chain the only audio we will hear is that slipping through the notch filter. Go ahead and test it out by twisting the frequency macro knob to the right and left to hear what happens. The resonance parameter will effectively make the notch wider or thinner, letting more or less audio through.
Your rack should look like this.

And the macro map settings should look like this.
Finally, again, rename the rack. I called mine “DyanEQ - Band Isolator”. Then delete it.
“Band Full” Rack
Now, we want to add a new Effects Rack to the channel. Add a Gate and the Envelope Follower to a single chain.
Now, take the rack from the last step, “DyanEQ - Band Isolator”, and add it to the chain BEFORE the Gate.
Map the Macro 1 & 2 from the “DyanEQ - Band Isolator” rack to macros to their own macros on the new rack. I mapped the frequency to macro 8 and the Resonance to macro 4, but I titled that macro 4 as “Band Width” instead of “resonance”.
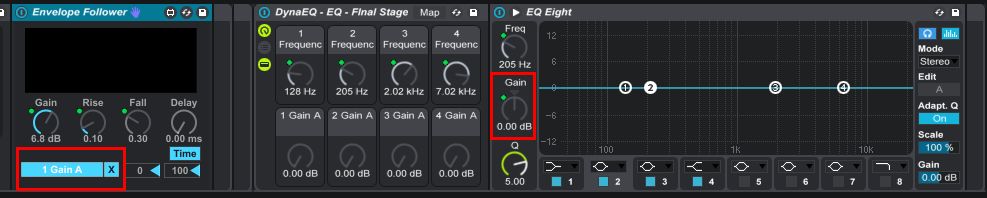
Set out to mapping and setting base parameters of the Gate and Envelope Follower. Don’t worry about the Map parameter of the Envelope Follower at this point. We will come back to it.
Make sure to map the Envelope Followers Gain, Rise (attack), Fall (release) to their own separate macro knobs. Also, the Gate’s threshold should be mapped at this point.
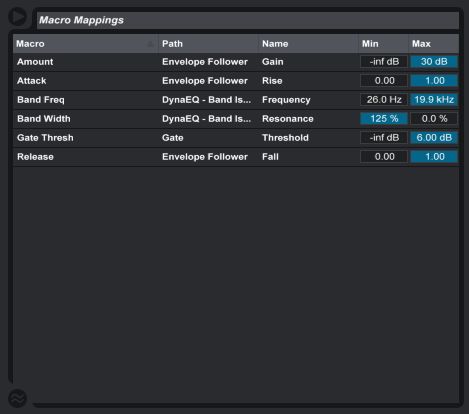
Use the pictures below for reference as to what should be mapped, the macro settings, and the base settings for none-mapped parameters.
“Band Full” Chain with Base Settings

“DynaEQ - Band - Full” Macro Mappings. Make sure to follow these exactly.
Again, rename the rack and delete it after. I went with “DynaEQ - Band - Full”
“All Bands” Rack
Drop another new rack onto the channel. Then drop the last rack we made into it to create a new chain. Then drop that same rack into the new rack again, 3 more times. Rename the chains as Band 1 – Band 4. Then right click in that area and create a new empty chain. Rename it DRY.
At this point coloring some chains and macro knobs will help you stay organized when you are using the rack later.
Turn the audio off for the 4 Band chains. Only the DRY chain should have audio passing out of it.
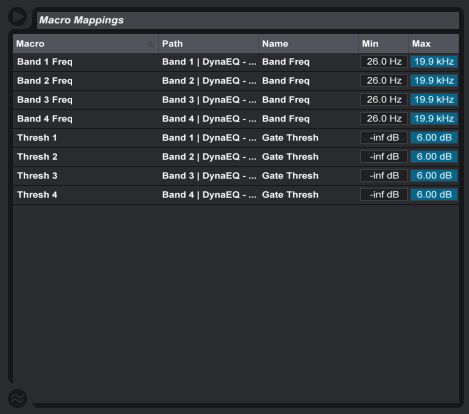
The last thing we need to do is go through each of the “Band” chains we just created and map their macros for the Band Threshold and Frequency to macros of the new rack.
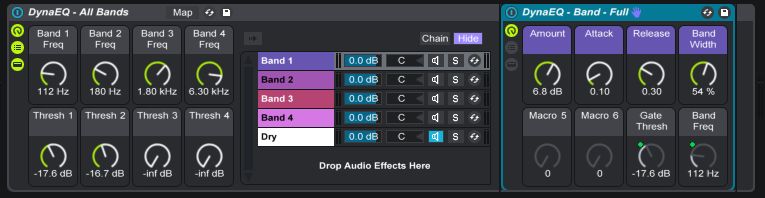
The rack’s chains should all look identical to this picture.
Make sure the macro mappings are right.
Again. Rename this completed rack and delete it after. I chose “DynaEQ – All Bands”.
“Final” Rack
Ok. One last time, drop an empty effects rack onto the channel with a single chain. On that chain add the “DynaEQ – All Bands” rack and then the “DynaEQ – EQ – Final Stage” rack after it.
Take the 8 macros from the “DynaEQ – All Bands” rack and map them to the 8 macros in the new rack.
Everything should look like this at this point.

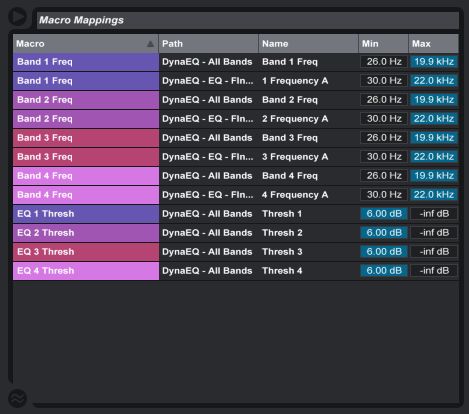
Next, open up the “DynaEQ – EQ – Final Stage” rack and map the 4 active filters’ frequencies to the corresponding macro knobs on the new rack. Filter 1’s frequency to the Band 1 Macro, which are also mapped to the frequency of the Auto Filters embed way inside all the racks.
The macro mappings should look like this now.
We are so close can you feel it?
Mapping the Envelope Followers
This is the final step. Remember when I said we would go back to the Map parameter on the Envelope Follower? Now is that time.
Open one of the Band’s racks and chains all the way down until you can see its Envelope Follower. Then make sure you can see the Final EQ’s EQ 8. Hit the Map button and the immediately click the Gain parameter of the band’s filter.
Make sure that Band 1’s Envelope follower is mapped to the EQ 8’s Filter 1.
Repeat that process for the other 4 bands.
FINAL STEP! Save that new rack and rename it. I called mine “DynaEQ – FULL”. It is also helpful to collapse everything so that it looks like the picture below. I found this is the best starting point with easy access and quickest workflow for most things that need getting at.
Tweaking Your New Dynamic EQ Rack
Congratulations!!! That was quite an adventure. Now you can get to work boosting or cutting certain frequencies in your track dynamically depending on the incoming signals you choose.
If you look at the EQ 8 you will see a parameter called “Scale”. Leaving this at 100% will result in a reduction of the EQ filter. If you change that parameter to -100% it will boost!! You can change filter types, the Q (range) of each filter, the gain, attack, release, and width of the Band Isolator, the Frequency points and so much more… all quite easily!
Enjoy!!
Discussion
"Your rack should look like this." and "And the macro map settings should look like this." both show the same pic which seems to be macro map. In another spot just below, the paragraph says the following:
"Map the Macro 1 & 2 from the “DyanEQ - Band Isolator†rack to macros to macros on the new rack. I mapped the frequency to macro 8 and the Resonance to macro 4, but I titled that macro 4 as “Widen†instead of “resonanceâ€."
Just a typo surely, but "rack to macros to macros" reads a little confusing. Also, in the next sentence, it says "I titled that macro4 as "Widen" instead of "resonance"". However, in the pic for that, Macro4 says Band Width.
I eventually noticed that the 2nd pic shows what each Macro mapping is for which parameter, including name, but maybe mention this in the article a little more clearly? Again, totally my dunce-ness, hahahaha, but . . . oof rabbit hole! Also in '"All Bands" Rack" I'd maybe note that for each Band in the new mappings you make, that you renamed each as well.
Quibbles my point(s) to be sure, but would probably make things a wee bit clearer for some of us dunces. :)
Have you completed the rack? Are you still struggling with something? Maybe I can help get you to the finish line.
When mapping the envelope followers to the corresponding gains of the EQ-bands, they have to be mapped to the macros controlling the gains of the Final Stage EQ-Rack, not the gain knobs in the EQ itself. ;-)
Want to join the discussion?
Create an account or login to get started!