
Not enough bottom end in your mix? Kick drum a bit weedy, thin or disappointingly lightweight? Using Logic Pro's SubBass plug-in is a well documented method for synthesising very low frequencies where none previously exist, but its use is fraught with the danger of creating multiple clashing frequencies which can cause havoc and potentially wreck a mix with a mess of low end, some of which can't even be heard, unless you have monitors the size of a house. This article shows you how to double the kick drum with a pure sine tone (no harmonics to complicate matters) whose frequency you can control, in both Logic Pro and Pro Tools.
In Logic Pro:
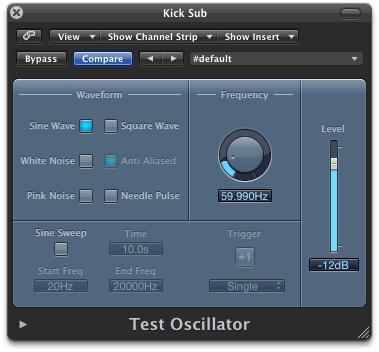
Шаг 1: Испытание генератора
Есть два простых способа доступа к чистым тоном синуса в Logic Pro. Первая заключается в использовании сэмплер EXS24 без каких-либо сэмплер инструмент загружен, но для этого требуется MIDI-информационную записку, чтобы играть. Второе Испытание Oscillator, удобный гаджет предназначен для проверки реакции системы мониторинга и акустических свойств для прослушивания пространства. При загрузке экземпляра в входной слот ввода / вывода канала в виртуальных инструментов (Утилита
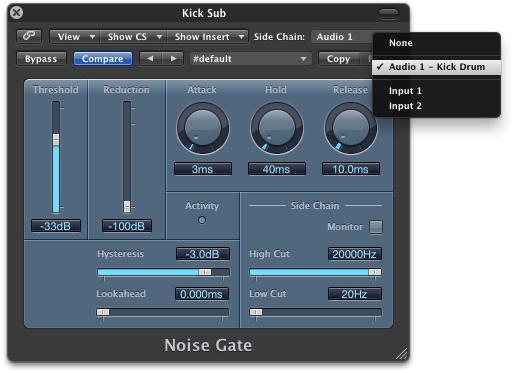
Шаг 2: Открытие ворот
Вставьте гейт плагин на том же канале, испытания генератора, а затем подключить его боковой цепи вклад в звуковую дорожку которого бочки дорожку в два раза. Отрегулируйте порог шума ворота так, чтобы она открывается, когда бочка играет.
Шаг 3: Настройте Sub
Проверьте испытания генератора играет синусоида, затем опустите ее частота к чему-то соответствующим «subby для вашего микса (около 50 до 60 Гц может быть) - но убедитесь, что Вы слышите, что он делает, а вы не хотите выпустить микс, который уничтожит дорогих акустических систем!
Для более точного контроля, вы можете замедлить движение управления, такие как частота набора номера, удерживая клавишу Shift. Также Вы можете вручную ввести значение, дважды щелкнув Частота поле, набрав номер и нажав Enter. «Конверта» из суб тон может быть в форме использования атаки и управления на гейт, но будьте осторожны, очень низкие значения могут вызвать щелчком.
В Pro Tools
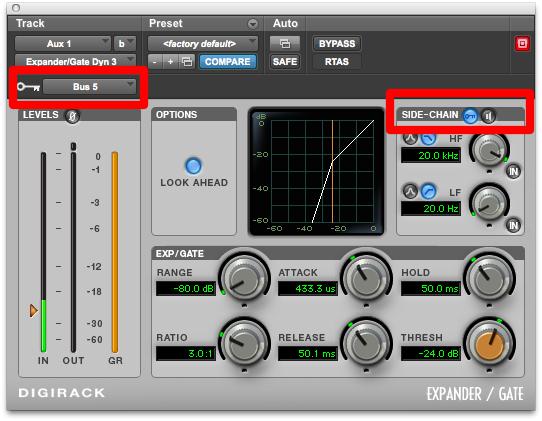
Подход в Pro Tools очень похоже, с одним или двумя незначительными отличиями. Синус волны генерируются генератор сигналов плагин - нажмите на первый слот Вставить Вспомогательные отслеживать вход и перейти к плагина
Затем соедините неиспользованный автобус до ввода ключа. Вы можете отправить на этот автобус из Отправить слот на звуковую дорожку удар барабана. Наконец включить боковой цепи, нажав на маленький значок ключа справа от слова "боковой цепи" на правой стороне плагин интерфейс. Настройка параметров гейт по вкусу, а также частоты генератор сигналов.
И это все, что нужно сделать!

Discussion
firstly, i set a kick drum on a track strip, standard 4 beat.
i then opened another track strip to open the test oscilator but didnt hear anything? was i meant to open it on the same strip as the kick?
secondly, if im sidechaing the noise gate to the kick drum to i need to convert it to audio first or leave it as midi?
thanks again
drusif
Firstly, the test oscillator should be opened as an instrument in the input slot - it is possible to open it as an insert plug-in but this tip won't work if you do that
For the software instrument kick drum track, these don't appear as available inputs to the sidechain, so you will need to send its output to an aux channel via an available bus. So create an aux channel first, then choose a bus as its input, then connect the output of the kick drum track to that bus. Once you have connected the bus it will be available as a sidechain input to the Noise gate.
Hope that helps.
however im not sure how to open the test oscilator as an instrument? where do i find that option?
tanks
Glad to see it has life in the digital world.
Thanks, Mike!
Want to join the discussion?
Create an account or login to get started!