
Not enough bottom end in your mix? Kick drum a bit weedy, thin or disappointingly lightweight? Using Logic Pro's SubBass plug-in is a well documented method for synthesising very low frequencies where none previously exist, but its use is fraught with the danger of creating multiple clashing frequencies which can cause havoc and potentially wreck a mix with a mess of low end, some of which can't even be heard, unless you have monitors the size of a house. This article shows you how to double the kick drum with a pure sine tone (no harmonics to complicate matters) whose frequency you can control, in both Logic Pro and Pro Tools.
In Logic Pro:
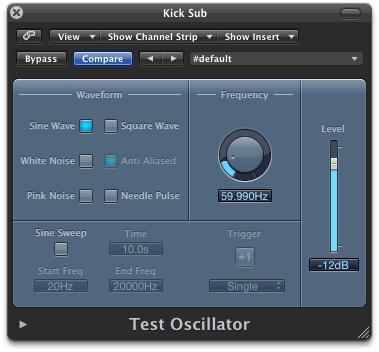
ステップ1:テストオシレータ
Logic Proで純粋な正弦波トーンにアクセスするには2つの簡単な方法があります。最初にロードされていないサンプラーインストゥルメントとEXS24サンプラーを使用することですが、これは再生するMIDIノート情報が必要です。二つ目はテストオシレータ、あなたのモニタリングシステムと、リスニング空間の音響特性の応答をテストするために設計された便利なガジェットです。あなたは、ソフトウェア音源のチャンネルのI / O( ユーティリティの入力スロットにインスタンスをロードするとき
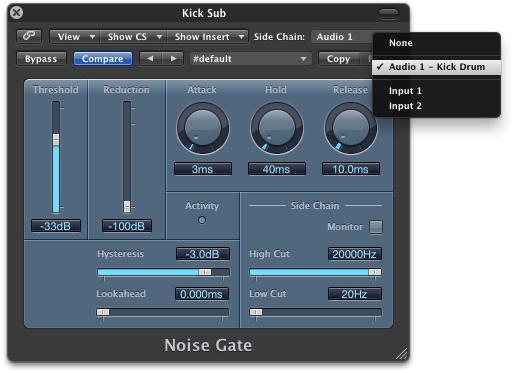
ステップ2:ゲートを開く
テストオシレータと同じチャネル上のプラグインでノイズゲートを挿入し、そのキックドラムのトラックをダブルしたいオーディオトラックにはサイドチェーン入力に接続します。それが唯一のキックドラムの再生時に開くようにノイズゲートのしきい値を調整します。
ステップ3:サブのチューニング
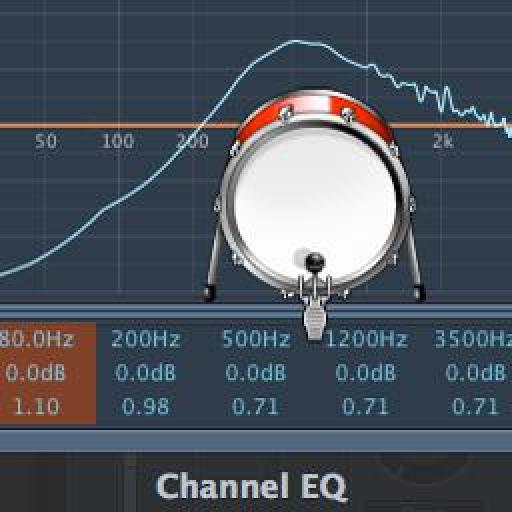
テスト発振器が正弦波を再生している確認し、何かをミックスするための適切な"subby"(50〜60 Hz付近で、おそらく)にその周波数を下げて - しかし、あなたはしたくないので、もしあなたが本当に、それが何をしているか聞くことができることを確認してください高価なスピーカーシステムを破壊するミックスを解放する!
より正確に制御するには、Shiftキーを押しながら周波数のツマミなどの動きを遅くすることができます。また、手動で番号を入力してReturnキーを押すと、周波数フィールドをダブルクリックして値を入力することができます。サブトーンの"包絡線"はノイズゲートのアタックとリリースコントロールを使用して整形が、用心、非常に低い値をクリックして引き起こす可能性がありますすることができます。
Pro Toolsの
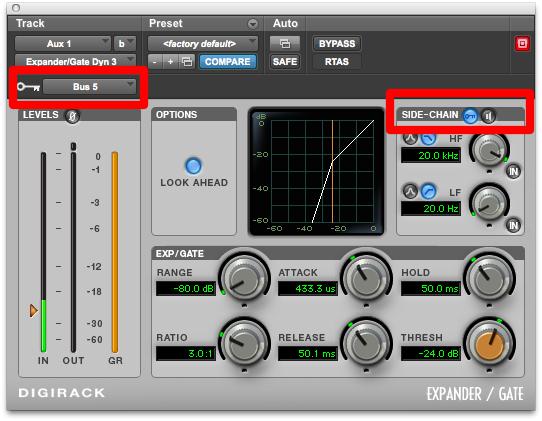
Pro Toolsのアプローチは、1つまたは2つのマイナーな違いは、非常によく似ています。正弦波は、信号発生器、プラグインによって生成されます- Aux入力トラックの最初のインサートスロットをクリックしてプラグインに行く
その後、キー入力に未使用のバスを接続する。その後、キックドラムのオーディオトラックのセンドスロットからバスに送ることができます。最後の言葉"側鎖"のプラグインインタフェースの右側の右側にある小さな鍵のアイコンをクリックすることで側鎖をオンにします。味だけでなく、信号発生器の周波数にノイズゲートのパラメータを調整します。
そして、それはそれで全部です!
もっと詳しくお知りになりたいのPro Toolsとロジック ?

Discussion
firstly, i set a kick drum on a track strip, standard 4 beat.
i then opened another track strip to open the test oscilator but didnt hear anything? was i meant to open it on the same strip as the kick?
secondly, if im sidechaing the noise gate to the kick drum to i need to convert it to audio first or leave it as midi?
thanks again
drusif
Firstly, the test oscillator should be opened as an instrument in the input slot - it is possible to open it as an insert plug-in but this tip won't work if you do that
For the software instrument kick drum track, these don't appear as available inputs to the sidechain, so you will need to send its output to an aux channel via an available bus. So create an aux channel first, then choose a bus as its input, then connect the output of the kick drum track to that bus. Once you have connected the bus it will be available as a sidechain input to the Noise gate.
Hope that helps.
however im not sure how to open the test oscilator as an instrument? where do i find that option?
tanks
Glad to see it has life in the digital world.
Thanks, Mike!
Want to join the discussion?
Create an account or login to get started!