
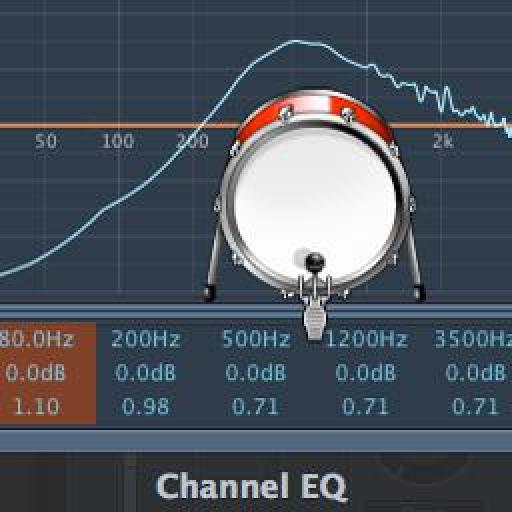
Not enough bottom end in your mix? Kick drum a bit weedy, thin or disappointingly lightweight? Using Logic Pro's SubBass plug-in is a well documented method for synthesising very low frequencies where none previously exist, but its use is fraught with the danger of creating multiple clashing frequencies which can cause havoc and potentially wreck a mix with a mess of low end, some of which can't even be heard, unless you have monitors the size of a house. This article shows you how to double the kick drum with a pure sine tone (no harmonics to complicate matters) whose frequency you can control, in both Logic Pro and Pro Tools.
In Logic Pro:
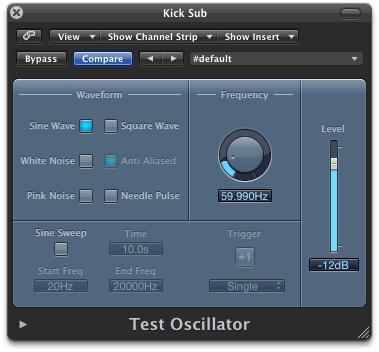
Fase 1: L'oscillatore di prova
Ci sono due semplici modi per accedere a un tono sinusoidale pura in Pro Logic. Il primo è quello di usare il campionatore EXS24 con nessuno strumento campionatore caricato, ma questo richiede informazioni MIDI nota da suonare. Il secondo è l'oscillatore di prova, un gadget utile progettata per testare la risposta del sistema di monitoraggio e le proprietà acustiche del vostro spazio di ascolto. Quando si carica un esempio nello slot di ingresso di un canale di strumenti software di I / O (Utility
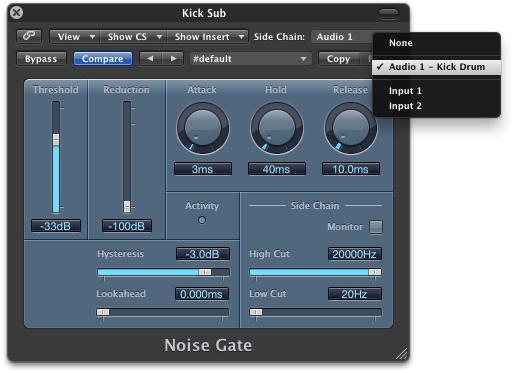
Fase 2: Apertura della Porta
Inserire un Noise Gate plug-in sullo stesso canale come l'oscillatore di prova, quindi collegare il suo ingresso catena laterale alla traccia audio il cui calcio traccia di batteria si vuole raddoppiare. Regolare la soglia del Noise Gate in modo che si apre solo quando la cassa gioca.
Fase 3: Tune il Sub
Controllare l'oscillatore di prova è la riproduzione di un onda sinusoidale, quindi abbassare la frequenza a qualcosa opportunamente 'Subby' per il mix (circa 50 a 60 Hz, forse) - ma fare in modo si può veramente sentire ciò che sta facendo, come non si vuole di rilasciare un mix che distruggerà i sistemi di altoparlanti costoso!
Per un controllo più accurato, è possibile rallentare il movimento dei controlli come il quadrante di frequenza tenendo premuto il tasto Shift. In alternativa è possibile inserire manualmente un valore facendo doppio clic sul campo di frequenza, digitando un numero e premendo Invio. La 'busta' del tono sub può essere modellata utilizzando i controlli di attacco e di rilascio sul Noise Gate, ma, attenzione, valori molto bassi possono provocare clic.
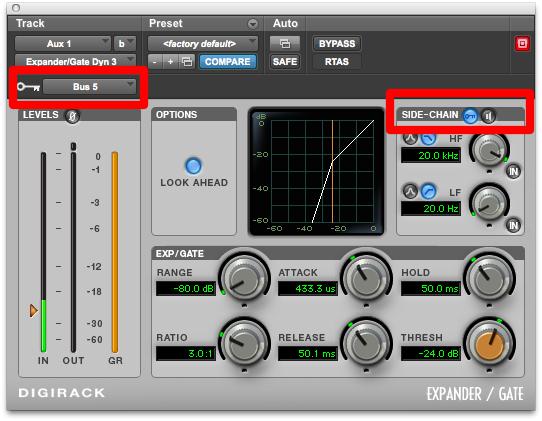
In Pro Tools
L'approccio in Pro Tools è molto simile, con una o due piccole differenze. Onde sinusoidali sono generati dal generatore di segnale plug-in - clicca sul primo slot per inserire una traccia di ingresso ausiliario e andare a plug-in
Quindi collegare un bus non utilizzati per l'ingresso chiave. È quindi possibile inviare a questo bus da uno slot Invia a traccia audio della cassa è. Infine accendere la catena laterale facendo clic sulla piccola icona a chiave sulla destra delle parole 'catena laterale' sul lato destro della interfaccia plug-in. Regolare i parametri del noise gate al gusto, così come la frequenza del generatore di segnale.
E questo è tutto ciò che devi fare!

Discussion
firstly, i set a kick drum on a track strip, standard 4 beat.
i then opened another track strip to open the test oscilator but didnt hear anything? was i meant to open it on the same strip as the kick?
secondly, if im sidechaing the noise gate to the kick drum to i need to convert it to audio first or leave it as midi?
thanks again
drusif
Firstly, the test oscillator should be opened as an instrument in the input slot - it is possible to open it as an insert plug-in but this tip won't work if you do that
For the software instrument kick drum track, these don't appear as available inputs to the sidechain, so you will need to send its output to an aux channel via an available bus. So create an aux channel first, then choose a bus as its input, then connect the output of the kick drum track to that bus. Once you have connected the bus it will be available as a sidechain input to the Noise gate.
Hope that helps.
however im not sure how to open the test oscilator as an instrument? where do i find that option?
tanks
Glad to see it has life in the digital world.
Thanks, Mike!
Want to join the discussion?
Create an account or login to get started!