
A modern DAWs is literally a complete studio-in-a-box—with even a modestly-powered computer, you can perform almost every activity you'd need to for recording and mixing. But, even with all this power, there's still one lingering technical limitation that all DAWs share—monitoring latency.
Latency is a delay in hearing audio that passes through a DAW. It's an unavoidable side-effect of the technical process of converting, recording, and playing back digital audio files, to and from a computer hard disk. Sometimes, like during simple playback, it goes unnoticed and can be ignored. But other times—during recording, tracking, and overdubbing—it can cause problems for the performers, and headaches for the engineer! But, armed with a basic understanding of the causes, you can easily deal with it in any situation, by employing the best strategy for minimizing or eliminating the latency, for the particular activity where it's causing problems.
Causes of Latency
There are several aspects of digital processing that can cause latency, but the most significant one—the one that can cause the latency to become a problem—is a technical part of digital recording and playback called RAM buffering.

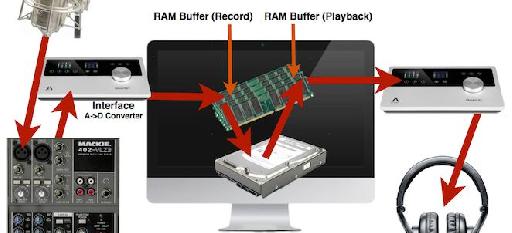
RAM buffering diagram.
To ensure reliable streaming of audio, without glitches, in recording and playback, the digital audio data stream is passed momentarily through RAM memory, on its way to and from the computer's hard disk. The time the audio spends in these RAM Buffers insures the uninterrupted flow of data, but in doing so, it adds a small, but sometimes perceptible, delay to the monitored audio. This delay is latency.
The size of the buffers determines the amount of latency, and it's user-adjustable.

User-adjustable buffer sizes.
With larger buffers, you get more reliable recording and playback performance, but greater latency.

256-Sample Buffer.
With smaller buffers, you get less latency, but potentially less reliable recording and playback performance—potentially more audio glitches, clicks, and pops.

64-Sample Buffer.
The problem with Latency
So why is latency a problem, and when does it interfere with the day-to-day business of recording? Well, in playback, it's not an issue. Latency may cause a momentary pause between the moment you hit the Play button and the moment the audio starts playing, but it's only a matter of milliseconds and will probably be unnoticeable. But during recording, it can be a problem for musicians who are monitoring themselves in headphones, through the DAW.
The typical scenario is, you're recording a performer, whose live performance is picked up by a mic or DI, sent through the DAW (where the live signal may or may not be processed), and back out to the musician's headphone mix. The signal the musician hears has passed through two RAM buffers (Record (In) and Playback (Out)), and he hears himself delayed slightly in the headphones. Now, that matter of a few milliseconds' delay can be enough to distract, or throw off his timing, and compromise the performance.
So, how do we avoid any issues, without compromising the reliability of the recording hardware? Well, there are three basic strategies to dealing with latency during recording:
- Lower the buffer size
- Employ a “Near-Zero-Latency” monitoring setup
- Emply a “True” Zero-Latency monitoring setup
Lower the Buffer Size
All DAWs offer user-adjustable ufbfer sizes. The usual strategy is to set a low buffer size during recording to minimize latency, and a higher one during playback to optimize system resources. Buffer sizes are listed in Samples, and to keep the latency small enough that it won't bother a performer, a setting of 128 samples or less is usually required—nowadays, with more powerful computers, 64-, and even 32-sample buffers are viable. If you hear any audio glitches, just try the next highest size.

128-sample buffer.
128 Samples will have a latency of around 6-8 milliseconds—anything under 10 milliseconds should not be a problem, at least for most performers.
“Near-Zero-Latency” Monitoring
Sometimes you can't get the buffer size as low as you need without too much audio glitchiness. An alternative is to have the live signal come into the interface, copy (split) it, and then route the copy right back out through the headphone monitor mix, instead of passing through the DAW first. There will still be a millisecond or two latency, but this is negligible.

“Near-Zero-Latency” Monitoring.
“True” Zero-Latency Monitoring
If you want to completely eliminate any moitoring latency for the performer, like when he'll also be hearing his performance acoustically, then you can take the mic or DI into a small analog mixer, and split the signal out to the headphones from there instead, mixing the Playback from the DAW into the analog mixer. Since this is an all-analog signal path for the live signal, there's no latency at all!

“True” zero-latency monitoring.
The drawback of the last two options is that you can't apply any DAW processing to the live signal during recording, but this is a small price to pay for the performer's comfort, and the chance to capture the best musical performance, without distraction or compromise.
The DSP option
Some Interfaces—like Universal Audio's Apollo series—have onboard DSP (Digital Signal Processing), which can be applied to plug-in processing in the Interface, instead of using the host computer's DSP. This can provide minimal Latency (basically just the 1 millisecond or so of the AD/DA itself), while still allowing the use of your favorite software processors, even while recording. This is a “best of both worlds” situation—you get the benefit of the absolute minimum Latency of Near-Zero-Latency Monitoring, which is imperceptible to performers, but you can still utilize hi-quality plug-in effects during the recording process. This is especially handy when the performer needs to hear an effect that's only available in plug-in format.
To get the benefits of this, plug-ins have to be able to run on the DSP in the Interface. In the previous example, the Apollo series supports the entire collection of UA plug-in processors, which include some of the best emulations of classic analog gear around.
The use of DSP has always been an option, to reduce Latency to the bare minimum. That's one of the things people were shelling out $10k-$15k for, in the original Pro Tools hardware-based systems, and onboard DSP is still usually found in the more expensive hardware options. But now this capability is becoming more mainstream—witness UA's new Apollo Twin, which offers the same benefits regarding Latency as their high-end, big-ticket systems, but for a price that puts it squarely in the low-mid price range, as Interfaces go.

The future?
In the near future, computer systems will likely be powerful enough that buffers can be permanently set to a size small enough to be unnoticeable, but for now, a little attention paid to this lingering gremlin of digital audio will keep it from getting in the way of capturing the best takes!
Learn more about working with (and without!) latency in this excellent video course by Tom Rice:

Discussion
Want to join the discussion?
Create an account or login to get started!