
There are tons of ways to find great dance kick sounds: from sample libraries, Audio Unit instruments, cut from loops, etc. Some of the deepest, punchiest kick sounds are created with synthesis though. It's also easier to “pitch” your kick to the key of your song without losing the quality of the sound (like a sampled kick). In this tip I'll show you how to create kick sounds with the ES1. We'll work our way around clockwise starting in the Oscillator section, the Filter, Amplifier, Envelope, and finally the Mod Envelope/Router.
Step 1 - Oscillator
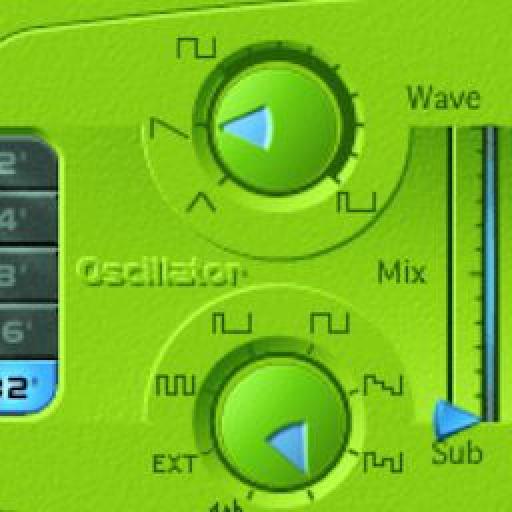
Since we'll be synthesizing this kick ourselves, you can start from either the default ES1 sound or any of the presets. Let's start by sliding the oscillator mix all the way down to Sub, then move the Sub Oscillator wave to the “off” position; we won't need any Oscillators at all, since the Filter's Resonance will be generating the wave.

Step 2 - Filter
Pull the filter down all the way, or raised slightly within an area well below 10% of the full filter range. Raise the resonance all the way up. Push the Key slider all the way up or the sound won't be pitched across the keys.
Next, let's set the Filter's ADSR Via Velocity slider to the value seen below (right of screen shot). Mine is set two notches above its centered position. When the two triangles are together as they are in the image below, this slider works as an “amount” for how much the envelope effects the Cutoff. When they're not together, the Envelope effects the Cutoff (via MIDI velocity) by the specified range.

Step 3 - Amplifier
Push the Level Via Vel slider all the way up, and set to ADSR.

Step 4 - Envelope
Pull the Attack all the way down, then adjust to taste by raising it slightly. The lower the value, the more of a tick you'll hear at the head of the sound. I have the Sustain all the way down so the Decay is creating the length of the sound. The lower the Decay, the shorter and more staccato the sound will be. The sound gets longer with higher Decay values.
Make sure there's a bit of Release, too; If it's all the way down you'll hear a slight click if your MIDI notes are shorter than the full length of the envelope.

Step 5 - Mod Envelope/Router
The Mod Envelope is a very fast Envelope that effects the target selected in the Router. First, choose Cutoff as the target from the Mod Envelope's Router. Raise the two light green triangles just above midway (the Init Via Vel slider.) If you drag the ruled bar, both values will change simultaneously. Next, set the Mod Envelope to a very fast value like -3.70ms or -6.30ms. This will whip the Filter down quickly and add punch to the head of the kick sound.

An example kick:
The same kick with Logic's compressor applied to it:
Tips
Set the LFO's Init Via Wheel value to zero, and pull the Glide all the way down. Make sure Analog is set to zero and Chorus is off.
Try different Attack and Decay settings in the envelope. Make slight changes to the Cutoff, ADSR Via Velocity, Init Via Velocity, and Mod Envelope. Change Filter Types. Adjust the Out Level, and bounce the kick as audio for a more precise consistent sound.
Have fun!

Discussion
Want to join the discussion?
Create an account or login to get started!